Turning
Learn to perform medium turns — 30° bank (normal level turn) — onto selected headings in level, climbing, and descending flight.
Lesson Objectives
- Perform coordinated 30° bank turns onto selected headings
- Maintain altitude (±100 ft) during level turns
- Execute climbing and descending turns
- Understand the effects of bank angle on load factor and stall speed
In this exercise you will learn to turn the aircraft onto selected headings using medium turns — defined as a 30° angle of bank. These are the normal level turns you will use throughout your flying career for navigation, traffic patterns, and maneuvering.
You will also learn to combine turns with climbs and descents, understanding how bank angle, load factor, and coordination all work together to produce smooth, accurate heading changes.
Simulator Practice
At Aviator.NYC, our AATD simulator lets you practice medium turns with real-time feedback on coordination, bank angle, and heading tracking before applying these skills in the aircraft.
Background Briefing Topics
- Forces in the Turn
- Use of Controls — Ailerons, Rudder, Elevator
- Effect on Stall Speed
- Climbing Turns
- Descending Turns
- Effect of Offset Seating
- Turning onto Headings — Heading Indicator
- Turning onto Headings — Magnetic Compass (UNOS)
Read the full Background Briefing →
Flight Exercise Topics
- Purpose
- Airmanship — Lookout Before Turning
- Entering the Turn
- Maintaining the Turn
- Returning to Straight Flight
- Climbing Turns
- Descending Turns
- Slipping Turns
Forces in the Turn
An aircraft turns by banking. When the wings are tilted, the total lift vector is tilted as well. The horizontal component of lift acts as the centripetal force that pulls the aircraft toward the center of the turn.
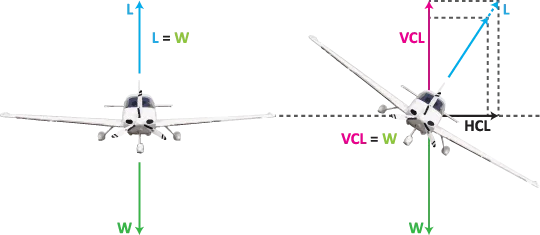
In a banked turn, lift can be resolved into two components:
- Vertical component — supports the weight of the aircraft (acts upward, opposing gravity).
- Horizontal component — acts toward the center of the turn, providing the centripetal force needed to curve the flight path.
The steeper the bank angle, the greater the horizontal component — and the tighter the turn for a given airspeed.
Use of Controls
Ailerons — Rolling Into the Turn
Ailerons are the primary control for establishing and adjusting bank angle. Deflecting the control wheel (or stick) in the direction of the desired turn raises one aileron and lowers the other, creating a difference in lift between the wings that rolls the aircraft.

Adverse Yaw
When ailerons are deflected, the wing going up (with the lowered aileron) produces more lift — and therefore more induced drag — than the wing going down. This differential drag causes the nose to yaw away from the direction of the turn. This effect is called adverse yaw.

Rudder Coordination
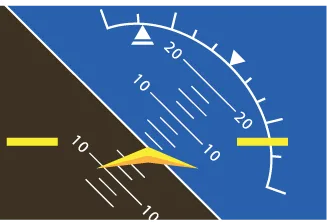
Rudder is applied in the same direction as the roll to counteract adverse yaw and keep the turn coordinated. The ball in the turn coordinator (or slip/skid indicator) should remain centered.
Once Established
After the desired bank angle is established, very little rudder is needed to maintain coordination. The ailerons are neutralized (or nearly so) to hold the bank constant.
Overbanking Tendency
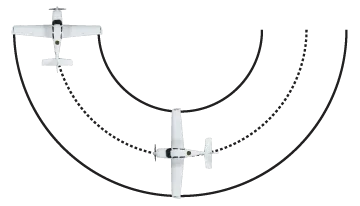
In an established turn, the outer wing travels faster than the inner wing (it has a larger radius). Because it moves faster, it generates more lift — creating a tendency to overbank. You will need a small amount of aileron pressure away from the turn to prevent the bank from increasing beyond 30°.
Increased Lift Requirement
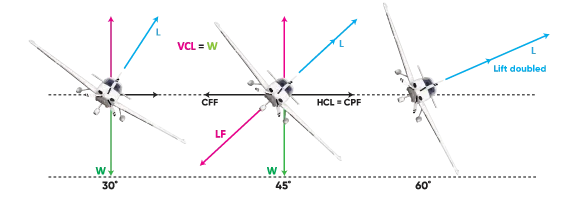
Because only the vertical component of lift supports the aircraft's weight in a turn, the total lift must be increased to maintain altitude. This is achieved by applying back pressure on the control column, which increases the angle of attack.
Back Pressure in Turns
At 30° of bank, the load factor is approximately 1.15G. You must increase back pressure to maintain altitude — without it, the aircraft will descend. The steeper the bank, the more back pressure required.
Effect on Stall Speed
The increased angle of attack in a turn has several consequences:
- More induced drag — the aircraft tends to slow down (approximately 5 knots at 30° bank if power is unchanged).
- Higher stall speed — at 30° bank, stall speed increases by approximately 7% compared to straight and level flight.
- Reduced stall margin — the gap between your flying speed and the stall speed narrows.
Stall Awareness
Always be aware that turning increases your stall speed. In a 30° bank turn, if your normal stall speed is 50 knots, it rises to approximately 53.5 knots. Maintain adequate airspeed throughout all turns.
Climbing Turns
When combining a climb with a turn:
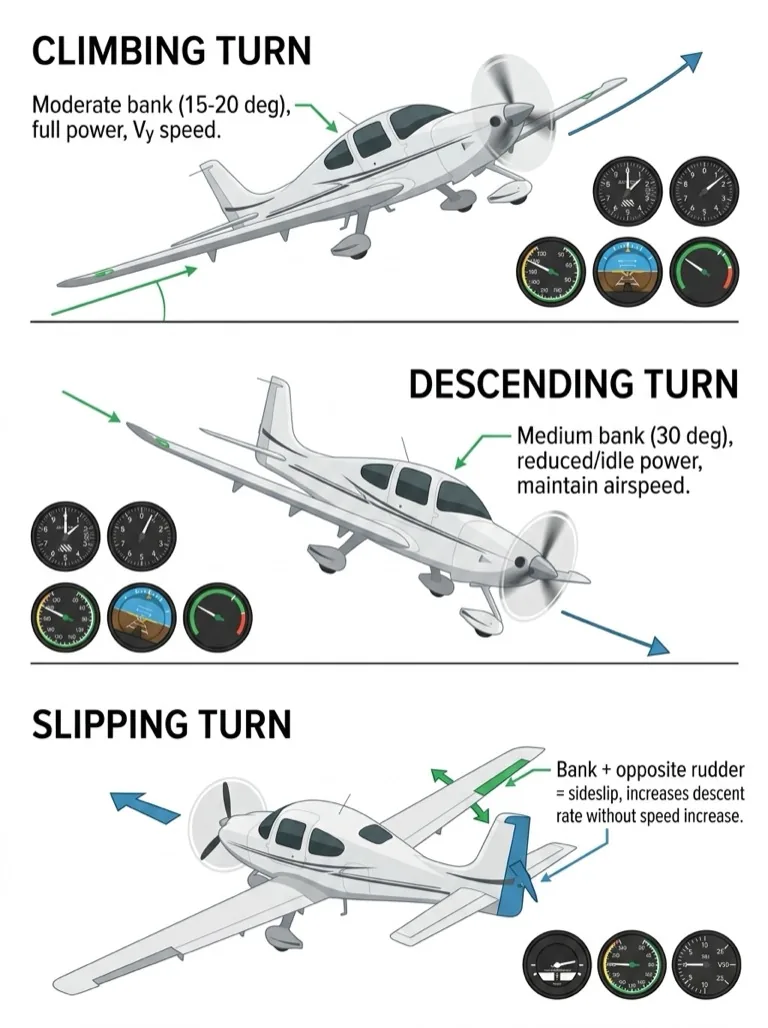
- Establish the climb first, then roll into the turn.
- Limit bank angle to a maximum of 15° — the reduced airspeed in a climb means less margin above stall.
- The outer wing (traveling faster) has a greater angle of attack, which increases the overbanking tendency. You need to actively "hold off" bank with opposite aileron.
- Rate of climb is reduced during turning — the vertical component of lift is less while banked, and some energy goes into turning.
Climb First, Then Turn
Establishing the climb attitude and allowing airspeed to stabilize before rolling into the turn ensures you maintain a safe margin above stall speed throughout the maneuver.
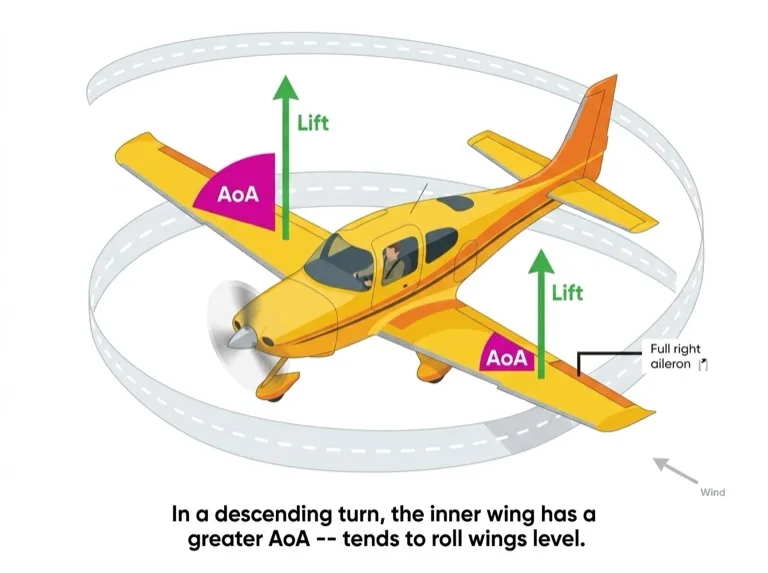
Descending Turns
When combining a descent with a turn:
- Establish the descent first, then roll into the turn.
- Bank angle may be up to 30° — the higher airspeed in a descent provides greater stall margin.
- In a descending turn, the inner wing has a higher angle of attack. This creates a tendency for the aircraft to roll out of the turn (opposite to the overbanking tendency in level turns).
- You need to "hold on" bank — maintain aileron pressure into the turn to keep the bank constant.
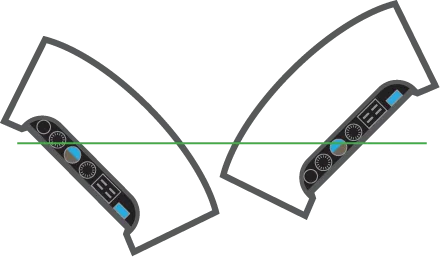
Effect of Offset Seating
In side-by-side seating aircraft, the pilot's eye position is offset from the aircraft centerline. This creates a visual illusion during turns:
- In a left turn, the nose appears to be pitched higher than it actually is.
- In a right turn, the nose appears to be pitched lower than it actually is.
Be aware of this illusion and cross-check your instruments (altimeter, VSI) to confirm you are maintaining level flight during turns.
Turning onto Headings — Heading Indicator
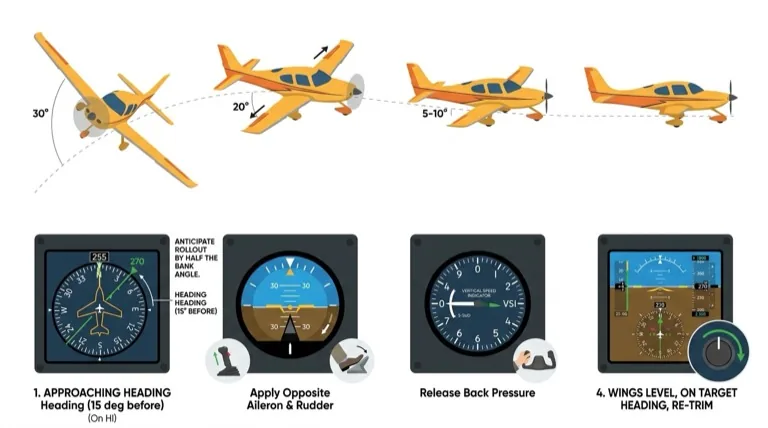
The heading indicator (HI) is the primary reference for turning onto a specific heading. Because it takes time to roll the wings level, you must anticipate the rollout.

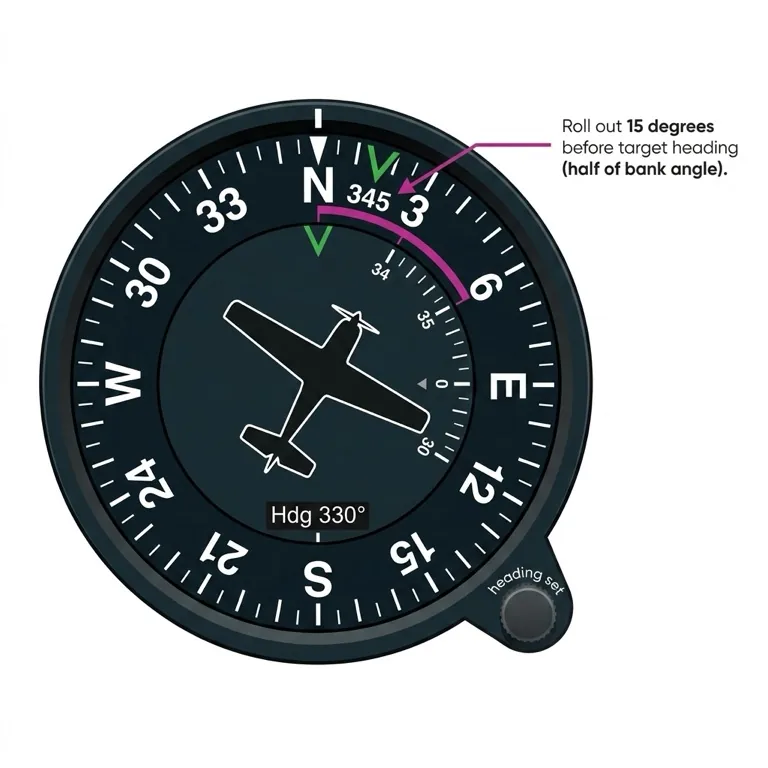
Anticipation Rule
Begin your rollout at half the bank angle before reaching the desired heading. For a 30° bank turn, start rolling out 15° before the target heading.
For example, if turning left from 360° to a heading of 270°, begin rolling wings level as the heading indicator passes through 285° (270° + 15°).
Turning onto Headings — Magnetic Compass
The magnetic compass suffers from turning errors caused by the dip of the Earth's magnetic field. In the Northern Hemisphere, the compass lags behind in northerly turns and leads ahead in southerly turns.
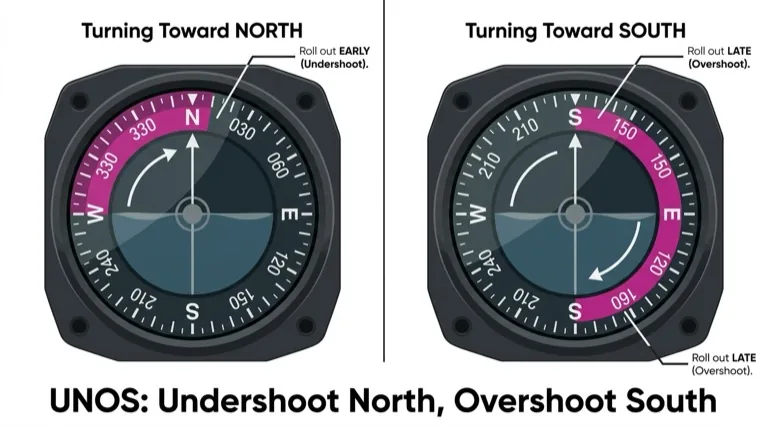
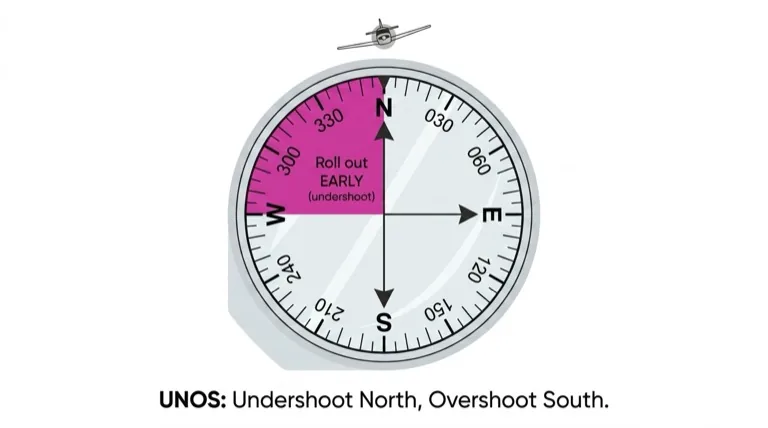
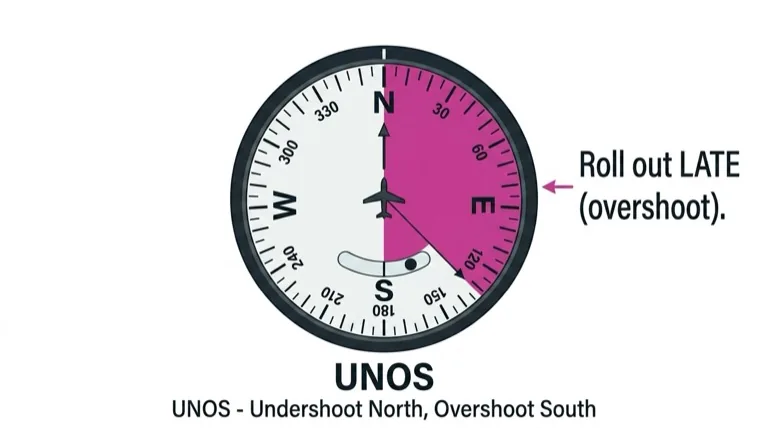
UNOS Rule (Northern Hemisphere)
Undershoot North, Overshoot South. When turning onto northerly headings, roll out approximately 30° before the compass shows your target heading. When turning onto southerly headings, roll out approximately 30° after the compass passes your target heading.
On easterly and westerly headings, compass turning errors are minimal. The 30° figure is approximate and applies at mid-latitudes — your instructor will discuss local variations.
Compass vs. Heading Indicator
Always use the heading indicator as your primary turning reference. Use the magnetic compass to periodically check and reset the HI, but avoid using it as your sole reference during a turn due to these acceleration and turning errors.
Purpose
To turn the aircraft onto selected headings during level, climbing, and descending flight using coordinated medium turns (30° bank).
Airmanship
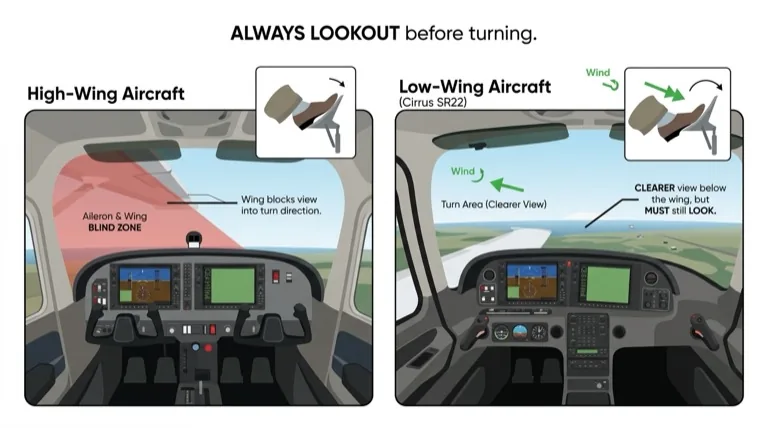
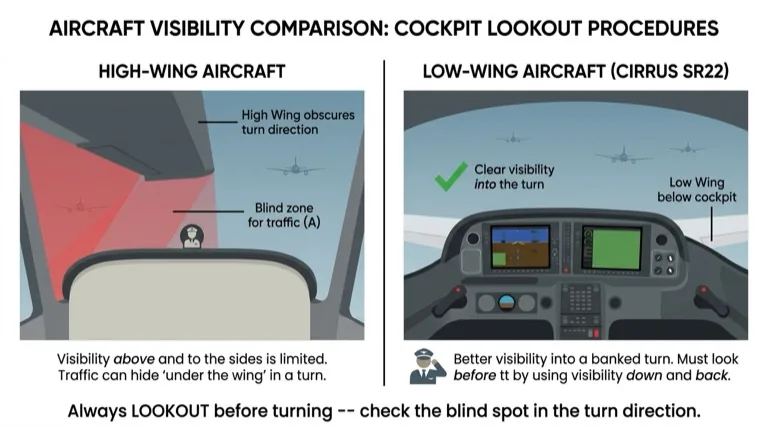
ALWAYS Lookout Before Turning
Before initiating any turn, you must look out in the direction of the turn. Look over your shoulder in the direction you intend to turn, scan across the nose, then scan back. Maintain your lookout scan throughout the entire turn.
- Before turning: Look over your shoulder in the direction of the turn, scan across, then back. Clear the area you are turning into.
- High-wing aircraft: Lift the wing (momentarily shallow the bank or roll slightly toward the turn) to visually check below the wing before committing to the turn.
- During the turn: Maintain a continuous lookout scan — do not fixate on instruments.
- After the turn: Re-orient yourself. Confirm your new heading and check your position relative to landmarks, traffic, and airspace.
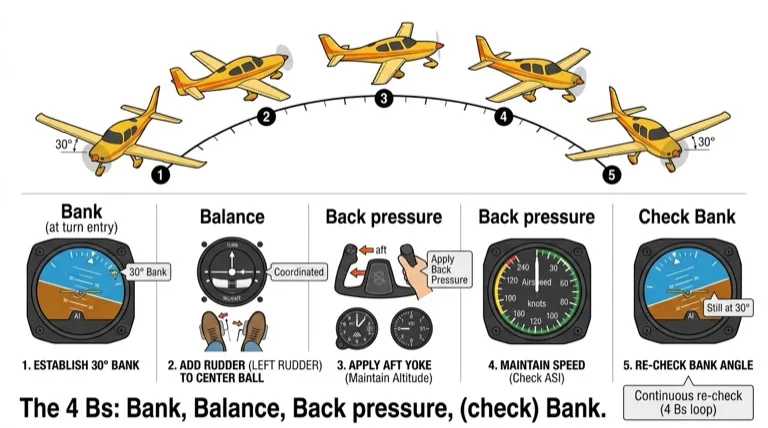
Entering the Turn
The technique for entering a medium turn is summarized as Bank — Balance — Back Pressure:
- Bank: Apply aileron in the direction of the turn to roll to 30° of bank. Use a smooth, positive control input.
- Balance: Apply rudder in the same direction as the aileron to coordinate the turn and counteract adverse yaw. Keep the ball centered.
- Back Pressure: As the bank establishes, progressively apply back pressure on the control column to increase the angle of attack and maintain altitude.
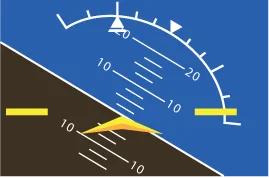
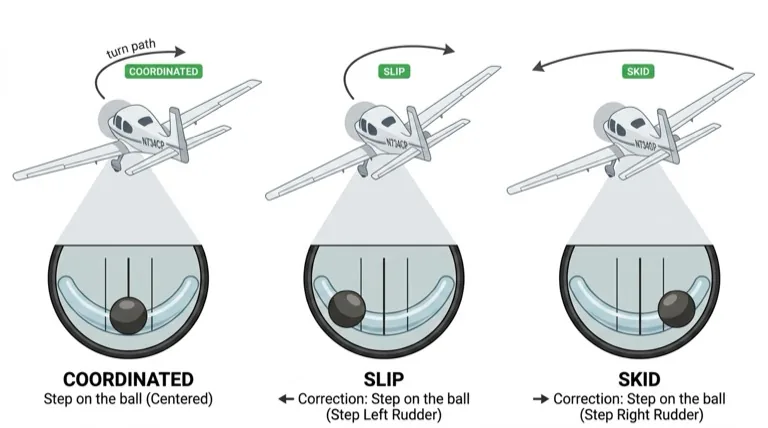
Coordination Check
The ball in the turn coordinator tells you if the turn is coordinated. Ball to the left — step on the left rudder pedal. Ball to the right — step on the right. "Step on the ball."
Maintaining the Turn
Once established at 30° bank:
- Bank: Hold with ailerons. Correct for the overbanking tendency with slight aileron pressure away from the turn.
- Balance: Keep the ball centered with rudder. Only small adjustments should be needed.
- Back Pressure: Maintain constant back pressure to hold altitude. Cross-check the altimeter and VSI.
Do Not Trim
A medium turn is a transient maneuver — do not adjust the trim. You will return to straight and level shortly, and trimming in the turn would require re-trimming on rollout.
Returning to Straight Flight
- Anticipate: Begin rolling out approximately 15° before reaching your target heading (half the bank angle).
- Roll out: Apply coordinated aileron and rudder to smoothly return to wings level. The rudder counteracts adverse yaw during the roll-out just as it did during roll-in.
- Release back pressure: As the wings come level, progressively release the back pressure to avoid climbing. Return to the straight-and-level pitch attitude.
Climbing Turns
- Establish the climb first — set climb power, adopt climb attitude, allow airspeed to settle.
- Roll into a gentle turn: maximum 15° bank.
- Accept a slightly lower pitch attitude to maintain the climb speed — do not let the aircraft slow excessively.
- Expect a reduced rate of climb during the turn.
- Counteract the overbanking tendency by holding off bank with opposite aileron.
- Roll wings level before transitioning back to level flight.
Bank Angle in Climbs
The reduced airspeed during a climb means less stall margin. Limiting bank to 15° keeps the load factor low and maintains a safe margin above stall speed.
Descending Turns
- Establish the descent first — reduce power (or close throttle for a glide), adopt descent attitude.
- Roll into the turn: up to 30° bank is acceptable due to the higher airspeed.
- Maintain the correct glide or descent airspeed using attitude (pitch).
- Be aware the rate of descent will increase during the turn.
- Counteract the tendency to roll out — in a descending turn, the inner wing has a higher angle of attack, which pushes the aircraft toward wings level. Apply aileron pressure to "hold on" the bank.
Slipping Turns
A slipping turn (or sideslip in a turn) is a deliberate cross-control technique: the aircraft is banked toward the turn while opposite rudder is applied.
- The bank provides the turning force, while the opposite rudder increases drag and steepens the descent without increasing airspeed.
- Greater slip (more opposite rudder) produces a greater rate of descent.
- Useful for losing altitude on final approach without gaining excessive speed — for example, when high on the approach path.
Slipping Turn Awareness
Slipping turns are an advanced technique. Maintain awareness of airspeed and altitude at all times. Some aircraft have limitations on prolonged slips — consult the POH for your specific aircraft.
Lesson Summary
In this lesson you have learned to perform smooth, accurate medium turns onto selected headings. You can now:
- Enter, maintain, and roll out of coordinated 30° bank turns in level flight.
- Perform climbing turns (15° bank maximum) and descending turns (up to 30° bank), including level-off procedures.
- Understand and compensate for adverse yaw using coordinated rudder inputs.
- Recognize the reduced stall margin in turns and maintain adequate airspeed.
- Anticipate rollout using the heading indicator (half bank angle = 15° for a 30° bank turn).
- Apply the UNOS rule when turning onto headings using the magnetic compass.
- Use a slipping turn to increase descent rate without gaining airspeed.
Key Takeaways
Core Principles
- Lookout first — always clear the area before and during every turn.
- Bank — Balance — Back Pressure — the sequence for entering any turn.
- Coordination — ball centered throughout; "step on the ball."
- Anticipation — start rollout early to hit your target heading precisely.
Looking Ahead
Turning is fundamental to virtually all phases of flight. You will apply these skills immediately in the pattern (traffic pattern) flying, navigation, and instrument procedures. The ability to turn accurately and smoothly onto headings while maintaining altitude is one of the most important building blocks for your future flying.
Simulator Consolidation
Book time on the Aviator.NYC simulator to practice turning onto specific headings — try sequences like 360° to 090° to 180° to 270° and back. Focus on rolling out exactly on heading with coordinated inputs and constant altitude.
In your next lesson, you will learn about descending — controlling the aircraft's descent path using power and attitude to manage rate of descent, descent angle, and airspeed.
Coming Up Next: Lesson 6 — Descending
Learn to perform glide descents, powered descents, and cruise descents. Understand the effect of flap and power on descent performance, and practice sideslipping as a method of increasing descent...
Skills You'll Work On
These are the maneuvers and procedures covered in this lesson. Your instructor tracks each one as you progress.
- Preflight Inspection
- Engine Starting
- Taxi & Before Takeoff Check
- Radio Communications
- Normal Takeoff and Climbs
- Gentle Climbing Turns
- Revise Effects of Primary Controls
- Revise Attitude Selection & Maintenance
- Medium Turns
- Steep Turns
- Slow Flight (With & Without Flaps)
- Use Of Trim
- Use of Flaps, Mixture, Carb Heat
- Revise Entry, Maintaining, Leveling Off from a Descent
- Entry, Maintaining, Leveling Off from a Descent
- Approach Planning & Altimeter Setting
- Normal Landing
- After Landing Parking and Securing
Grades reflect what was covered in this lesson, not a certification of pilot competency.
Lesson Plan
Where this fits: Lesson 5 of the Private Pilot syllabus, Stage 1 — Basics (Exercise 9, Turning). With straight and level flight established in Lesson 4, this session adds controlled changes of direction. It precedes Lesson 6, Descending, and the turning skills here are used throughout the approach and circuit work that follows.
- Prerequisite
- Lesson 4 — Straight and Level Flight (can hold a constant altitude, heading, and airspeed in balance). Comfortable with the effects of the controls, trim, and configuration changes.
- Materials
- Cessna 172 with G1000 simulator; student checklist card; headset. The simulator is set trimmed in cruise in the practice area, clear of traffic.
- Objectives for this session
- Enter, maintain, and roll out of coordinated medium (30° bank) turns onto selected headings in level flight.
- Perform gentle climbing turns (shallow bank) and descending turns, including the level-off, while controlling airspeed.
- Compensate for adverse yaw with coordinated rudder, keeping the turn in balance, and maintain a lookout scan into and through every turn.
- Practice the lookout-before-turning routine — clear the area, lift the high wing to check below — and re-orient to the new heading on rollout.
Looking Ahead
Lesson 6, Descending, covers glide, powered, and cruise descents, the effect of flap and power on the descent path, and sideslipping to increase the descent rate. If coordination or the lookout-before-turning routine needs more work, fly a few medium turns at the start of Lesson 6 before practicing descents.
These lesson plans are provided as supplementary training guidance only. They do not supersede FAA publications, aircraft manufacturer documentation, or your instructor's direction. Always refer to the FAA Instrument Flying Handbook, Airplane Flying Handbook, AIM, and applicable POH/AFM as the official sources.