Following this structured flow ensures you never miss a critical detail, allowing you to fly the approach with confidence and precision. For the FAA/NACO (government chart) version of this briefing, see our guide on how to brief an FAA/NACO approach chart.
What Should You Do Before Briefing an Approach?
Start your approach preparation about 40-50 miles from your destination, while workload is still manageable. You need three things before the verbal brief begins: current weather, the approach loaded in your avionics, and all frequencies set and identified. Completing this setup enroute means the actual briefing becomes a focused review of the chart rather than a scramble to catch up.
Obtain the Weather
Tune in to the Automatic Terminal Information Service (ATIS) or Automated Weather Observing System (AWOS) to get the current airport conditions. If your aircraft has Automatic Dependent Surveillance-Broadcast (ADS-B) weather, you can get the Meteorological Aerodrome Report (METAR) much earlier. Write down key details like wind, visibility, and altimeter setting to determine the most likely runway and approach in use.
Load the Approach
Once you have the expected approach from ATC or the weather, load it into your Flight Management System (FMS) or GPS. Be ready to activate vectors to final or a specific leg of the approach when cleared by controllers.
Set and Identify Frequencies
Program your avionics before you get busy:
- Set the primary approach frequency (e.g., Localizer) in both NAV radios if available. This provides redundancy.
- Identify the navigation source by listening to the Morse code.
- Set the required navigation aid (NAVAID) for Distance Measuring Equipment (DME), if applicable.
- Place any missed approach NAV frequencies in standby for quick activation.
Review the Chart
Take a moment to scan the entire approach plate. Look for any unusual notes, obstacles, or non-standard procedures that could affect your flight.
What Should You Include in a Jeppesen Approach Brief?
A Jeppesen approach brief covers 10 items read from top to bottom on the chart: approach name, chart date, frequencies, final approach course, altitudes, minimums, airport information, visibility requirements, missed approach procedure, and terrain. Following this order matches the chart layout so you never have to hunt for information. The table below breaks down each item and what to check. For the FAA/NACO chart version of this checklist, see our guide on how to brief an FAA/NACO approach plate.
| Briefing Item | What to Check |
|---|---|
| Approach & Location | State the full name of the approach and airport (e.g., "ILS Runway 12 into Santa Maria"). |
| Chart Date & Number | Confirm you have the current, valid plate. |
| Frequencies | Verify the primary NAV frequency, approach control, tower, and ground frequencies are set. |
| Final Approach Course | Set the inbound course on your Course Deviation Indicator (CDI), Horizontal Situation Indicator (HSI), or other primary flight display. |
| Altitudes | Identify and announce all critical altitudes: • Glide Slope Intercept Altitude • Final Approach Fix (FAF) Altitude (for non-precision) • Step-down fix altitudes |
| Minimums (DA/MDA) | State the Decision Altitude (DA) for a precision approach or Minimum Descent Altitude (MDA) for a non-precision approach. |
| Airport & Runway Info | Note the Touchdown Zone Elevation (TDZE) and airport elevation. Per FAR 91.175, if you have the approach lights in sight, you can continue to 100' above the TDZE. |
| Visibility Requirements | Confirm the required flight visibility and verify the reported weather meets or exceeds it. |
| Missed Approach | Read the entire missed approach procedure out loud: the initial heading/track, the climb altitude, and the holding fix instructions. |
| Terrain & Obstacles | Note the Minimum Safe Altitude (MSA) for your direction of arrival and any significant terrain features depicted. |
Example Briefing: ILS Rwy 12 at Santa Maria (KSMX)
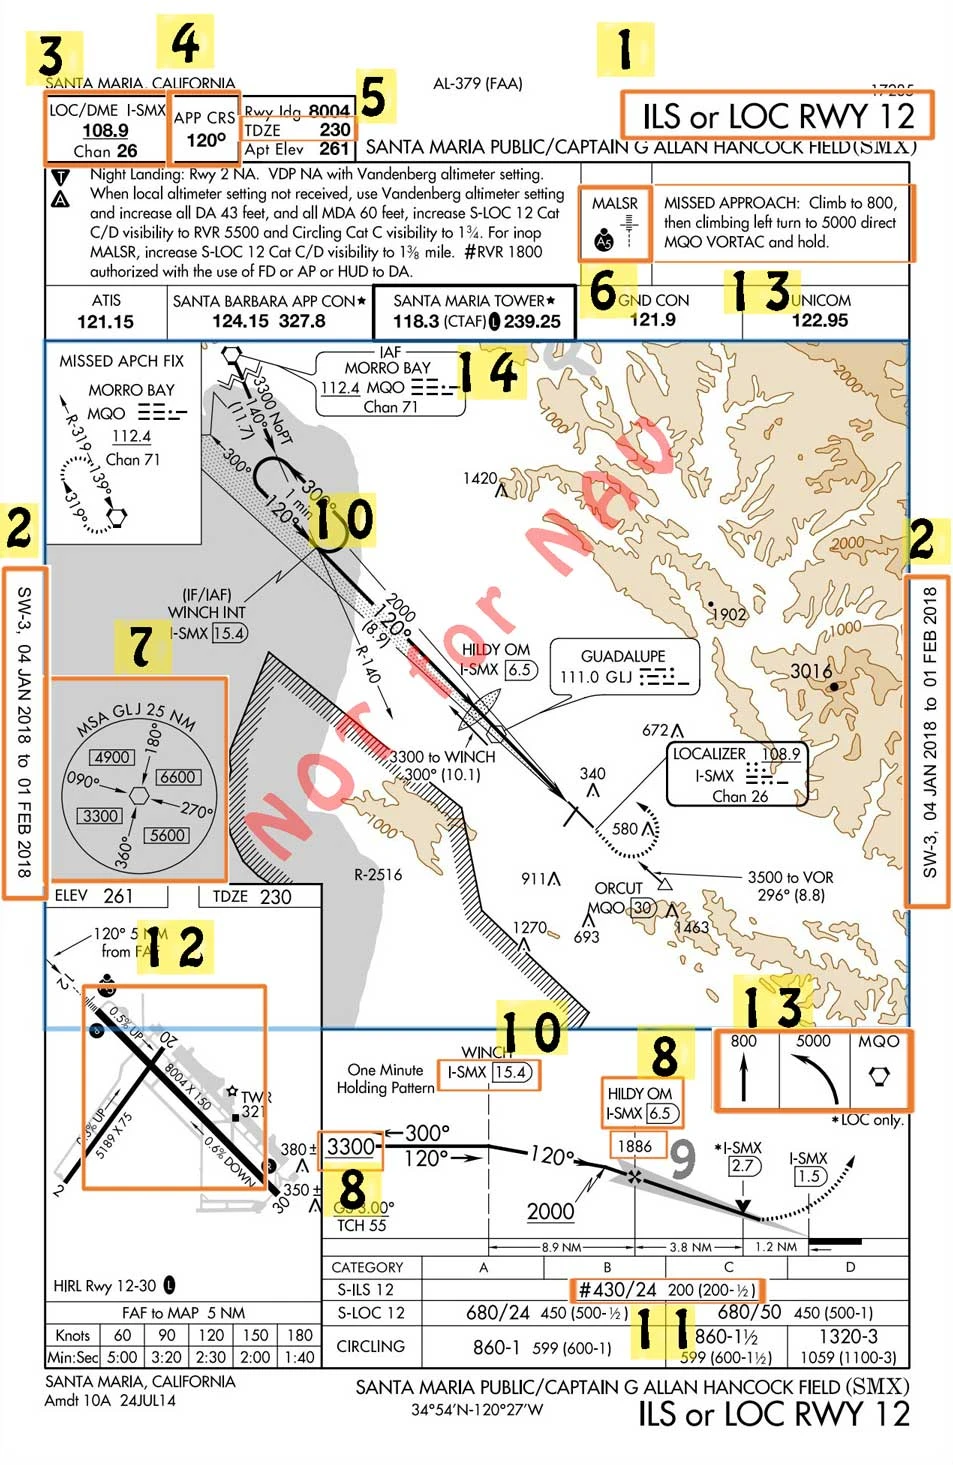
Here is how you might brief the approach shown above:
"This will be the ILS Runway 12 approach into Santa Maria. The plate is current. Localizer frequency is 108.9, set and identified in both radios. The final approach course is 120 degrees, which is set. We will intercept the glideslope at or above 1886 feet.
Our Decision Altitude is 430 feet, and the Touchdown Zone Elevation is 230 feet. If we see the approach lights, we can continue to 330 feet. We need a half-mile visibility, and ATIS is reporting one mile. The approach has a MALSR lighting system, and the PAPI is on the right.
If we go missed, the procedure is to climb on runway heading to 800 feet, then a climbing left turn direct to the Morro Bay VOR to hold.
Any questions?"
SELECT YOUR PATH
NYC / AVIATOR.NYCNEW PILOTS: WHAT'S YOUR GOAL?
LICENSED PILOTS: SELECT TRAINING
FLY AS A HOBBY
Learn safely, step-by-step, and at your own pace.
A private pilot license in NYC typically costs $12,000–$34,000. Most students need 60–80 flight hours to reach checkride proficiency. Simulator training at $215/hr saves over 45% compared to aircraft rental at each stage — and over 60% with a $1,080 training bundle ($180/hr). Pay-as-you-go pricing with no membership fees or upfront commitment.
See the full private pilot license cost breakdown →Yes. You need at least a Third Class FAA Medical Certificate before you can fly solo. Most healthy adults pass without issues — the exam covers basic vision, hearing, and general health. Schedule your exam with an Aviation Medical Examiner (AME) early in training. Important: if you have ever been prescribed medication for anxiety, depression, or ADHD — even as a child — talk to an AME before investing heavily in training to avoid surprises.
How to get your FAA medical certificate for flight training →Yes. Aviator.NYC's FAA-certified Advanced Aviation Training Device (AATD) with Garmin G1000 NXi avionics logs hours that count directly toward your private pilot certificate. Simulator training at $215/hr saves over 45% compared to aircraft rental — and over 60% with a training bundle — with no weather cancellations or maintenance delays. Train on 20+ aircraft configurations from Cessna 172 to Beechcraft Bonanza, all in Midtown Manhattan.
FAA-approved flight simulator training in NYC →Most students earn their private pilot license in 4–12 months depending on training frequency. The FAA requires a minimum of 40 flight hours, but most students need 60–80 hours to reach checkride proficiency. A typical path: Weeks 1–2 in the simulator building foundations, Weeks 3–12 flying dual and solo at a local airport, then Months 3–12 completing cross-country flights and checkride prep. You control the pace — train around your work schedule.
Private pilot training timeline and milestones →Start with a 2-hour discovery session ($430) in Aviator.NYC's Manhattan simulator. No experience needed — your airline pilot instructor walks you through takeoff, flight, and landing. After your first session, you'll know if flight training is right for you. From there, a structured path takes you from simulator foundations to your first solo flight at a local airport.
Book your first flight lesson in Manhattan →Part 61 defines requirements for pilot certification. Part 141 defines requirements for school approval. Both use the same commercially available lesson plans and lead to the same FAA certificate. The key difference: under Part 61, every flight you take counts toward your certificate requirements. Under Part 141, off-syllabus flights don't count toward the 141 program. Part 61 dominates in NYC because the off-syllabus flexibility better serves students who train infrequently and want every flight hour to always count. Aviator.NYC operates under Part 61 — by design.
Part 61 vs Part 141 flight training — which is right for you →The FAA Private Pilot Knowledge Test is a 60-question multiple-choice exam covering aerodynamics, weather, navigation, regulations, and flight planning. You need a score of 70% or higher to pass. Most students use online prep courses like Sheppard Air or Sporty's and pass within 2–4 weeks of focused study. Pass the written test early in your training — it builds confidence and lets you focus on flying skills.
Private pilot training steps and written exam prep →Instructor quality matters more than price. Look for instructors with airline or professional experience who teach part-time because they love it — not because they're building hours. Visit 1–2 schools in person. Ask about cancellation rates, aircraft availability, and whether they use FAA-approved simulators to reduce cost. For NYC-area students, the closest GA airports are Republic Airport (KFRG), Morristown Airport (KMMU), Essex County Airport (KCDW), Westchester Airport (KHPN), and Lincoln Park Airport (N07).
Best flight training airports near New York City →FLY AS A CAREER
From first lesson to professional pilot — one clear path.
The career path follows six stages: Private Pilot License → Instrument Rating → Commercial Certificate → Multi-Engine Rating → CFI Certification → Airline Transport Pilot (ATP). Each rating builds on the previous one. You need 1,500 total flight hours for an ATP certificate, which most pilots build by instructing after earning their CFI. The entire pathway from zero experience to airline-eligible typically takes 4–6 years part-time or 18–24 months full-time.
See the complete career pilot roadmap — PPL through ATP →The complete career pathway costs roughly $80,000–$150,000+ spread across multiple ratings: Private Pilot ($12,000–$34,000), Instrument Rating ($9,250–$21,000), Commercial ($15,000–$50,000), Multi-Engine ($6,000–$8,000), and CFI ($3,000–$5,000). You don't pay this all at once — each rating is a separate phase. Simulator training at $215/hr saves over 45% at every stage compared to aircraft time, and over 60% with training bundles. Once you earn your CFI, you earn $30–$60/hour while building the hours you need for airlines.
Full pilot license cost breakdown by rating →With consistent training, 18–24 months is realistic for the accelerated path. Most part-time students take 4–6 years. The bottleneck is building 1,500 total hours for an ATP certificate. After earning your CFI, instructing is the most common way to build hours while getting paid. Regional airlines are currently hiring pilots at 1,500 hours with competitive first-year pay.
Airline Transport Pilot requirements and timeline →The instrument rating is your next step. It teaches you to fly in clouds and low visibility using only your instruments — a requirement for every professional pilot path. The instrument rating requires 40 hours of instrument training (up to 20 hours can be in an FAA-approved simulator) and 50 hours of cross-country PIC time. Most working professionals complete it in 3–6 months.
Instrument rating — step 2 in the career pilot roadmap →Yes, for most career pilots. The CFI (Certified Flight Instructor) certificate lets you earn $30–$60/hour teaching other pilots while building the 1,500 hours you need for airlines. It also deepens your own flying knowledge — teaching forces mastery. Requirements: Commercial Pilot Certificate, Instrument Rating, 250+ total hours, and passing the CFI practical test. The training typically takes 20–30 additional flight hours.
CFI certification — step 5 in the career pilot roadmap →Airlines require a First Class FAA Medical Certificate. This is a more thorough exam than the Third Class medical used for private flying. It includes detailed vision, hearing, cardiovascular, and neurological screening. Most healthy adults pass. Get your First Class medical early — before investing in career training — to catch any potential issues. The exam is done by an Aviation Medical Examiner (AME) and is valid for 12 months.
FAA medical certificate requirements for career pilots →Yes, extensively. The FAA allows up to 20 hours of simulator time toward your instrument rating, up to 50 hours toward your commercial certificate, and up to 25 hours toward your ATP. Simulator training at $215/hr saves over 45% compared to aircraft at the standard rate — and over 60% with training bundles — across every stage of the career path. Aviator.NYC's AATD features the Garmin G1000 NXi and GFC 700 autopilot used in modern training aircraft, so skills transfer directly to the airplane.
How FAA-approved simulator training reduces career pilot costs →The multi-engine rating is required for most airline jobs. There is no FAA minimum flight time required, but most students need 10–15 hours of training. Cost is typically $6,000–$8,000. Training covers VMC demonstrations, single-engine operations, and asymmetric thrust management. Most pilots complete it in 1–2 weeks of intensive training.
Multi-engine rating — step 4 in the career pilot roadmap →YOUTH PROGRAM (AGES 8-17)
Safe, age-appropriate lessons that grow with your child.
Children can start simulator-based flight training at age 8. There are no medical requirements for simulator lessons. Training is structured by age: ages 8–12 focus on basic stick-and-rudder control, instrument scanning, and simple ATC calls in 1-hour sessions. Ages 13–15 progress to traffic patterns, VOR navigation, and checklist discipline in 2-hour sessions. The simulator is a zero-risk environment supervised by professional instructors.
Youth aviation program milestones by age →Under FAA regulations (FAR 61.87), a student pilot can solo a glider at age 14 and a powered airplane at age 16. At age 17, they are eligible for a full Private Pilot Certificate with 40+ hours of training. Starting simulator training at age 8–12 gives your child years of structured skill building before solo eligibility, creating a significant head start over peers who begin at 16.
FAA solo flight age requirements for young pilots →Youth training uses pay-as-you-go pricing designed for younger attention spans. 1-hour sessions at $215, 2-hour sessions at $430. A 6-hour training bundle ($1,080) saves over 30% compared to individual sessions. No membership fees or upfront commitment.
Youth flight training pricing and session options →Ages 8–12: Discovery and foundation — basic controls, instrument scanning, simple radio calls. Ages 13–15: Structured skill building — traffic patterns, navigation, checklist discipline. Age 16: Solo flight eligible (FAR 61.87) — pre-solo maneuvers, emergency procedures, student certificate. Age 17: Private Pilot Certificate eligible (FAR 61.103) — checkride, cross-country flights, instrument basics introduction.
Complete youth aviation age milestones and FAA requirements →Not for simulator training. Children ages 8–15 train exclusively in the FAA-approved simulator and do not need a medical certificate. A medical certificate is only required before solo flight in an actual aircraft, which is not permitted until age 16. When the time comes, most healthy teenagers pass the Third Class medical easily.
FAA medical requirements for student pilots under 18 →Yes. Early training creates a massive head start. A student who begins at age 8 has 8 years of structured skill building before solo eligibility at 16. Hours logged in the FAA-approved AATD simulator count toward future certificate requirements. By age 17, a dedicated student can hold a Private Pilot Certificate while peers are just starting. This is a direct path toward airline or professional aviation careers.
Career pilot roadmap starting from youth training →Instructors are active airline pilots or experienced CFIs who specialize in youth aviation training for ages 8–17. They understand age-appropriate pacing, use patient teaching methods, and make sessions engaging without sacrificing real aviation standards. Parents are welcome to observe every lesson from the instructor station.
Meet our airline pilot flight instructors →The FAA-approved AATD simulator is a zero-risk training environment. No aircraft is involved until your child reaches solo eligibility at age 16+. Children practice stalls, engine failures, and emergency procedures safely and repeatedly. The simulator uses the same Garmin G1000 NXi avionics found in real training aircraft, so skills transfer directly when they transition to flying.
FAA-approved flight simulator for youth training →INSTRUMENT RATING
Everything you need to know about earning your instrument rating:
The FAA requires 50 hours of PIC cross-country time, 40 hours of actual or simulated instrument time (up to 20 hours in an FAA-approved AATD like Aviator.NYC's simulator), and passing both a written knowledge test and a practical checkride. You must already hold a Private Pilot Certificate. The 20 simulator hours alone save over $4,400 compared to logging that time in an airplane.
FAA instrument rating requirements explained (14 CFR 61.65) →Total cost typically ranges from $9,250 to $16,800 depending on pace and how much airplane time you add. The simulator-first approach saves over $4,400 compared to airplane-only training. Dual instruction starts at $215/hr in the simulator — over 45% less than aircraft rental. Training bundles save over 60%. Pay-as-you-go with no upfront commitment.
Instrument rating cost breakdown and simulator savings →Your first lesson starts with a 20-minute briefing covering instrument scan fundamentals and the G1000 NXi layout. Then 90 minutes of hands-on simulator time: straight-and-level flight by instruments only, basic attitude control, and an introduction to the instrument scan pattern. Your instructor is an airline pilot who flies IFR professionally — not someone learning alongside you. No experience with instruments required.
What to expect in your first IFR simulator lesson →Most working professionals complete their instrument rating in 3–6 months training 1–2 sessions per week. The 10-lesson simulator curriculum covers fundamentals through mock checkride. After the simulator phase, you transition to the airplane for cross-country time and real-world IFR experience. Consistent weekly sessions are more effective than sporadic blocks — instrument skills decay fast without regular practice.
Instrument rating training timeline and milestones →A structured 10-lesson progression: Lessons 1–2 build instrument scan and basic attitude flying. Lessons 3–5 introduce VOR navigation, holding patterns, and your first approach. Lessons 6–7 cover precision approaches (ILS, GPS). Lessons 8–9 add STARs, complex arrivals, and lost communications. Lesson 10 is a full mock checkride. Each session: 20-min briefing, 90-min simulator, 10-min debrief.
See the full 10-lesson IFR training plan →After building proficiency in the simulator, you take your instrument skills to the airplane at a local airport. The G1000 NXi in the simulator matches the avionics in common training aircraft (Cessna 172S, Cessna 182T), so the cockpit layout transfers directly. Cross-country flights build the PIC time required for your rating while practicing real ATC communications, weather decision-making, and approach procedures in actual conditions.
IFR simulator-to-airplane transition guide →The instrument rating checkride has two parts: an oral exam (~1.5 hours) covering regulations, weather theory, approach procedures, and decision-making scenarios; and a flight test (~2 hours) where you fly approaches, holds, intercepting and tracking courses, and demonstrate partial panel skills. The DPE will test unusual attitudes and recovery, and at least one missed approach. Lesson 10 in the curriculum is a full mock checkride that mirrors the real exam.
Instrument rating checkride preparation →IFR CURRENCY OPTIONS
Choose your IFR currency training option:
The FAA WINGS (Pilot Proficiency Program) lets you earn safety credit while rebuilding IFR proficiency. Aviator.NYC's LOFT scenarios are structured as WINGS activities — you get IFR currency practice and FAA safety credit simultaneously. Each scenario is a realistic cross-country flight with approaches, holds, and decision-making challenges designed by active airline pilots.
IFR currency through FAA WINGS simulator scenarios →Short, focused simulator sessions built around airports you actually fly to. Practice ILS, RNAV, and LOC approaches at local airports like Teterboro Airport (KTEB), Republic Airport (KFRG), Westchester Airport (KHPN), and Morristown Airport (KMMU). Complete your 6 approaches, holding, and tracking requirements in one or two sessions. No travel to an airport, no weather delays, no Hobbs time running while you brief approaches.
IFR currency approaches at NYC-area airports →Custom sessions built around your experience level, aircraft type, and specific currency needs. If you fly a Bonanza, we configure the G1000 NXi to match. If you need RNAV (GPS) approaches specifically, we build a profile focused on those. Your airline pilot instructor tailors the session to what you actually need — not a one-size-fits-all curriculum.
Custom IFR currency training sessions →Guided IFR currency practice with an airline-experienced CFII. Includes structured approach profiles, real-time feedback on instrument scan and procedures, and FAA WINGS credit. Ideal if you've been out of the IFR system for a while and want professional guidance rebuilding precision. If your currency has lapsed beyond 6 months, you'll need an Instrument Proficiency Check (IPC) — available as part of dual sessions. Dual sessions start at $430 for 2 hours.
Dual IFR currency training with instrument proficiency check →Independent simulator access for current IFR pilots at $190 for 2 hours. No checkout required — if you're familiar with G1000 NXi operations and know how to log approaches for currency, you can practice the required 6 approaches, holding, and tracking on your own. Solo practice saves roughly 75% compared to aircraft rental time. Available in bulk bundles for even greater savings.
Solo IFR currency simulator practice →What Do the Notes on an Approach Plate Mean?
The notes section of an approach chart contains operational restrictions, alternate minimums, and equipment-dependent adjustments that can change whether you are legal to fly the approach. Missing a note about inoperative lighting or night restrictions can mean starting an approach you cannot complete. Always read every note before briefing the approach — they are not optional fine print.
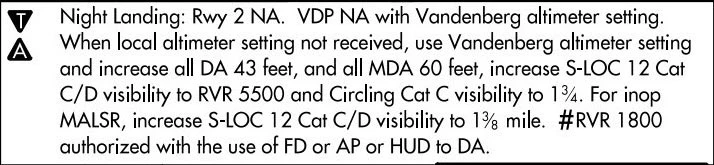
What to Look For in the Notes
- Night Restrictions: Some approaches have "Night Landing: Rwy 2 NA" or similar notes indicating runways unavailable at night
- Visual Descent Point (VDP): Notes may indicate "VDP NA" with alternate altimeter settings, affecting your descent planning
- Alternate Altimeter Settings: When local altimeter isn't available, you may need to use a nearby station (like Vandenberg) and add feet to your DA/MDA
- Inoperative Equipment: Medium Intensity Approach Lighting System with Runway Alignment Indicator Lights (MALSR) or other lighting system outages may require increased visibility minimums
- Category Restrictions: Higher approach categories may have different visibility requirements
What Are the Final Checks Before Flying an Approach?
Before the final approach segment, complete your briefing with these practical items. These checks bridge the gap between the chart briefing and actually flying the approach — covering aircraft configuration, fuel, and situational awareness items that the approach plate does not address. For technique on executing the approach itself, see our guide on how to fly an instrument approach.
- Aircraft Configuration: Brief your planned flap settings and target approach speeds.
- Fuel Status: Confirm you have enough fuel for the approach, a potential missed approach, and diversion to your alternate.
- Airport Diagram: Review the airport diagram for your planned runway exit, taxi route, and any known hotspots.
- Threats: Discuss any weather hazards like icing or thunderstorms, challenging terrain, or relevant NOTAMs.
How to Brief an FAA/NACO Approach Plate
Step-by-step checklist for briefing FAA government approach charts with the same structured technique.
How to Properly Fly an Instrument Approach
Put your briefing into action with proper approach flying techniques and stabilized approach criteria.
Ready to Master Your IFR Skills?
A smooth, standardized approach brief is the mark of a proficient instrument pilot. Book a session in our FAA-approved AATD simulator and practice with airline pilot instructors.
SELECT YOUR PATH
NYC / AVIATOR.NYCNEW PILOTS: WHAT'S YOUR GOAL?
LICENSED PILOTS: SELECT TRAINING
FLY AS A HOBBY
Learn safely, step-by-step, and at your own pace.
A private pilot license in NYC typically costs $12,000–$34,000. Most students need 60–80 flight hours to reach checkride proficiency. Simulator training at $215/hr saves over 45% compared to aircraft rental at each stage — and over 60% with a $1,080 training bundle ($180/hr). Pay-as-you-go pricing with no membership fees or upfront commitment.
See the full private pilot license cost breakdown →Yes. You need at least a Third Class FAA Medical Certificate before you can fly solo. Most healthy adults pass without issues — the exam covers basic vision, hearing, and general health. Schedule your exam with an Aviation Medical Examiner (AME) early in training. Important: if you have ever been prescribed medication for anxiety, depression, or ADHD — even as a child — talk to an AME before investing heavily in training to avoid surprises.
How to get your FAA medical certificate for flight training →Yes. Aviator.NYC's FAA-certified Advanced Aviation Training Device (AATD) with Garmin G1000 NXi avionics logs hours that count directly toward your private pilot certificate. Simulator training at $215/hr saves over 45% compared to aircraft rental — and over 60% with a training bundle — with no weather cancellations or maintenance delays. Train on 20+ aircraft configurations from Cessna 172 to Beechcraft Bonanza, all in Midtown Manhattan.
FAA-approved flight simulator training in NYC →Most students earn their private pilot license in 4–12 months depending on training frequency. The FAA requires a minimum of 40 flight hours, but most students need 60–80 hours to reach checkride proficiency. A typical path: Weeks 1–2 in the simulator building foundations, Weeks 3–12 flying dual and solo at a local airport, then Months 3–12 completing cross-country flights and checkride prep. You control the pace — train around your work schedule.
Private pilot training timeline and milestones →Start with a 2-hour discovery session ($430) in Aviator.NYC's Manhattan simulator. No experience needed — your airline pilot instructor walks you through takeoff, flight, and landing. After your first session, you'll know if flight training is right for you. From there, a structured path takes you from simulator foundations to your first solo flight at a local airport.
Book your first flight lesson in Manhattan →Part 61 defines requirements for pilot certification. Part 141 defines requirements for school approval. Both use the same commercially available lesson plans and lead to the same FAA certificate. The key difference: under Part 61, every flight you take counts toward your certificate requirements. Under Part 141, off-syllabus flights don't count toward the 141 program. Part 61 dominates in NYC because the off-syllabus flexibility better serves students who train infrequently and want every flight hour to always count. Aviator.NYC operates under Part 61 — by design.
Part 61 vs Part 141 flight training — which is right for you →The FAA Private Pilot Knowledge Test is a 60-question multiple-choice exam covering aerodynamics, weather, navigation, regulations, and flight planning. You need a score of 70% or higher to pass. Most students use online prep courses like Sheppard Air or Sporty's and pass within 2–4 weeks of focused study. Pass the written test early in your training — it builds confidence and lets you focus on flying skills.
Private pilot training steps and written exam prep →Instructor quality matters more than price. Look for instructors with airline or professional experience who teach part-time because they love it — not because they're building hours. Visit 1–2 schools in person. Ask about cancellation rates, aircraft availability, and whether they use FAA-approved simulators to reduce cost. For NYC-area students, the closest GA airports are Republic Airport (KFRG), Morristown Airport (KMMU), Essex County Airport (KCDW), Westchester Airport (KHPN), and Lincoln Park Airport (N07).
Best flight training airports near New York City →FLY AS A CAREER
From first lesson to professional pilot — one clear path.
The career path follows six stages: Private Pilot License → Instrument Rating → Commercial Certificate → Multi-Engine Rating → CFI Certification → Airline Transport Pilot (ATP). Each rating builds on the previous one. You need 1,500 total flight hours for an ATP certificate, which most pilots build by instructing after earning their CFI. The entire pathway from zero experience to airline-eligible typically takes 4–6 years part-time or 18–24 months full-time.
See the complete career pilot roadmap — PPL through ATP →The complete career pathway costs roughly $80,000–$150,000+ spread across multiple ratings: Private Pilot ($12,000–$34,000), Instrument Rating ($9,250–$21,000), Commercial ($15,000–$50,000), Multi-Engine ($6,000–$8,000), and CFI ($3,000–$5,000). You don't pay this all at once — each rating is a separate phase. Simulator training at $215/hr saves over 45% at every stage compared to aircraft time, and over 60% with training bundles. Once you earn your CFI, you earn $30–$60/hour while building the hours you need for airlines.
Full pilot license cost breakdown by rating →With consistent training, 18–24 months is realistic for the accelerated path. Most part-time students take 4–6 years. The bottleneck is building 1,500 total hours for an ATP certificate. After earning your CFI, instructing is the most common way to build hours while getting paid. Regional airlines are currently hiring pilots at 1,500 hours with competitive first-year pay.
Airline Transport Pilot requirements and timeline →The instrument rating is your next step. It teaches you to fly in clouds and low visibility using only your instruments — a requirement for every professional pilot path. The instrument rating requires 40 hours of instrument training (up to 20 hours can be in an FAA-approved simulator) and 50 hours of cross-country PIC time. Most working professionals complete it in 3–6 months.
Instrument rating — step 2 in the career pilot roadmap →Yes, for most career pilots. The CFI (Certified Flight Instructor) certificate lets you earn $30–$60/hour teaching other pilots while building the 1,500 hours you need for airlines. It also deepens your own flying knowledge — teaching forces mastery. Requirements: Commercial Pilot Certificate, Instrument Rating, 250+ total hours, and passing the CFI practical test. The training typically takes 20–30 additional flight hours.
CFI certification — step 5 in the career pilot roadmap →Airlines require a First Class FAA Medical Certificate. This is a more thorough exam than the Third Class medical used for private flying. It includes detailed vision, hearing, cardiovascular, and neurological screening. Most healthy adults pass. Get your First Class medical early — before investing in career training — to catch any potential issues. The exam is done by an Aviation Medical Examiner (AME) and is valid for 12 months.
FAA medical certificate requirements for career pilots →Yes, extensively. The FAA allows up to 20 hours of simulator time toward your instrument rating, up to 50 hours toward your commercial certificate, and up to 25 hours toward your ATP. Simulator training at $215/hr saves over 45% compared to aircraft at the standard rate — and over 60% with training bundles — across every stage of the career path. Aviator.NYC's AATD features the Garmin G1000 NXi and GFC 700 autopilot used in modern training aircraft, so skills transfer directly to the airplane.
How FAA-approved simulator training reduces career pilot costs →The multi-engine rating is required for most airline jobs. There is no FAA minimum flight time required, but most students need 10–15 hours of training. Cost is typically $6,000–$8,000. Training covers VMC demonstrations, single-engine operations, and asymmetric thrust management. Most pilots complete it in 1–2 weeks of intensive training.
Multi-engine rating — step 4 in the career pilot roadmap →YOUTH PROGRAM (AGES 8-17)
Safe, age-appropriate lessons that grow with your child.
Children can start simulator-based flight training at age 8. There are no medical requirements for simulator lessons. Training is structured by age: ages 8–12 focus on basic stick-and-rudder control, instrument scanning, and simple ATC calls in 1-hour sessions. Ages 13–15 progress to traffic patterns, VOR navigation, and checklist discipline in 2-hour sessions. The simulator is a zero-risk environment supervised by professional instructors.
Youth aviation program milestones by age →Under FAA regulations (FAR 61.87), a student pilot can solo a glider at age 14 and a powered airplane at age 16. At age 17, they are eligible for a full Private Pilot Certificate with 40+ hours of training. Starting simulator training at age 8–12 gives your child years of structured skill building before solo eligibility, creating a significant head start over peers who begin at 16.
FAA solo flight age requirements for young pilots →Youth training uses pay-as-you-go pricing designed for younger attention spans. 1-hour sessions at $215, 2-hour sessions at $430. A 6-hour training bundle ($1,080) saves over 30% compared to individual sessions. No membership fees or upfront commitment.
Youth flight training pricing and session options →Ages 8–12: Discovery and foundation — basic controls, instrument scanning, simple radio calls. Ages 13–15: Structured skill building — traffic patterns, navigation, checklist discipline. Age 16: Solo flight eligible (FAR 61.87) — pre-solo maneuvers, emergency procedures, student certificate. Age 17: Private Pilot Certificate eligible (FAR 61.103) — checkride, cross-country flights, instrument basics introduction.
Complete youth aviation age milestones and FAA requirements →Not for simulator training. Children ages 8–15 train exclusively in the FAA-approved simulator and do not need a medical certificate. A medical certificate is only required before solo flight in an actual aircraft, which is not permitted until age 16. When the time comes, most healthy teenagers pass the Third Class medical easily.
FAA medical requirements for student pilots under 18 →Yes. Early training creates a massive head start. A student who begins at age 8 has 8 years of structured skill building before solo eligibility at 16. Hours logged in the FAA-approved AATD simulator count toward future certificate requirements. By age 17, a dedicated student can hold a Private Pilot Certificate while peers are just starting. This is a direct path toward airline or professional aviation careers.
Career pilot roadmap starting from youth training →Instructors are active airline pilots or experienced CFIs who specialize in youth aviation training for ages 8–17. They understand age-appropriate pacing, use patient teaching methods, and make sessions engaging without sacrificing real aviation standards. Parents are welcome to observe every lesson from the instructor station.
Meet our airline pilot flight instructors →The FAA-approved AATD simulator is a zero-risk training environment. No aircraft is involved until your child reaches solo eligibility at age 16+. Children practice stalls, engine failures, and emergency procedures safely and repeatedly. The simulator uses the same Garmin G1000 NXi avionics found in real training aircraft, so skills transfer directly when they transition to flying.
FAA-approved flight simulator for youth training →INSTRUMENT RATING
Everything you need to know about earning your instrument rating:
The FAA requires 50 hours of PIC cross-country time, 40 hours of actual or simulated instrument time (up to 20 hours in an FAA-approved AATD like Aviator.NYC's simulator), and passing both a written knowledge test and a practical checkride. You must already hold a Private Pilot Certificate. The 20 simulator hours alone save over $4,400 compared to logging that time in an airplane.
FAA instrument rating requirements explained (14 CFR 61.65) →Total cost typically ranges from $9,250 to $16,800 depending on pace and how much airplane time you add. The simulator-first approach saves over $4,400 compared to airplane-only training. Dual instruction starts at $215/hr in the simulator — over 45% less than aircraft rental. Training bundles save over 60%. Pay-as-you-go with no upfront commitment.
Instrument rating cost breakdown and simulator savings →Your first lesson starts with a 20-minute briefing covering instrument scan fundamentals and the G1000 NXi layout. Then 90 minutes of hands-on simulator time: straight-and-level flight by instruments only, basic attitude control, and an introduction to the instrument scan pattern. Your instructor is an airline pilot who flies IFR professionally — not someone learning alongside you. No experience with instruments required.
What to expect in your first IFR simulator lesson →Most working professionals complete their instrument rating in 3–6 months training 1–2 sessions per week. The 10-lesson simulator curriculum covers fundamentals through mock checkride. After the simulator phase, you transition to the airplane for cross-country time and real-world IFR experience. Consistent weekly sessions are more effective than sporadic blocks — instrument skills decay fast without regular practice.
Instrument rating training timeline and milestones →A structured 10-lesson progression: Lessons 1–2 build instrument scan and basic attitude flying. Lessons 3–5 introduce VOR navigation, holding patterns, and your first approach. Lessons 6–7 cover precision approaches (ILS, GPS). Lessons 8–9 add STARs, complex arrivals, and lost communications. Lesson 10 is a full mock checkride. Each session: 20-min briefing, 90-min simulator, 10-min debrief.
See the full 10-lesson IFR training plan →After building proficiency in the simulator, you take your instrument skills to the airplane at a local airport. The G1000 NXi in the simulator matches the avionics in common training aircraft (Cessna 172S, Cessna 182T), so the cockpit layout transfers directly. Cross-country flights build the PIC time required for your rating while practicing real ATC communications, weather decision-making, and approach procedures in actual conditions.
IFR simulator-to-airplane transition guide →The instrument rating checkride has two parts: an oral exam (~1.5 hours) covering regulations, weather theory, approach procedures, and decision-making scenarios; and a flight test (~2 hours) where you fly approaches, holds, intercepting and tracking courses, and demonstrate partial panel skills. The DPE will test unusual attitudes and recovery, and at least one missed approach. Lesson 10 in the curriculum is a full mock checkride that mirrors the real exam.
Instrument rating checkride preparation →IFR CURRENCY OPTIONS
Choose your IFR currency training option:
The FAA WINGS (Pilot Proficiency Program) lets you earn safety credit while rebuilding IFR proficiency. Aviator.NYC's LOFT scenarios are structured as WINGS activities — you get IFR currency practice and FAA safety credit simultaneously. Each scenario is a realistic cross-country flight with approaches, holds, and decision-making challenges designed by active airline pilots.
IFR currency through FAA WINGS simulator scenarios →Short, focused simulator sessions built around airports you actually fly to. Practice ILS, RNAV, and LOC approaches at local airports like Teterboro Airport (KTEB), Republic Airport (KFRG), Westchester Airport (KHPN), and Morristown Airport (KMMU). Complete your 6 approaches, holding, and tracking requirements in one or two sessions. No travel to an airport, no weather delays, no Hobbs time running while you brief approaches.
IFR currency approaches at NYC-area airports →Custom sessions built around your experience level, aircraft type, and specific currency needs. If you fly a Bonanza, we configure the G1000 NXi to match. If you need RNAV (GPS) approaches specifically, we build a profile focused on those. Your airline pilot instructor tailors the session to what you actually need — not a one-size-fits-all curriculum.
Custom IFR currency training sessions →Guided IFR currency practice with an airline-experienced CFII. Includes structured approach profiles, real-time feedback on instrument scan and procedures, and FAA WINGS credit. Ideal if you've been out of the IFR system for a while and want professional guidance rebuilding precision. If your currency has lapsed beyond 6 months, you'll need an Instrument Proficiency Check (IPC) — available as part of dual sessions. Dual sessions start at $430 for 2 hours.
Dual IFR currency training with instrument proficiency check →Independent simulator access for current IFR pilots at $190 for 2 hours. No checkout required — if you're familiar with G1000 NXi operations and know how to log approaches for currency, you can practice the required 6 approaches, holding, and tracking on your own. Solo practice saves roughly 75% compared to aircraft rental time. Available in bulk bundles for even greater savings.
Solo IFR currency simulator practice →Frequently Asked Questions
What is the correct order for briefing a Jeppesen approach plate?
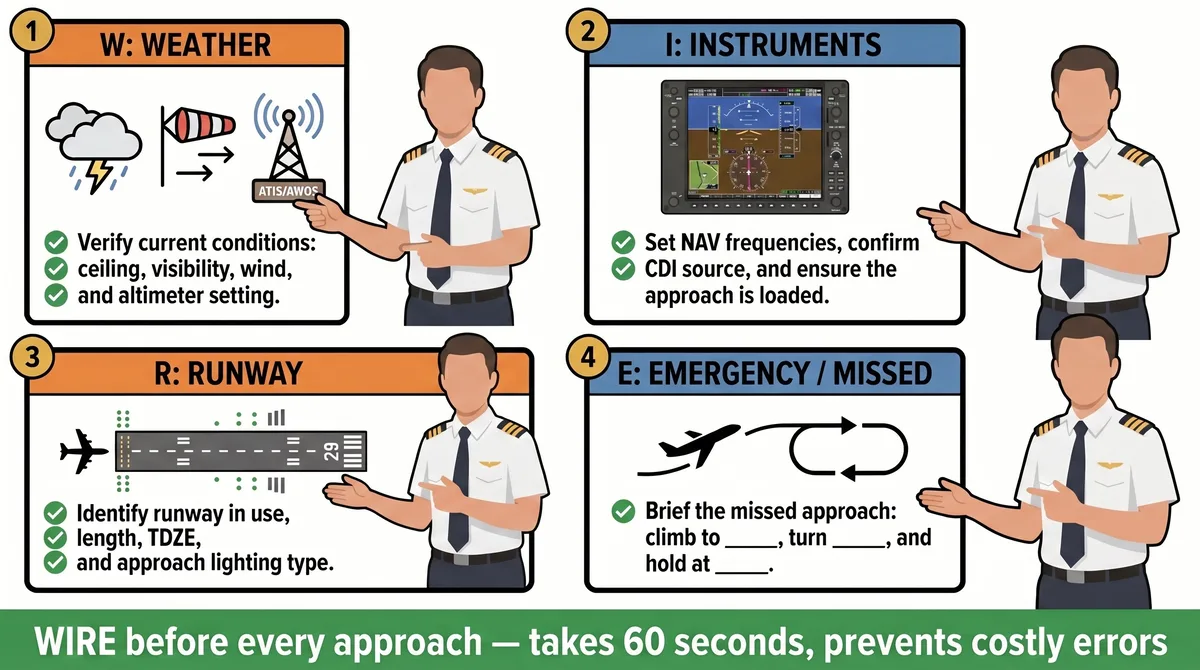
Brief a Jeppesen approach plate covering these 10 items: approach name, chart date, frequencies, final approach course, altitudes, minimums (DA/MDA), airport info, visibility, missed approach, and terrain. The chart layout reads top to bottom, but professional pilots brief in chronological order — starting from where you are in the enroute or arrival sequence, through the Initial Approach Fix (IAF) or Final Approach Fix (FAF), down to minimums, what happens when you land, and what happens if you don't land. The WIRE acronym (Weather, Instruments, Runway, Emergency) helps remember the key elements. Raw memorization of chart items does not hold up under workload — having a logical flow that matches the sequence of flight does.
How do I read the minimums section on a Jeppesen approach chart?
Jeppesen minimums are in the lower right corner of the approach plate. First, determine your aircraft approach category (A, B, C, or D, based on your approach speed at maximum landing weight). Then find the row for your approach type — ILS gives you a Decision Altitude (DA), while non-precision approaches like VOR or LOC give you a Minimum Descent Altitude (MDA). The visibility requirement is shown next to the altitude value. Always check the notes section as well — inoperative lighting systems or other equipment outages can increase your required visibility. If the approach has multiple lines of minimums, verify you are reading the correct one for your aircraft category and equipment.
What's the difference between Jeppesen and FAA/NACO approach charts?
Jeppesen and FAA/NACO approach charts contain the same essential information — frequencies, altitudes, minimums, missed approach procedure — but organize it differently. Jeppesen places frequencies in the upper right, minimums in the lower right, and Minimum Safe Altitude (MSA) in the upper left. FAA charts show frequencies at the top in a dedicated box, minimums in a table at the bottom, and MSA in the plan view. Jeppesen integrates notes throughout the chart, while FAA charts group them in the upper left area. Being proficient with both formats is valuable for checkride preparation and for transitioning between training environments. See our guide on how to brief an FAA/NACO approach chart for the government chart format and a side-by-side comparison table.
When should I brief an instrument approach?
Brief the approach about 40-50 miles from your destination, after obtaining the current weather (ATIS or AWOS) and loading the approach into your avionics. This timing matters because it falls in a relatively low-workload phase of flight — you are still enroute, before the terminal area where ATC instructions increase and configuration changes begin. Use this window to identify and set all frequencies, verify the approach is loaded correctly in the FMS or GPS, and review the chart for any unusual notes or restrictions. If you wait until you are already being vectored for the approach, you will be rushing through the brief while managing altitude, heading, and communications — exactly the high-workload situation the brief is designed to prevent.
Continue Your IFR Training
Related programs and resources for instrument pilots
Instrument Rating Training Guide
Complete guide to earning your instrument rating in NYC — curriculum, requirements, and training timeline.
IFR Currency Training
Maintain instrument currency with structured simulator sessions — six approaches, holds, and tracking.
Professional Pilot IFR Prep
Advanced IFR training for airline interviews and ATP checkrides — SID/STAR procedures and CRM.
Business Jet IFR Transition
Single-pilot jet IFR procedures — high-altitude operations, automation management, and crew concepts.
Rusty Pilot Training
Rebuild IFR confidence safely after a break from flying — structured refresher with airline pilot instructors.
FAA WINGS LOFT Scenarios
Line Oriented Flight Training with FAA WINGS credit — real-world IFR scenarios from airline training.