What Is the Difference Between the G1000 and the G3000?
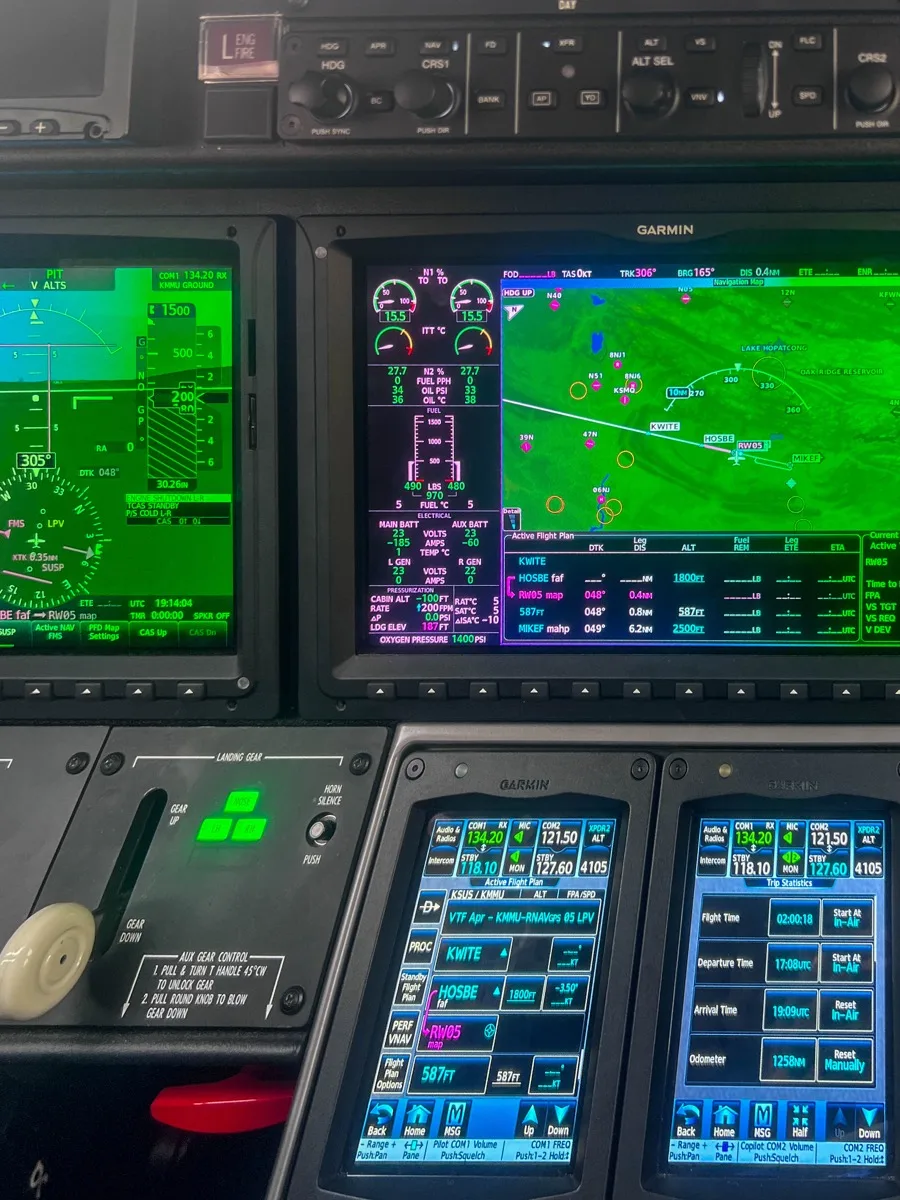
The G1000 is Garmin's integrated flight deck for piston trainers and light aircraft: a primary flight display (PFD) and a multi-function display (MFD), each rimmed with softkeys along the bottom and knobs at the corners. Every input — a frequency, a waypoint, a procedure — goes through those physical controls. The G3000 is the next generation, designed for higher-performance aircraft and single-pilot jets. Its displays are cleaner because the controls moved: nearly all data entry happens on one or two Garmin Touchscreen Controllers (GTCs) mounted low on the panel, which act as keyboard, FMS, radio panel, and systems controller in one. Cirrus builds its Perspective Touch+ flight deck on the G3000 platform. The flight logic underneath — flight plan structure, direct-to, procedure loading, the GFC 700 autopilot — is shared DNA. The interface philosophy is not: heads-up knob work versus heads-down touch typing.
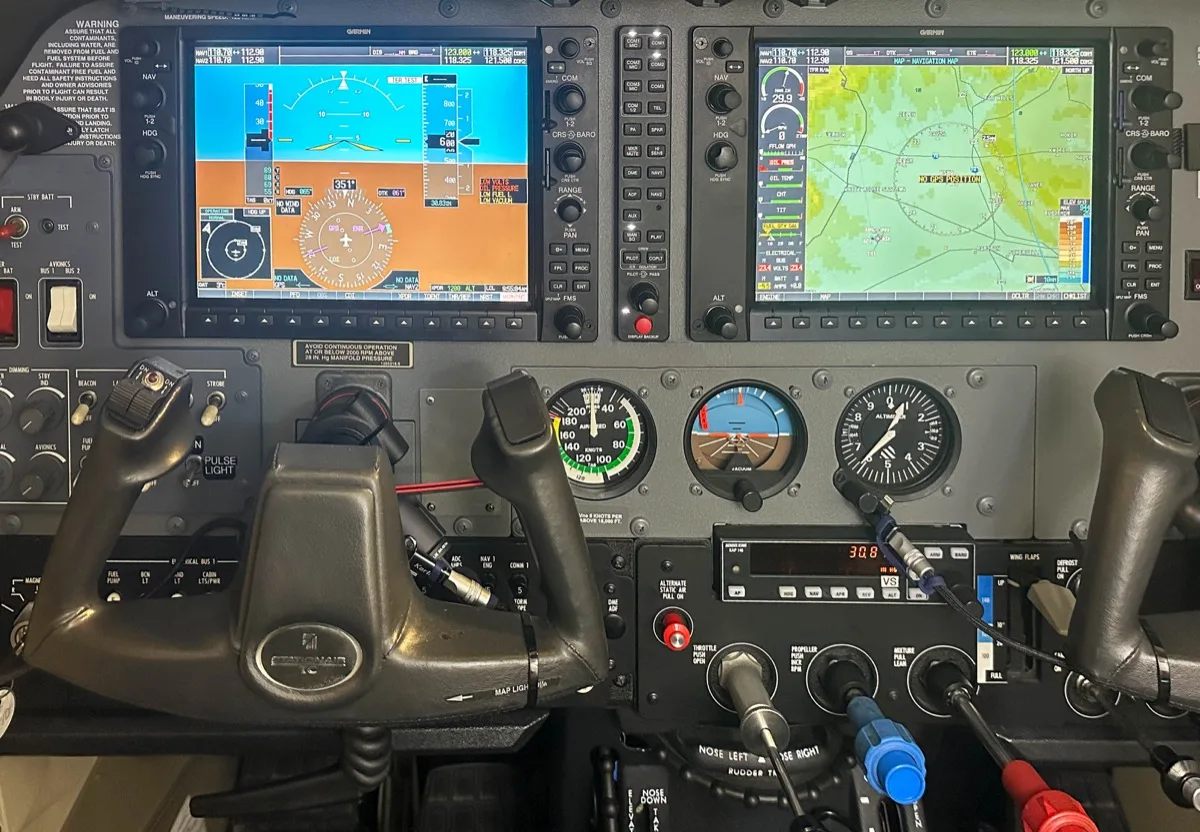
In the simulator fleet this maps one-to-one. Our G1000 simulator runs Garmin G1000 NXi across 15 aircraft profiles, from the Cessna 172 to the King Air B200. The Cirrus SR simulator is built around Garmin Perspective Touch+ (G3000 displays, GTC 580 controllers) for the SR20 and SR22; a separate SF50 Vision Jet simulator, single-seat with its own FAA approval, joins it in the same studio. Delayed to 2027. It will run at the new Midtown studio.
How Does Flight Plan Entry Differ Between the Two?
On the G1000, a flight plan is built with the FMS knob: press the FPL key, then twist the outer knob to move the cursor and the inner knob to spell each waypoint, character by character. Experienced G1000 pilots develop real speed with it, but nobody calls it typing. Amending a route in the air means the same knob work while flying the airplane — which is exactly why instructors drill it until it is muscle memory. On the G3000, the GTC gives you an alphanumeric keyboard on a touchscreen. You tap the flight plan, type "KMMU" the way you would on a phone, and airways and procedures present themselves as menus you touch. It is dramatically faster on the ground and in smooth air. The trade-off appears in turbulence: a knob you can brace a finger against, a touchscreen you cannot. Garmin knows this — the GTC keeps a knob in the corner for exactly those moments, and good G3000 technique means learning when to fall back to it.
How Do You Load and Activate an Approach on Each?
The G1000 approach flow runs through the PROC key: press it, pick the approach, the transition, then choose between Load and Activate — with vectors-to-final as its own decision point. The steps live in nested pages, and the classic instrument-student errors (activating too early, flying past the fix while heads-down in the menu) come from working those pages under time pressure. We cover that workflow step-by-step in our G1000 approach activation guide. On the G3000, the same decisions exist — load, activate, vectors — but they are laid out as large touch targets on the GTC procedures page instead of a knob-driven list. Fewer keystrokes, more visual confirmation, and the approach chart preview is a tap away. What does not change is the instrument discipline around it: brief the approach before you load it, confirm the correct transition, and verify what the autopilot will do when the needles come alive. The panel changes where your fingers go. It does not change the procedure.
Is the Autopilot Different on the G3000?
Here is the part most pilots find reassuring: both panels in our fleet run the same autopilot, the Garmin GFC 700. Same flight director logic, same mode annunciations, same lateral and vertical modes — HDG, NAV, APR, ALT, VS, FLC, and VNAV behave the way you already know. Approach coupling and the mode-reversion quirks that instrument instructors love to demonstrate are the same system on both machines. The difference is physical: on the G1000 the autopilot mode controller sits between the displays as a row of buttons; on the G3000 it is a dedicated panel, and some status detail moves onto the PFD. If you have read our guide to VNAV on the G1000, every concept in it transfers to the G3000 untouched. This is the deeper pattern of the whole comparison: Garmin kept the automation brain constant across generations and re-skinned the hands-on layer. Learn the GFC 700 once, deeply, and you own it on both panels.
G1000 vs Cirrus G3000: how the two simulators differ
Midtown studio: Opening September 22, 2026 at 35 West 31st Street, Suite 901.
Pilots ask which of our two simulators to train in, and the answer depends entirely on where you are in your flying.
Both are FAA-approved training devices with glass panels, which makes them look interchangeable from the outside. They are not.
The short version: through the first six to ten hours the choice barely matters, because that time is airmanship. At the instrument level it matters a great deal, because most of the training is the avionics workflow itself.
How to choose
- Primary students: the G1000, which flies the Cessna, Piper, Diamond, and Beechcraft trainers most people learn in.
- Instrument students and current instrument pilots: whichever panel is in the airplane you fly.
- Cirrus pilots and jet candidates: the Cirrus G3000, which carries SR20, SR22, and SF50 Vision Jet profiles.
| G1000 | Cirrus SR Delayed to 2027 | |
|---|---|---|
| Aircraft | Cessna 172R / 172S, Cessna 182T / T182T, Piper Archer, and Diamond DA40 | Cirrus SR20 and Cirrus SR22 |
| Avionics | Garmin G1000 NXi | Garmin Perspective Touch+ (G3000 displays, GTC 580 controllers) |
| Panel type | Knobs and soft keys | Touchscreen controllers |
| Autopilot | GFC 700 | GFC 700 |
| Software | Garmin G1000 PC Trainer (manufacturer software) | Cirrus Perspective Touch+ profile on X-Plane 12 |
| FAA status | FAA-approved AATD, loggable with an instructor | FAA-approved AATD, loggable with an instructor |
| Available | Now, in Midtown Manhattan | Delayed to 2027. It will run at the new Midtown studio. |
What you get
Simulator hours that transfer into the airplane instead of into a workflow you will never use again.
What it costs to guess
The wrong choice is rarely wasted at the primary level and expensive at the instrument level.
These are not video games
The G1000 simulator is an FAA-approved Advanced Aviation Training Device (AATD). Flown with an instructor, the time counts toward the instrument rating, instrument currency, the private pilot certificate, and the commercial certificate.
The Cirrus SR simulator will be an FAA-approved Advanced Aviation Training Device (AATD). Flown with an instructor, the time will count toward the instrument rating and instrument currency.
The Vision Jet simulator will be an FAA-approved Advanced Aviation Training Device (AATD). Flown with an instructor, the time will count toward the instrument rating, instrument currency, and type rating preparation.
The VR simulators are recreational. They are not FAA approved, and time in them does not count toward any certificate, rating, or currency, even with an instructor.
What Should You Practice When Moving Between the Two?
Moving up from the G1000 to the G3000 — typically a pilot stepping into a Cirrus with Perspective Touch+ or preparing for the Vision Jet — the work is rebuilding your flows. Your instrument scan survives; your finger memory does not. Spend the first session doing nothing but ordinary tasks: enter a full flight plan, change a frequency, load an approach, amend a route mid-leg. Speed comes back fast, but only if you resist the urge to hunt through menus mid-approach. Moving from the G3000 back to the G1000 happens more often than people expect — Cirrus pilots renting a 172, or instrument students whose checkride airplane carries the older panel. The surprise runs the other way: tasks feel slower, and the knob-and-cursor flight plan editing takes deliberate practice. In both directions the honest answer is the same: fly the new panel on the ground first, in a simulator, where pausing mid-procedure costs nothing and repeating an approach takes two minutes. For instrument pilots keeping legal, our IFR currency sessions run on exactly this equipment.
Frequently Asked Questions
Do G1000 skills transfer to the G3000?
Yes — more than any two competing avionics platforms. The flight plan structure, waypoint logic, direct-to behavior, procedure concepts, and autopilot modes are shared across Garmin's integrated flight decks, so a proficient G1000 pilot already understands what the G3000 is doing. What has to be rebuilt is the physical workflow: where each task lives on the touchscreen controllers, and the habit of confirming inputs on a touch interface. Most pilots describe the transition as days, not weeks. The reverse also holds: G3000 pilots stepping into a G1000 airplane know the concepts cold and just need knob-and-softkey practice. This is why we treat the two simulators as one training system with two interfaces rather than two separate curricula — the instrument flying is the same; the hands are different.
Is the G3000 harder to learn than the G1000?
For a brand-new pilot, the G3000 is usually the easier first panel: touchscreens and menus behave like every device they already own, and the displays stay uncluttered because controls live on the GTC. For a pilot with existing G1000 habits, the G3000 is not harder — it is different, and the difficulty is unlearning finger memory rather than learning concepts. The one place the G1000 is genuinely more forgiving is rough air: physical knobs and keys are easier to operate precisely in turbulence than a touch target, which is why G3000 technique includes using the GTC's knob as the fallback input. Neither panel is a reason to change your training plans. Pick the panel that matches the airplane you will actually fly, and let the simulator absorb the awkward first hours.
Which panel does the Cirrus SR22 use?
Current-production Cirrus SR20 and SR22 aircraft use Cirrus Perspective Touch+, which is built on the Garmin G3000 platform — G3000-family displays driven by GTC touchscreen controllers. Earlier SR-series airplanes carried Cirrus Perspective, built on the G1000 platform, so the answer for a specific airplane depends on its year and panel option. The SF50 Vision Jet is Perspective Touch+ as well, which is exactly why Cirrus pilots treat the SR22 as the natural stepping stone to the jet: the avionics workflow carries over almost wholesale. If you are buying, renting, or transitioning into a specific Cirrus, check which Perspective generation it carries before choosing where to train — the right simulator is the one that matches your panel, not the newest one.
What planes use the Garmin G3000?
The G3000 family lives in high-performance singles and single-pilot jets. Cirrus uses it as the foundation of Perspective Touch+ in the SR20, SR22, and SF50 Vision Jet. Beyond Cirrus, G3000-family flight decks fly in aircraft like the Daher TBM 900-series turboprops, the Piper M600, and light jets including the Cessna Citation M2 and CJ3+ and the HondaJet — which is why airline-bound and owner-flown pilots alike treat GTC touchscreen fluency as a career skill rather than a Cirrus quirk. The G1000, by contrast, is the standard panel of the training fleet: Cessna 172 and 182, Piper Archer and Seminole, Diamond DA40 and DA42, Beechcraft Bonanza and Baron, and turboprops up to the King Air line. That split is exactly how our simulators divide the work — the G1000 covers the training fleet, and the Cirrus simulators cover the Perspective Touch+ world.
Can you log simulator time on both the G1000 and G3000 simulators?
Yes. Both devices are FAA-approved AATDs, and with an instructor present the time is loggable under the same regulations on either machine — toward instrument currency, the instrument rating, and other certificate requirements, subject to the usual FAA limits by certificate and rating. The panel choice does not change what the FAA lets you log; it changes how much of that time transfers as real proficiency to the airplane you fly. An instrument pilot who flies a G1000-equipped Archer gets more from approaches flown on the G1000 device; a Perspective Touch+ SR22 owner gets more from the same approaches flown on the Cirrus G3000 device. The details of what counts toward what are covered in our guide to logging simulator approaches.
SELECT YOUR PATH
NYC / AVIATOR.NYCNEW PILOTS: WHAT'S YOUR GOAL?
LICENSED PILOTS: SELECT TRAINING
FLY AS A HOBBY
Learn safely, step-by-step, and at your own pace.
A private pilot license in NYC typically costs $12,000–$34,000. Most students need 60–80 flight hours to reach checkride proficiency. Simulator training at $215/hr saves over 45% compared to aircraft rental at each stage — and over 60% with a $1,080 training bundle ($180/hr). Pay-as-you-go pricing with no membership fees or upfront commitment.
See the full private pilot license cost breakdown →Yes. You need at least a Third Class FAA Medical Certificate before you can fly solo. Most healthy adults pass without issues — the exam covers basic vision, hearing, and general health. Schedule your exam with an Aviation Medical Examiner (AME) early in training. Important: if you have ever been prescribed medication for anxiety, depression, or ADHD — even as a child — talk to an AME before investing heavily in training to avoid surprises.
How to get your FAA medical certificate for flight training →Yes. Aviator.NYC's FAA-certified Advanced Aviation Training Device (AATD) with Garmin G1000 NXi avionics logs hours that count directly toward your private pilot certificate. Simulator training at $215/hr saves over 45% compared to aircraft rental — and over 60% with a training bundle — with no weather cancellations or maintenance delays. Train on 20+ aircraft configurations from Cessna 172 to Beechcraft Bonanza, all in Lower Manhattan.
FAA-approved flight simulator training in NYC →Most students earn their private pilot license in 4–12 months depending on training frequency. The FAA requires a minimum of 40 flight hours, but most students need 60–80 hours to reach checkride proficiency. A typical path: Weeks 1–2 in the simulator building foundations, Weeks 3–12 flying dual and solo at a local airport, then Months 3–12 completing cross-country flights and checkride prep. You control the pace — train around your work schedule.
Private pilot training timeline and milestones →Start with a 2-hour discovery session ($430) in Aviator.NYC's Manhattan simulator. No experience needed — your airline pilot instructor walks you through takeoff, flight, and landing. After your first session, you'll know if flight training is right for you. From there, a structured path takes you from simulator foundations to your first solo flight at a local airport.
Book your first flight lesson in Manhattan →Part 61 defines requirements for pilot certification. Part 141 defines requirements for school approval. Both use the same commercially available lesson plans and lead to the same FAA certificate. The key difference: under Part 61, every flight you take counts toward your certificate requirements. Under Part 141, off-syllabus flights don't count toward the 141 program. Part 61 dominates in NYC because the off-syllabus flexibility better serves students who train infrequently and want every flight hour to always count. Aviator.NYC operates under Part 61 — by design.
Part 61 vs Part 141 flight training — which is right for you →The FAA Private Pilot Knowledge Test is a 60-question multiple-choice exam covering aerodynamics, weather, navigation, regulations, and flight planning. You need a score of 70% or higher to pass. Most students use online prep courses like Sheppard Air or Sporty's and pass within 2–4 weeks of focused study. Pass the written test early in your training — it builds confidence and lets you focus on flying skills.
Private pilot training steps and written exam prep →Instructor quality matters more than price. Look for instructors with airline or professional experience who teach part-time because they love it — not because they're building hours. Visit 1–2 schools in person. Ask about cancellation rates, aircraft availability, and whether they use FAA-approved simulators to reduce cost. For NYC-area students, the closest GA airports are Republic Airport (KFRG), Morristown Airport (KMMU), Essex County Airport (KCDW), Westchester Airport (KHPN), and Lincoln Park Airport (N07).
Best flight training airports near New York City →FLY AS A CAREER
From first lesson to professional pilot — one clear path.
The career path follows six stages: Private Pilot License → Instrument Rating → Commercial Certificate → Multi-Engine Rating → CFI Certification → Airline Transport Pilot (ATP). Each rating builds on the previous one. You need 1,500 total flight hours for an ATP certificate, which most pilots build by instructing after earning their CFI. The entire pathway from zero experience to airline-eligible typically takes 4–6 years part-time or 18–24 months full-time.
See the complete career pilot roadmap — PPL through ATP →The complete career pathway costs roughly $80,000–$150,000+ spread across multiple ratings: Private Pilot ($12,000–$34,000), Instrument Rating ($9,250–$21,000), Commercial ($15,000–$50,000), Multi-Engine ($6,000–$8,000), and CFI ($3,000–$5,000). You don't pay this all at once — each rating is a separate phase. Simulator training at $215/hr saves over 45% at every stage compared to aircraft time, and over 60% with training bundles. Once you earn your CFI, you earn $30–$60/hour while building the hours you need for airlines.
Full pilot license cost breakdown by rating →With consistent training, 18–24 months is realistic for the accelerated path. Most part-time students take 4–6 years. The bottleneck is building 1,500 total hours for an ATP certificate. After earning your CFI, instructing is the most common way to build hours while getting paid. Regional airlines are currently hiring pilots at 1,500 hours with competitive first-year pay.
Airline Transport Pilot requirements and timeline →The instrument rating is your next step. It teaches you to fly in clouds and low visibility using only your instruments — a requirement for every professional pilot path. The instrument rating requires 40 hours of instrument training (up to 20 hours can be in an FAA-approved simulator) and 50 hours of cross-country PIC time. Most working professionals complete it in 3–6 months.
Instrument rating — step 2 in the career pilot roadmap →Yes, for most career pilots. The CFI (Certified Flight Instructor) certificate lets you earn $30–$60/hour teaching other pilots while building the 1,500 hours you need for airlines. It also deepens your own flying knowledge — teaching forces mastery. Requirements: Commercial Pilot Certificate, Instrument Rating, 250+ total hours, and passing the CFI practical test. The training typically takes 20–30 additional flight hours.
CFI certification — step 5 in the career pilot roadmap →Airlines require a First Class FAA Medical Certificate. This is a more thorough exam than the Third Class medical used for private flying. It includes detailed vision, hearing, cardiovascular, and neurological screening. Most healthy adults pass. Get your First Class medical early — before investing in career training — to catch any potential issues. The exam is done by an Aviation Medical Examiner (AME) and is valid for 12 months.
FAA medical certificate requirements for career pilots →Yes, extensively. The FAA allows up to 20 hours of simulator time toward your instrument rating, up to 50 hours toward your commercial certificate, and up to 25 hours toward your ATP. Simulator training at $215/hr saves over 45% compared to aircraft at the standard rate — and over 60% with training bundles — across every stage of the career path. Aviator.NYC's AATD features the Garmin G1000 NXi and GFC 700 autopilot used in modern training aircraft, so skills transfer directly to the airplane.
How FAA-approved simulator training reduces career pilot costs →The multi-engine rating is required for most airline jobs. There is no FAA minimum flight time required, but most students need 10–15 hours of training. Cost is typically $6,000–$8,000. Training covers VMC demonstrations, single-engine operations, and asymmetric thrust management. Most pilots complete it in 1–2 weeks of intensive training.
Multi-engine rating — step 4 in the career pilot roadmap →YOUTH PROGRAM (AGES 8-17)
Safe, age-appropriate lessons that grow with your child.
Children can start simulator-based flight training at age 8. There are no medical requirements for simulator lessons. Training is structured by age: ages 8–12 focus on basic stick-and-rudder control, instrument scanning, and simple ATC calls in 1-hour sessions. Ages 13–15 progress to traffic patterns, VOR navigation, and checklist discipline in 2-hour sessions. The simulator is a zero-risk environment supervised by professional instructors.
Youth aviation program milestones by age →Under FAA regulations (FAR 61.87), a student pilot can solo a glider at age 14 and a powered airplane at age 16. At age 17, they are eligible for a full Private Pilot Certificate with 40+ hours of training. Starting simulator training at age 8–12 gives your child years of structured skill building before solo eligibility, creating a significant head start over peers who begin at 16.
FAA solo flight age requirements for young pilots →Youth training uses pay-as-you-go pricing designed for younger attention spans. 1-hour sessions at $215, 2-hour sessions at $430. A 6-hour training bundle ($1,080) saves over 30% compared to individual sessions. No membership fees or upfront commitment.
Youth flight training pricing and session options →Ages 8–12: Discovery and foundation — basic controls, instrument scanning, simple radio calls. Ages 13–15: Structured skill building — traffic patterns, navigation, checklist discipline. Age 16: Solo flight eligible (FAR 61.87) — pre-solo maneuvers, emergency procedures, student certificate. Age 17: Private Pilot Certificate eligible (FAR 61.103) — checkride, cross-country flights, instrument basics introduction.
Complete youth aviation age milestones and FAA requirements →Not for simulator training. Children ages 8–15 train exclusively in the FAA-approved simulator and do not need a medical certificate. A medical certificate is only required before solo flight in an actual aircraft, which is not permitted until age 16. When the time comes, most healthy teenagers pass the Third Class medical easily.
FAA medical requirements for student pilots under 18 →Yes. Early training creates a massive head start. A student who begins at age 8 has 8 years of structured skill building before solo eligibility at 16. Hours logged in the FAA-approved AATD simulator count toward future certificate requirements. By age 17, a dedicated student can hold a Private Pilot Certificate while peers are just starting. This is a direct path toward airline or professional aviation careers.
Career pilot roadmap starting from youth training →Instructors are active airline pilots or experienced CFIs who specialize in youth aviation training for ages 8–17. They understand age-appropriate pacing, use patient teaching methods, and make sessions engaging without sacrificing real aviation standards. Parents are welcome to observe every lesson from the instructor station.
Meet our airline pilot flight instructors →The FAA-approved AATD simulator is a zero-risk training environment. No aircraft is involved until your child reaches solo eligibility at age 16+. Children practice stalls, engine failures, and emergency procedures safely and repeatedly. The simulator uses the same Garmin G1000 NXi avionics found in real training aircraft, so skills transfer directly when they transition to flying.
FAA-approved flight simulator for youth training →INSTRUMENT RATING
Everything you need to know about earning your instrument rating:
The FAA requires 50 hours of PIC cross-country time, 40 hours of actual or simulated instrument time (up to 20 hours in an FAA-approved AATD like Aviator.NYC's simulator), and passing both a written knowledge test and a practical checkride. You must already hold a Private Pilot Certificate. The 20 simulator hours alone save over $4,400 compared to logging that time in an airplane.
FAA instrument rating requirements explained (14 CFR 61.65) →Total cost typically ranges from $9,250 to $16,800 depending on pace and how much airplane time you add. The simulator-first approach saves over $4,400 compared to airplane-only training. Dual instruction starts at $215/hr in the simulator — over 45% less than aircraft rental. Training bundles save over 60%. Pay-as-you-go with no upfront commitment.
Instrument rating cost breakdown and simulator savings →Your first lesson starts with a 20-minute briefing covering instrument scan fundamentals and the G1000 NXi layout. Then 90 minutes of hands-on simulator time: straight-and-level flight by instruments only, basic attitude control, and an introduction to the instrument scan pattern. Your instructor is an airline pilot who flies IFR professionally — not someone learning alongside you. No experience with instruments required.
What to expect in your first IFR simulator lesson →Most working professionals complete their instrument rating in 3–6 months training 1–2 sessions per week. The 10-lesson simulator curriculum covers fundamentals through mock checkride. After the simulator phase, you transition to the airplane for cross-country time and real-world IFR experience. Consistent weekly sessions are more effective than sporadic blocks — instrument skills decay fast without regular practice.
Instrument rating training timeline and milestones →A structured 10-lesson progression: Lessons 1–2 build instrument scan and basic attitude flying. Lessons 3–5 introduce VOR navigation, holding patterns, and your first approach. Lessons 6–7 cover precision approaches (ILS, GPS). Lessons 8–9 add STARs, complex arrivals, and lost communications. Lesson 10 is a full mock checkride. Each session: 20-min briefing, 90-min simulator, 10-min debrief.
See the full 10-lesson IFR training plan →After building proficiency in the simulator, you take your instrument skills to the airplane at a local airport. The G1000 NXi in the simulator matches the avionics in common training aircraft (Cessna 172S, Cessna 182T), so the cockpit layout transfers directly. Cross-country flights build the PIC time required for your rating while practicing real ATC communications, weather decision-making, and approach procedures in actual conditions.
IFR simulator-to-airplane transition guide →The instrument rating checkride has two parts: an oral exam (~1.5 hours) covering regulations, weather theory, approach procedures, and decision-making scenarios; and a flight test (~2 hours) where you fly approaches, holds, intercepting and tracking courses, and demonstrate partial panel skills. The DPE will test unusual attitudes and recovery, and at least one missed approach. Lesson 10 in the curriculum is a full mock checkride that mirrors the real exam.
Instrument rating checkride preparation →IFR CURRENCY OPTIONS
Choose your IFR currency training option:
The FAA WINGS (Pilot Proficiency Program) lets you earn safety credit while rebuilding IFR proficiency. Aviator.NYC's LOFT scenarios are structured as WINGS activities — you get IFR currency practice and FAA safety credit simultaneously. Each scenario is a realistic cross-country flight with approaches, holds, and decision-making challenges designed by active airline pilots.
IFR currency through FAA WINGS simulator scenarios →Short, focused simulator sessions built around airports you actually fly to. Practice ILS, RNAV, and LOC approaches at local airports like Teterboro Airport (KTEB), Republic Airport (KFRG), Westchester Airport (KHPN), and Morristown Airport (KMMU). Complete your 6 approaches, holding, and tracking requirements in one or two sessions. No travel to an airport, no weather delays, no Hobbs time running while you brief approaches.
IFR currency approaches at NYC-area airports →Custom sessions built around your experience level, aircraft type, and specific currency needs. If you fly a Bonanza, we configure the G1000 NXi to match. If you need RNAV (GPS) approaches specifically, we build a profile focused on those. Your airline pilot instructor tailors the session to what you actually need — not a one-size-fits-all curriculum.
Custom IFR currency training sessions →Guided IFR currency practice with an airline-experienced CFII. Includes structured approach profiles, real-time feedback on instrument scan and procedures, and FAA WINGS credit. Ideal if you've been out of the IFR system for a while and want professional guidance rebuilding precision. If your currency has lapsed beyond 6 months, you'll need an Instrument Proficiency Check (IPC) — available as part of dual sessions. Dual sessions start at $430 for 2 hours.
Dual IFR currency training with instrument proficiency check →Independent simulator access for current IFR pilots at $190 for 2 hours. No checkout required — if you're familiar with G1000 NXi operations and know how to log approaches for currency, you can practice the required 6 approaches, holding, and tracking on your own. Solo practice saves roughly 75% compared to aircraft rental time. Available in bulk bundles for even greater savings.
Solo IFR currency simulator practice →