Takeoff and Climb to Downwind
Learn to perform a standard takeoff and climb to the downwind leg of the traffic pattern. This exercise combines power management, directional control, and climb performance into the first phase of every pattern flight.
Lesson Objectives
- Perform a standard takeoff with proper directional control and rotation technique
- Climb to pattern altitude on the upwind and crosswind legs
- Turn onto the downwind leg at the correct altitude and distance from the runway
- Maintain appropriate power settings and airspeeds during each phase
The standard takeoff is the foundation of every flight. In this lesson you will learn the forces acting on the aircraft during takeoff, factors that affect takeoff performance, and the correct procedure to climb from the runway to the downwind leg of the traffic pattern.
Understanding takeoff performance is essential for safe flight operations. You must always consider the conditions on the day — wind, temperature, weight, and runway surface — and assess whether the takeoff can be accomplished safely within the available distance.
Simulator Practice
At Aviator.NYC, you will practice standard takeoffs on the AATD simulator under varying conditions — different winds, temperatures, and weight configurations. The simulator allows you to safely explore the boundaries of takeoff performance before encountering them in the aircraft.
Background Briefing Topics
- Forces During Takeoff
- Takeoff Distance vs Takeoff Run
- Factors Affecting Takeoff Distance
- Pre-Takeoff Checks
- Effect of Power During Takeoff
- Use of Rudder and Elevator During Takeoff
- Checks During Takeoff
- ATC and Radio Procedures
Read the full Background Briefing →
Flight Exercise Topics
- Purpose
- Standard Takeoff Procedure
- Climb to Downwind
Forces During Takeoff
During the takeoff roll, the engine produces thrust which must overcome the aircraft's inertia and rolling friction. As the aircraft accelerates along the runway, airspeed increases and the wings begin generating lift. When the lift produced equals or exceeds the weight of the aircraft, the aircraft is ready to fly.
The sequence is straightforward: thrust overcomes inertia, the aircraft accelerates, and when sufficient airspeed is achieved, back pressure on the control column rotates the aircraft to a climbing attitude. The aircraft lifts off when enough lift is being generated to support its weight.
Key Concept
The takeoff is not a sudden event — it is a transition. The wings are generating increasing lift throughout the takeoff roll. Rotation simply changes the angle of attack to the point where lift exceeds weight.
Takeoff Distance vs Takeoff Run
It is important to understand the difference between these two performance figures, both of which are published in the Pilot's Operating Handbook (POH):
- Takeoff Run (Ground Roll)
- The distance from the start of the takeoff roll to the point at which the aircraft becomes airborne. This is the runway length consumed on the ground.
- Takeoff Distance
- The total distance from the start of the takeoff roll to the point at which the aircraft clears a 50-foot obstacle. This includes both the ground roll and the initial climb segment.
When assessing whether a runway is long enough, always use the takeoff distance figure — not just the ground roll — and apply appropriate safety factors. A common rule of thumb is to ensure you have at least 1.5 times the calculated takeoff distance available.
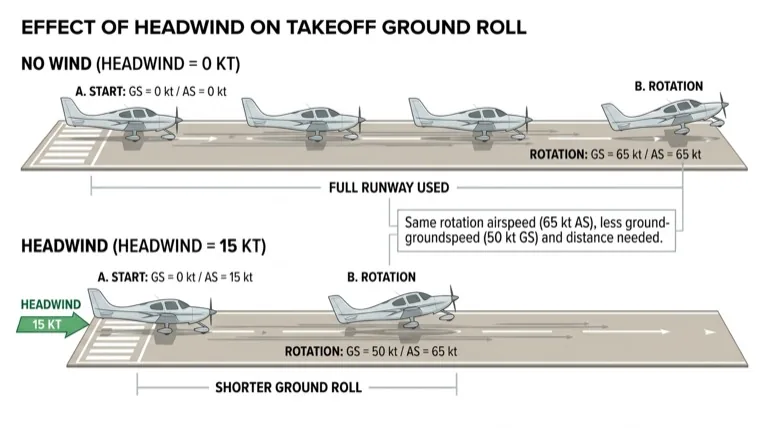
Factors Affecting Takeoff Distance
Several factors increase or decrease the distance required for takeoff. You must assess these conditions before every flight:
| Factor | Effect on Takeoff Distance |
|---|---|
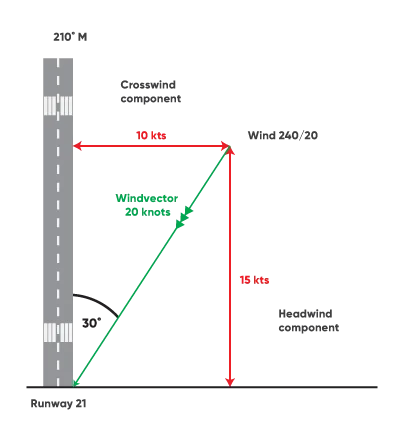
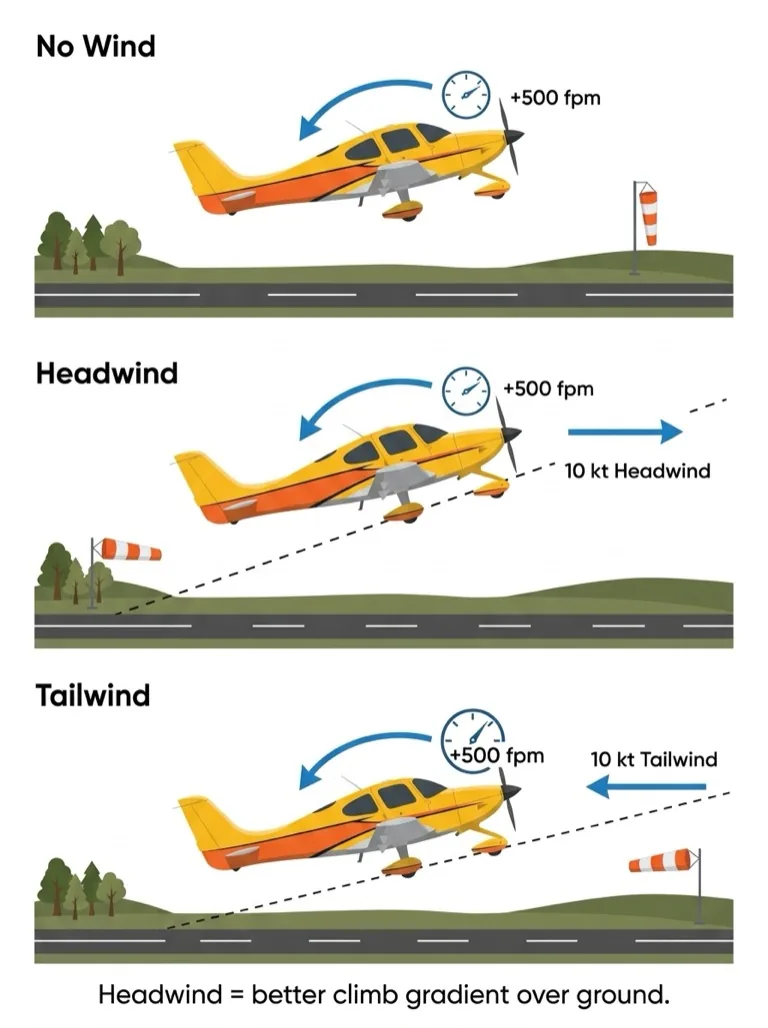
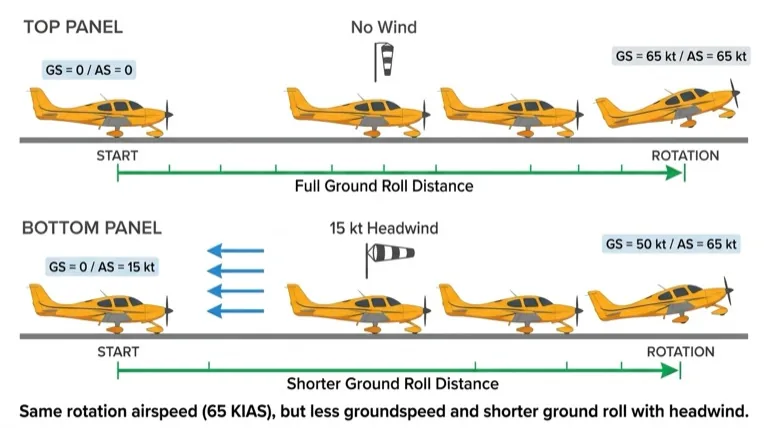
| Headwind | Shortens takeoff distance — the aircraft achieves flying speed sooner |
| Tailwind | Lengthens takeoff distance — more ground speed required to achieve flying speed |
| High temperature | Lengthens — reduced air density means less lift and less engine power |
| High density altitude | Lengthens — same effect as high temperature (thinner air) |
| Heavy weight | Lengthens — more lift required, longer acceleration time |
| Grass surface | Lengthens — more rolling friction than paved runway |
| Uphill slope | Lengthens — a component of gravity opposes acceleration |
| Downhill slope | Shortens — gravity assists acceleration |
| Flap setting (initial) | Shortens ground roll — more lift at lower speed. May increase total distance due to drag. |
Important
On a hot day, at a high-elevation airport, with a heavy aircraft on a grass strip and a tailwind — all factors work against you simultaneously. Always calculate takeoff performance using the POH charts for the actual conditions.
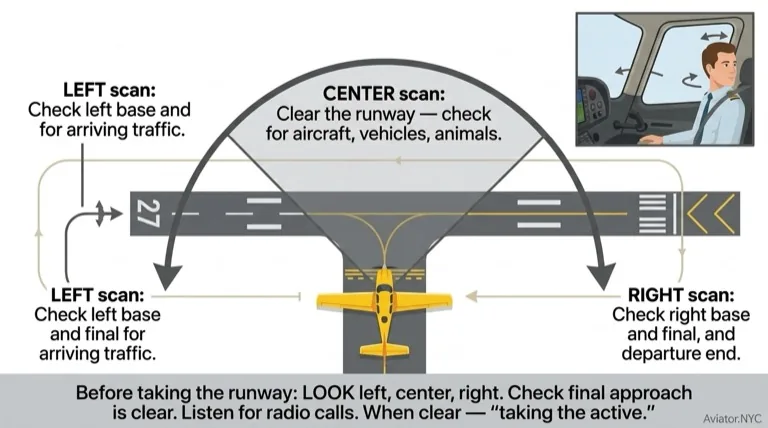
Pre-Takeoff Checks
Before taking the runway, complete the pre-takeoff (run-up) checks in accordance with the POH checklist. These checks verify that the engine and systems are operating correctly:
- Engine run-up: Set power to the specified RPM (typically 1700-1800 RPM for Cessna 172) and check for smooth operation.
- Magneto check: Select each magneto individually (LEFT, then RIGHT, then BOTH). Maximum allowable RPM drop is specified in the POH (typically 125 RPM per magneto, 50 RPM differential between magnetos).
- Carburetor heat check: Apply full carburetor heat and verify a drop in RPM (indicates the system is functioning). Return to cold.
- Flight controls: Free and correct — full deflection in all axes, verify correct movement.
- Instruments: Set altimeter to field elevation or current barometric pressure. Heading indicator aligned with compass. Attitude indicator erect.
- Briefing: Brief the takeoff procedure, departure direction, and emergency plan (what you will do if the engine fails on takeoff).
Pre-Takeoff Briefing
Before every takeoff, verbally brief your plan for an engine failure. At minimum: "If the engine fails below 500 feet AGL, I will land straight ahead. Above 500 feet, I will consider a modified pattern to return." This decision must be made on the ground, not in the air.
Effect of Power During Takeoff
When full power is applied for takeoff, several yawing and rolling tendencies appear. These are collectively known as left-turning tendencies (for aircraft with a clockwise-rotating propeller as seen from the cockpit):
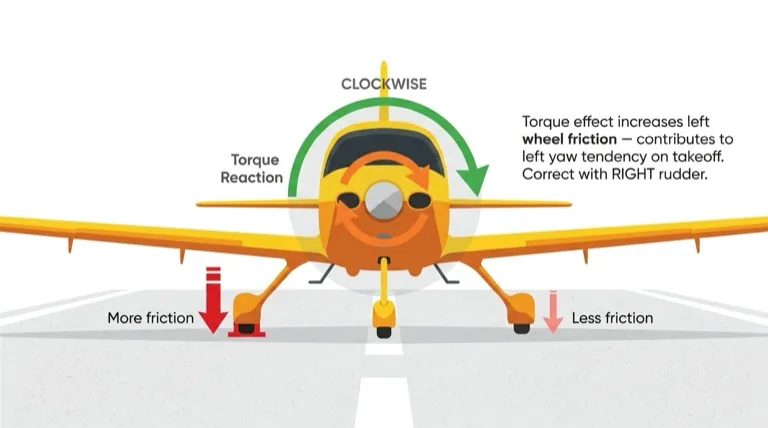
- Torque Reaction
- Newton's third law — the engine turns the propeller clockwise, so the aircraft tends to roll left (counterclockwise). This is most noticeable at high power and low airspeed.
- P-Factor (Asymmetric Thrust)
- At high angles of attack, the descending blade (right side) produces more thrust than the ascending blade (left side), creating a yaw to the left.
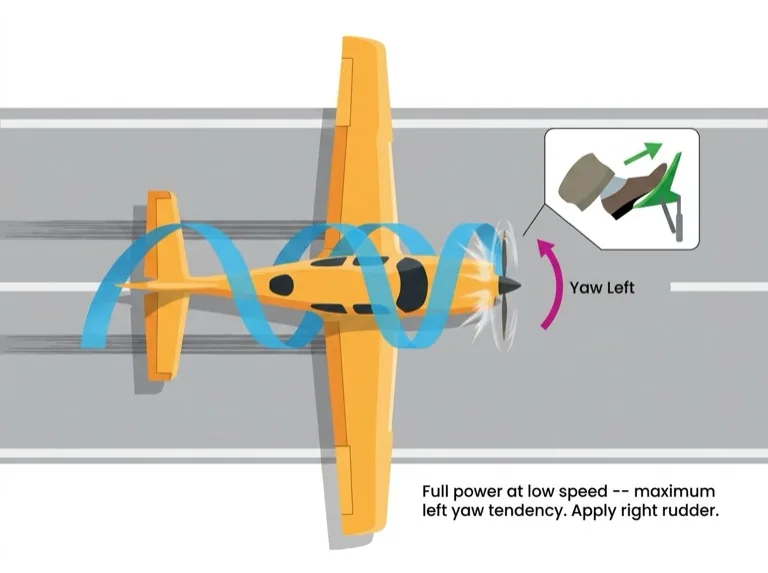
- Spiraling Slipstream
- The propeller slipstream spirals around the fuselage and strikes the left side of the vertical stabilizer, pushing the tail right and yawing the nose left.
- Gyroscopic Precession
- When a force is applied to the spinning propeller disc (such as raising or lowering the nose), the resulting movement is felt 90 degrees ahead in the direction of rotation. During rotation (pitching up), this creates a left yaw.
Practical Point
You will need right rudder during the takeoff roll and initial climb to counteract these left-turning tendencies. The amount of rudder required decreases as airspeed increases and power is reduced.
Use of Rudder and Elevator During Takeoff
Rudder
The rudder is used throughout the takeoff roll to maintain the aircraft on the runway centerline. Apply right rudder to counteract left-turning tendencies. The amount required will vary with power setting, airspeed, and crosswind component. Smooth, progressive inputs are essential — avoid abrupt corrections.
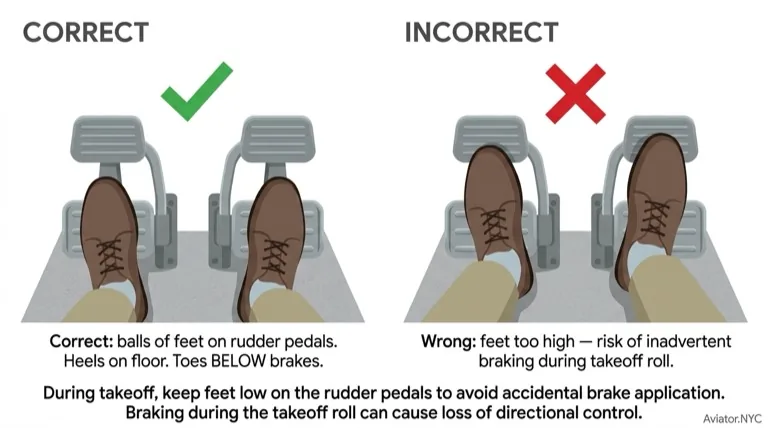
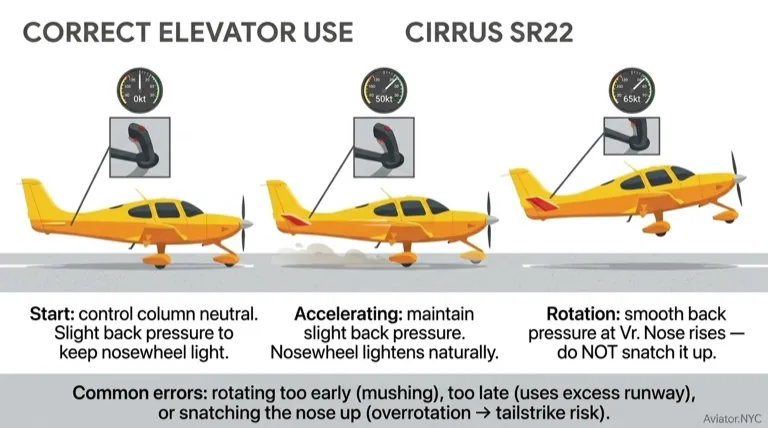
Elevator
During the initial takeoff roll, the elevator position depends on the aircraft type and conditions. For most nosewheel aircraft in calm conditions, maintain a neutral or slightly aft elevator position. As the aircraft accelerates toward rotation speed (VR), apply gentle back pressure to raise the nosewheel and rotate to the climb attitude.
Do Not Force the Aircraft Off the Ground
Rotating too early — before adequate airspeed — results in a high angle of attack, high drag, and poor climb performance. Allow the aircraft to accelerate to VR before rotating. The aircraft will fly when it is ready.
Checks During Takeoff
During the takeoff roll, monitor the following:
- Engine instruments in the green: Oil pressure, oil temperature, and other engine gauges should indicate normal. If not — abort the takeoff.
- Airspeed alive: The airspeed indicator should show increasing airspeed early in the takeoff roll. If the airspeed is not increasing — abort the takeoff (possible pitot blockage or instrument failure).
- Directional control: The aircraft should track the centerline. If directional control is lost — abort the takeoff.
ATC and Radio Procedures
At a controlled airport, you must receive a takeoff clearance before entering the runway. The typical sequence:
- Complete run-up checks at the hold-short line.
- When ready, advise the tower: "[Airport] Tower, [Callsign], ready for departure runway [number]."
- Receive takeoff clearance: "[Callsign], runway [number], cleared for takeoff."
- Read back the clearance and taxi onto the runway.
- After departure, contact the departure frequency if instructed, or remain on tower frequency for pattern work.
At an uncontrolled airport, announce your intentions on the CTAF (Common Traffic Advisory Frequency) before taxiing onto the runway and again when departing.
Purpose
To perform a standard takeoff and climb to the downwind leg of the traffic pattern, demonstrating correct power application, directional control, rotation technique, and climb performance management.
Standard Takeoff Procedure
Lineup
- Taxi onto the runway and align the aircraft with the centerline.
- Verify the heading indicator matches the runway heading.
- Check that the runway is clear in both directions.
- Ensure the nosewheel is straight and feet are off the brakes.
Power Application
- Apply full power smoothly — advance the throttle steadily over 2-3 seconds. Do not jam the throttle forward.
- As power increases, apply right rudder to counteract left-turning tendencies.
- Verify engine instruments in the green and airspeed alive.
Takeoff Roll and Rotation
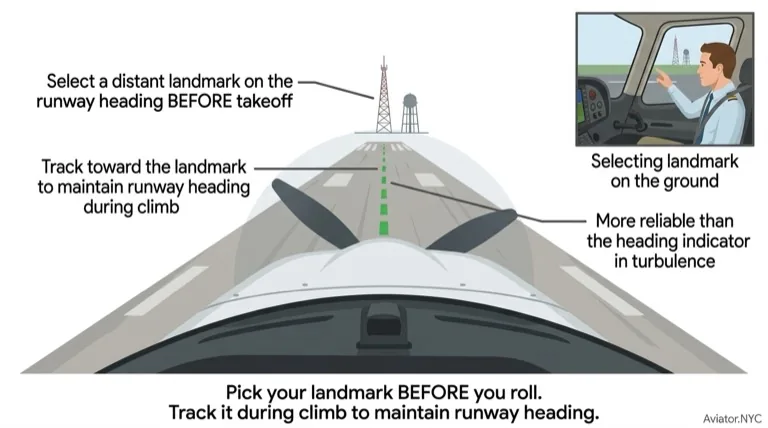
- Maintain the runway centerline with rudder throughout the roll.
- Keep wings level with aileron as required (especially in crosswind).
- At VR (rotation speed — typically 55-60 knots in a Cessna 172), apply gentle back pressure to rotate to the climb attitude.
- Allow the aircraft to lift off and establish a positive rate of climb.
Initial Climb
- Establish and maintain VY (best rate of climb speed — typically 74 knots in a Cessna 172).
- Retract flaps on schedule if any were used for takeoff (typically above 200 feet AGL).
- Maintain wings level and track the extended runway centerline.
- Continue right rudder as needed for coordinated flight.
Simulator Practice
In the Aviator.NYC AATD simulator, practice the takeoff sequence repeatedly to build the muscle memory for smooth power application, rudder coordination, and rotation timing. Pay particular attention to airspeed control during the initial climb.
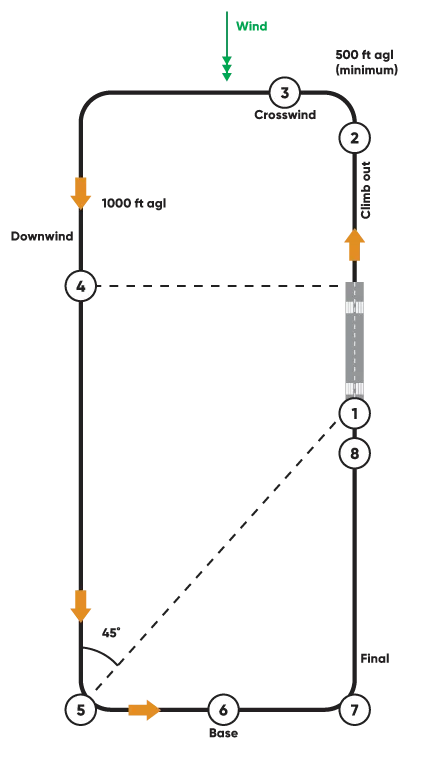
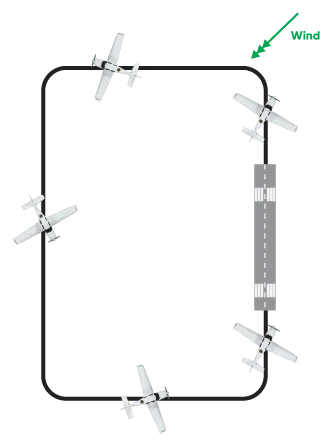
Climb to Downwind
Crosswind Turn
- Continue climbing at VY on the runway heading until approximately 300 feet below pattern altitude (or as specified by local procedures).
- At the appropriate point, make a 90-degree turn in the direction of the traffic pattern (typically left turn).
- Maintain VY during the turn. Use coordinated aileron and rudder — ball centered.
- Roll wings level on the crosswind heading.
Turn to Downwind
- Continue climbing on the crosswind leg.
- At the appropriate distance from the runway (typically 0.5-1 mile), turn 90 degrees to the downwind heading (parallel to and opposite the runway direction).
- Level off at pattern altitude (typically 1,000 feet AGL).
Establishing Downwind
- As you level off, reduce power to cruise setting (approximately 2,300 RPM for a Cessna 172 in the pattern).
- Allow the aircraft to accelerate to pattern speed.
- Trim for level flight.
- Maintain pattern altitude and track parallel to the runway at the appropriate lateral distance.
Altitude and Airspeed
The transition from climb to level flight requires prompt power reduction and re-trimming. If you leave climb power set while leveling off, the aircraft will accelerate beyond pattern speed. Anticipate the level-off and begin reducing power as you approach pattern altitude.
Key Takeaways
The Standard Takeoff Is the Foundation
Every flight begins with a takeoff. The standard takeoff procedure — smooth power application, centerline tracking, rotation at VR, and climb at VY — must become second nature. It is the foundation upon which all pattern flying is built.
Performance Factors Must Always Be Considered
| Factor | Effect |
|---|---|
| Headwind | Shortens takeoff distance |
| Tailwind | Lengthens takeoff distance |
| High temperature / density altitude | Lengthens takeoff distance |
| Heavy weight | Lengthens takeoff distance |
| Grass / soft surface | Lengthens takeoff distance |
| Uphill slope | Lengthens takeoff distance |
Standard Takeoff Sequence
- Line up on centerline — verify heading.
- Full power smoothly — right rudder — check instruments and airspeed alive.
- Maintain centerline with rudder.
- Rotate at VR — climb at VY.
- Retract flaps on schedule.
- Crosswind turn — continue climbing.
- Turn to downwind — level off at pattern altitude.
- Reduce power — trim for level flight.
Critical Points to Remember
- Never force the aircraft off the ground — allow it to accelerate to VR before rotating.
- Right rudder is essential — left-turning tendencies are strongest at high power and low airspeed.
- Airspeed alive is a go/no-go check — if the airspeed is not increasing early in the roll, abort.
- Always brief your emergency plan — decide what you will do if the engine fails before you start the takeoff.
- Level off promptly at pattern altitude — anticipate and reduce power to avoid go-arounding.
What's Next
In the next lesson — Pattern Emergencies — you will learn how to handle engine failures and other emergencies that may occur during the takeoff and pattern phases of flight. This includes the critical decision of what to do if the engine fails immediately after takeoff.
Simulator Tip
Schedule an AATD session at Aviator.NYC to practice multiple takeoffs in quick succession. The simulator allows you to repeat the sequence far more efficiently than in the aircraft, building consistency and confidence in your takeoff technique.
Coming Up Next: Lesson 12 — Pattern and Landing Emergencies
Learn to recognize and respond to engine failures and other emergencies during the most critical phases of flight — takeoff, pattern, and landing. Pre-planned decision-making is the key to surviving...
Preflight Discussion
Aviator.NYC Lesson Plan
Briefing Topics
- Hudson River Exclusion and Skyline Route rules
- Reporting points and altitude ranges
- CTAF 123.05 procedures
Simulator Session
- Route Planning — Caldwell Airport (KCDW) or KMMU to Hudson River Corridor
- Radio Practice — CTAF calls at each reporting point
- Altitude Control — maintaining corridor limits
- Situational Awareness — traffic scan and G1000 overlay
- Optional Diversion — Hudson River Exclusion to Skyline Route
Debrief
Review corridor procedures and build confidence in congested airspace.
Pilot Preparation
- Download the Hudson River Corridor chart
- Review all reporting points and their altitudes
Skill Items
| Skill | D P 1 2 3 4 5 6 |
|---|---|
| Preflight Inspection | |
| Engine Starting | |
| Taxi & Before Takeoff Check | |
| Radio Communications | |
| Normal Takeoff & Departure | |
| General Handling | |
| Traffic Pattern Entry | |
| Altitude Speed Config & Trim | |
| Approach Planning & Altimeter Setting | |
| Normal/ Crosswind Landing | |
| Side Slip Technique | |
| After Landing Parking and Securing |
Radio Communication Scenarios
Practice VFR radio calls for this lesson. Listen to the scenario, then formulate your response before revealing the full exchange.
You are in N106ST and have just landed on Runway 25 Left at Daytona Beach International. You've taxied off the runway, passed the hold short lines, and completed your after-landing checklist. You want to taxi to the Embry-Riddle ramp, but you are unfamiliar with the airport. Contact Ground and request a progressive taxi.
Request a progressive taxi. This means you're asking the controller to guide you step-by-step. Include: "Ground," callsign, runway you just exited, destination (Embry-Riddle ramp), and "request progressive taxi — unfamiliar."
- You (Pilot)"Daytona Ground, november-one-zero-six-sierra-tango, clear of runway two-five Left, request progressive taxi to the Embry-Riddle ramp. Unfamiliar."
- Daytona Ground"november-one-zero-six-sierra-tango, Daytona Ground, progressive taxi. Turn left on taxiway Bravo."
- You (Pilot)"Left on Bravo, six-sierra-tango."
- Daytona Ground"six-sierra-tango, cross runway two-five Right, Embry-Riddle ramp third right."
- You (Pilot)"Cross two-five Right, Embry-Riddle ramp third right, six-sierra-tango."
You are in N106ST and have just landed on Mansfield Lahm Municipal's Runway 14. You've taxied off the runway, passed the hold short lines, completed your after-landing checklist, and are ready to contact Ground Control. The tower advised you to use 121.8. You want a taxi to the General Aviation ramp for fuel.
Contact Ground on the assigned frequency. Include: "Ground," callsign, that you're clear of the runway, and your destination on the field.
- You (Pilot)"Mansfield Ground, november-one-zero-six-sierra-tango, clear of runway one-four, request taxi to the general aviation ramp."
- Mansfield Ground"november-one-zero-six-sierra-tango, Mansfield Ground, taxi to the general aviation ramp via Alpha."
- You (Pilot)"General aviation ramp via Alpha, six-sierra-tango."
These lesson plans are provided as supplementary training guidance only. They do not supersede FAA publications, aircraft manufacturer documentation, or your instructor's direction. Always refer to the FAA Instrument Flying Handbook, Airplane Flying Handbook, AIM, and applicable POH/AFM as the official sources.