Taxiing
Learn to maneuver the aircraft safely on the ground — including checks, procedures, rights of way, ATC procedures, signals, and emergency procedures for steering or brake failure.
Lesson Objectives
- Taxi the aircraft safely with proper nosewheel steering and differential braking
- Perform pre-taxi and run-up checks using the appropriate checklist
- Communicate with ATC for taxi instructions and read back clearances
- Respond correctly to steering or brake failure during ground operations
In this exercise you will learn how to maneuver the aircraft safely on the ground. You will also learn the checks and procedures carried out while taxiing, along with the basic rights of way, Air Traffic Control (ATC) procedures, and signals.
You should also understand the emergency procedures used in the event of steering or brake failure. This exercise is taught in conjunction with flight exercises at the beginning and end of each flight.
Simulator Practice
At Aviator.NYC, our AATD simulator allows you to practice taxi procedures and nosewheel steering in a safe environment before your first time in an actual aircraft.
Background Briefing Topics
- Pre-Taxi Checks
- Effects of Inertia
- Engine Handling
- Control of Direction
- Parking Area Procedures and Taxiing in Confined Spaces
- Effect of Wind and Use of the Flight Controls
- Effects of Ground Surface
- Apron and Maneuvering Area Markings
- Marshaling Signals
- ATC Light Signals
- Rights of Way on the Ground
- Rudder Check
- Instrument Checks
Read the full Background Briefing →
Flight Exercise Topics
- Purpose
- Airmanship
- Moving Off
- Control of Direction on the Ground
- Use of Differential Braking
- Stopping
Pre-Taxi Checks
The pre-taxi checks are normally completed using the aircraft's checklist. Depending on airport procedures, it may be necessary to obtain ATC clearance by radio before starting to taxi.

Before Taxiing
Take a thorough look around before starting to taxi, in case your path has become obstructed since your pre-flight check. If in any doubt, shut down the engine and check for yourself.
Effects of Inertia
You will notice that increased power is needed to get the aircraft moving, particularly on a grass surface. Much less power is needed once the aircraft is rolling.
When taxiing, be aware that changes in speed or direction must be anticipated — the aircraft's inertia makes it want to continue in the original direction at the original speed.
Engine Handling
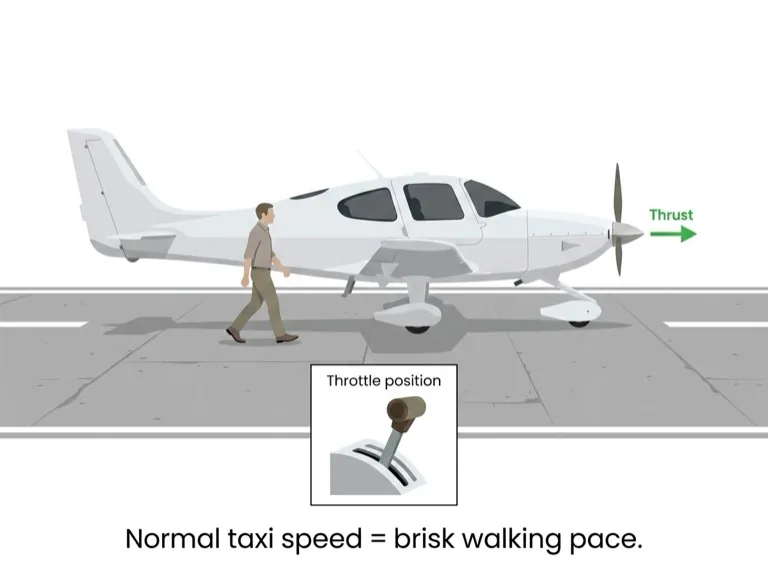
The throttle is the primary means of controlling speed while taxiing. Key points:
- Set the throttle friction loose when taxiing for smooth adjustments.
- When slowing or stopping, close the throttle first, then apply brakes.
- Keep carburetor heat at cold when taxiing — the hot air inlet is unfiltered and can ingest debris, grass, and dust.
- Monitor engine temperatures carefully, especially in hot weather. Most light aircraft engines are air-cooled and rely on airflow to stay at the correct operating temperature.
- Do not idle on a fully closed throttle — this causes spark plug fouling. Use the RPM setting specified in the checklist.
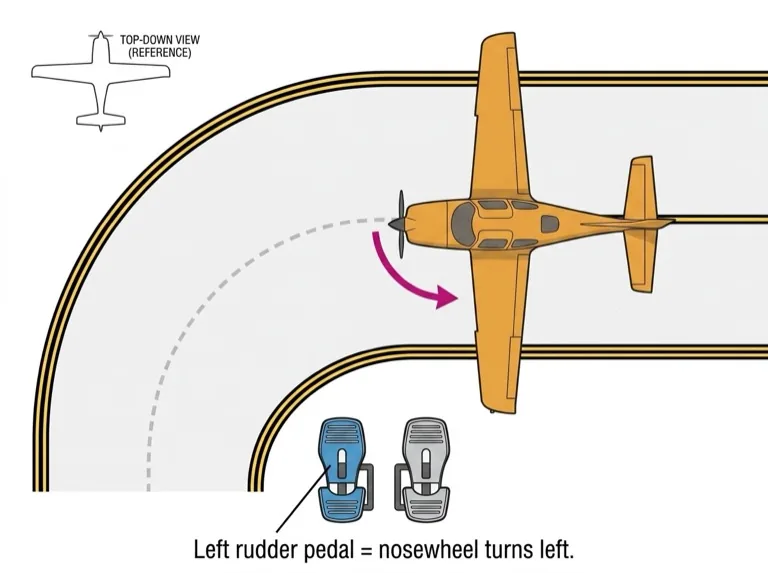
Control of Direction
Most light aircraft have a nosewheel linked to the rudder pedals (directly or via springs). A nosewheel aircraft has its center of gravity ahead of the main wheels, making it directionally stable while taxiing.
To turn, apply and maintain rudder pedal pressure in the direction of the turn. When pressure is released, the aircraft straightens out.
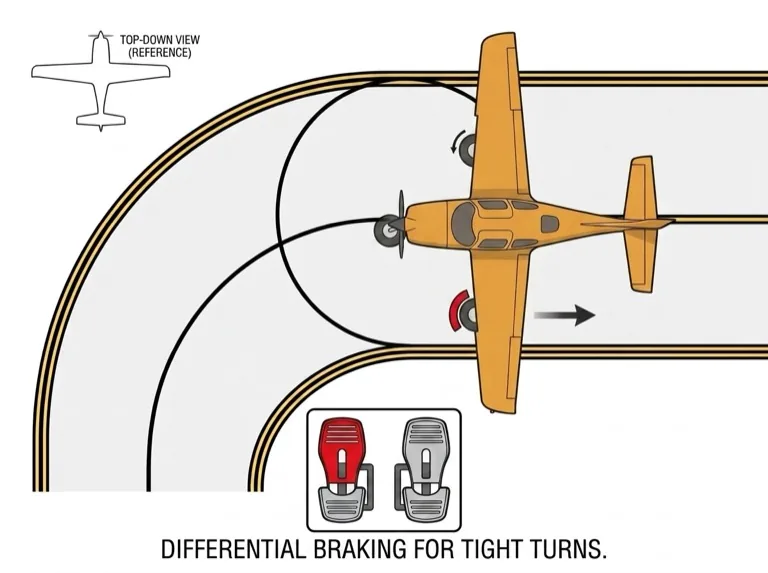
Differential Braking
Where fitted (most aircraft), differential braking can assist turns by applying the brake on one side only. This gives a tighter turning radius than nosewheel steering alone.
Toe Brakes
On aircraft with toe brakes, the lower half of the rudder pedals controls steering (and nosewheel on most types). The upper half (toe portion) controls braking.
Some nosewheel aircraft have a free-castering nosewheel with no linkage to the rudder pedals. These aircraft rely on rudder effect and much more differential braking for directional control, especially in crosswinds.
Parking Area Procedures and Taxiing in Confined Spaces
Take great care when taxiing near other aircraft with engines running:

- Even a light aircraft's propeller slipstream can damage the controls of another aircraft behind it.
- Jet blast from an airliner can reach 80 mph up to 120 feet behind it.
- Consider your wingspan and tail length — a small direction change can cause large wing-tip and tail movements.
Taxi Safety Rules
- Taxi slowly; avoid riding the brakes continuously (causes overheating and fade).
- Never use power against the brakes while taxiing.
- Never turn around a locked wheel — this causes serious tire damage.
- If in doubt about clearance, ask for assistance or shut down and check.
Effect of Wind and Use of the Flight Controls
Light winds have little effect on taxiing. In stronger winds, directional control becomes more challenging:
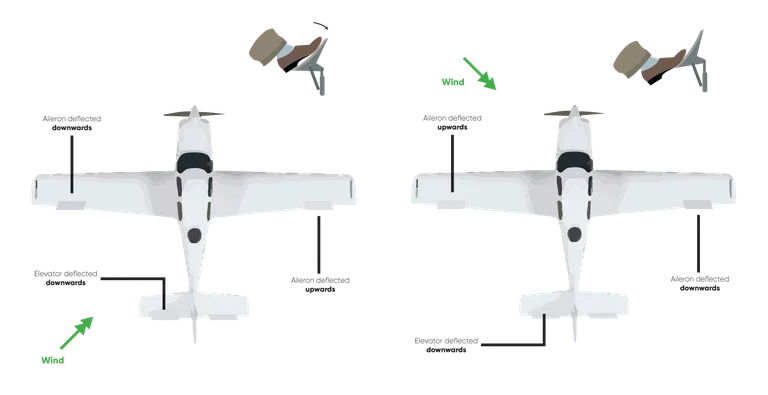
- A crosswind causes the aircraft to weathercock — the wind striking the fin pivots the aircraft into the wind.
- Use rudder pedals and differential braking to counter the weathercock tendency.
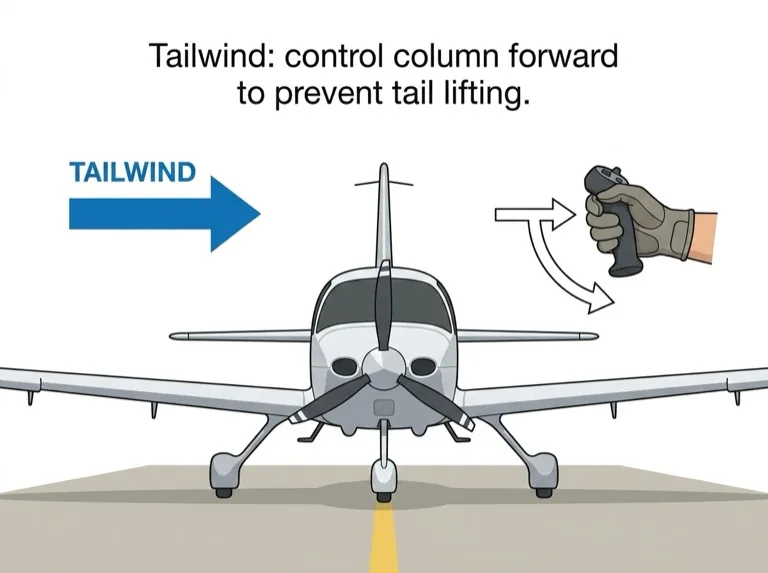
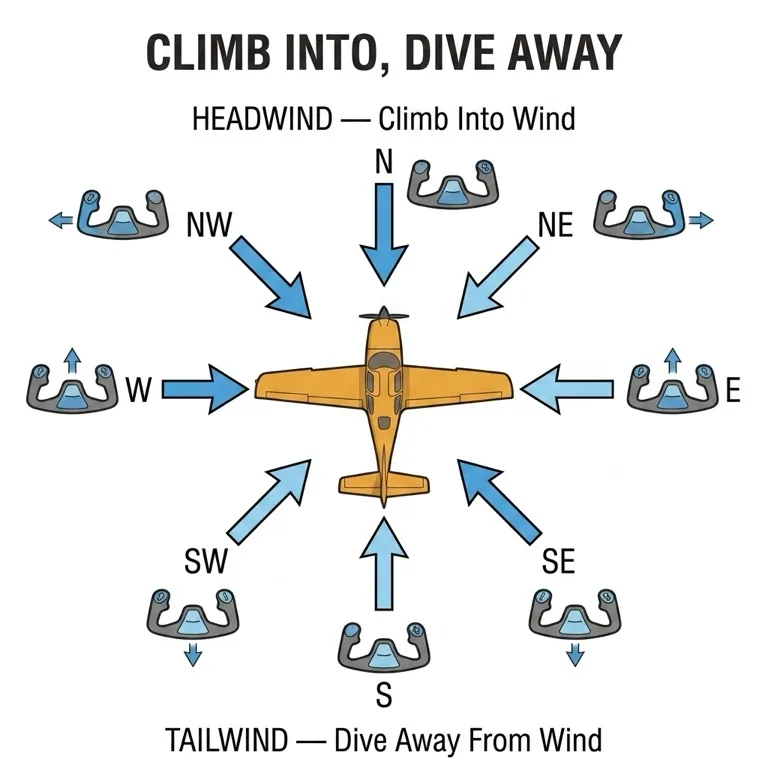
Control Column Positions in Wind
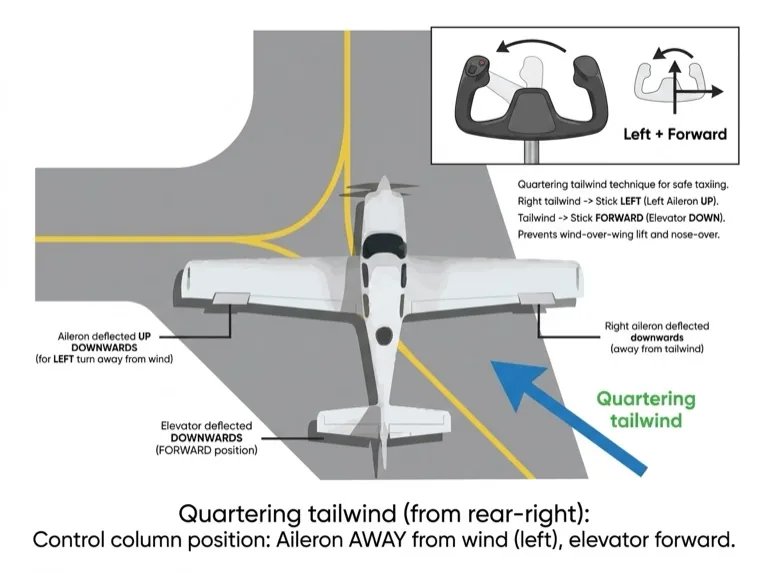
Correct positioning of the flight controls relative to wind direction prevents the wind from lifting the upwind wing. This is especially important with a quartering tailwind.
Wind Rules for Taxiing
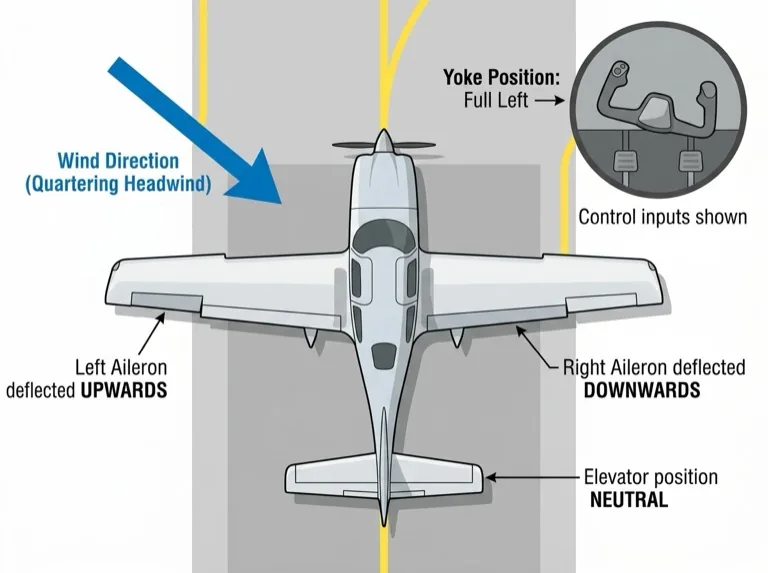
- Headwind or quartering headwind: Stick back and into the wind (ailerons into wind, elevator up).
- Tailwind or quartering tailwind: Stick forward and away from the wind (ailerons away from wind, elevator down).
- In strong winds, reduce taxi speed and turn slowly.
- Exercise extreme caution if wind speed exceeds half the aircraft's stalling speed.
Practice using the recommended control positions even in light winds — it builds good habits and helps you appreciate wind direction, which is important during takeoff.
Effects of Ground Surface
Slope and surface type significantly affect taxiing:
- Downslope: Less power needed; anticipate increased speed.
- Upslope: More power required.
- Hard surfaces: Less power needed than grass.
- Grass: Avoid long grass (may hide obstructions). Avoid gravel or loose stones — they can damage the propeller and airframe.
Surface Transitions
When crossing from one surface type to another (e.g., concrete to grass), cross at approximately a 45-degree angle, as slowly as possible, using minimum power. This minimizes stress on the landing gear and prevents the nose from pitching with a risk of propeller ground strike.
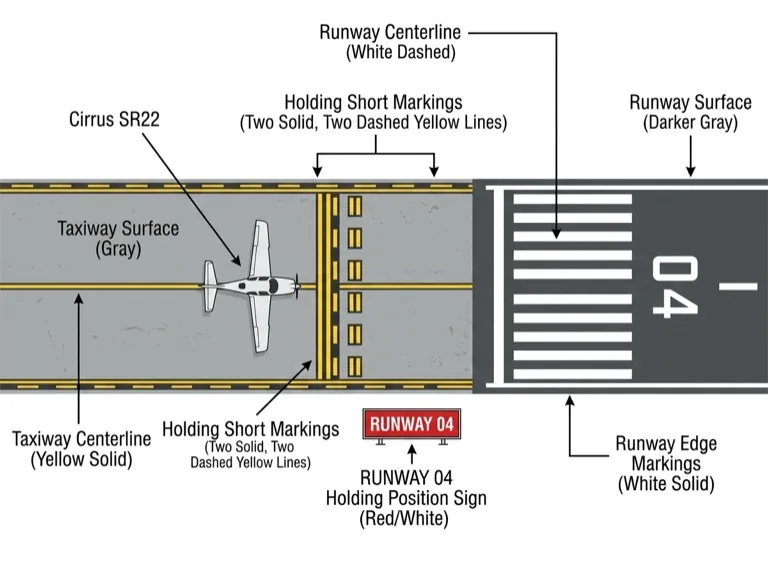
Apron and Maneuvering Area Markings
Common airport ground markings you should recognize:
| Marking | Meaning |
|---|---|
| Orange/white marker boards or flags | Boundary of an area unsafe for taxiing |
| Two or more white crosses | Disused taxiway or runway |
| Holding point marker board (e.g., "A 05/23") | Hold position for the designated runway |
| Single or double yellow lines across taxiway | Runway holding position markings |
Marshaling Signals
You may receive marshaling signals, usually when parking at the end of a flight. Common signals include:
| Signal | Meaning |
|---|---|
| Arms raised, palms forward | This bay / Come ahead |
| Right arm sweeping forward | Turn left |
| Left arm sweeping forward | Turn right |
| Arms crossed overhead | Stop |
| Right hand drawn across throat | Stop engine(s) |
| Arms down, palms forward | Marshaling finished |
Pilot Responsibility
Marshaling signals are for guidance only. The pilot in command is responsible for the safety of the aircraft and must decide whether it is safe to comply with the marshaller's directions.
ATC Light Signals
Light signals are used primarily during radio failure. The principal signals to an aircraft on the ground:
| Light Signal | Meaning (Aircraft on Ground) |
|---|---|
| Steady Red | Stop |
| Green Flashes | Authorized to taxi at pilot's discretion |
| White Flashes | Return to starting point on the airport |
Rights of Way on the Ground
Regardless of these rules and any ATC instructions, it is ultimately the pilot's responsibility to avoid collisions.
Priority Order
- Aircraft landing and taking off
- Aircraft being towed
- Aircraft taxiing
- Vehicles and pedestrians
Converging Traffic Rules
| Situation | Action |
|---|---|
| Head-on approach | Each aircraft alters course to the right |
| Converging at an angle | Aircraft on the right has right of way ("on the right, in the right") |
| Overtaking | Overtaking aircraft alters course to the left |
Rudder Check
On aircraft where the rudder pedals are directly linked to the nosewheel, a rudder check cannot be done while stationary. Instead, perform it while taxiing:
- Ensure the area is clear of other aircraft and obstructions.
- Tax slowly.
- Apply full rudder deflection in each direction.
- Do not use differential braking during the rudder check.
Instrument Checks
During taxi turns, four flight instruments can be checked. Your instructor will demonstrate how to verify:
- Turn indicator (or turn coordinator), including the balance ball
- Attitude indicator (artificial horizon)
- Heading indicator (directional gyro)
- Magnetic compass
These checks are normally done during routine taxi turns — each instrument is verified in both a left-hand and right-hand turn.
Simulator Practice
On the Aviator.NYC G1000 NXi simulator, you can practice reading these instruments during simulated taxi turns. The G1000's integrated HSI and PFD make instrument cross-checks intuitive once you understand what to look for.
Taxiing Emergencies
Although rare, there are three types of emergencies to be prepared for:
Steering Failure
In the event of a steering failure, you should still have some directional control through the rudder and differential braking (where available). Stop the aircraft and request assistance.
Brake Failure
If brakes fail — there will usually have been warning signs beforehand — take these steps:
- Steer clear of obstructions.
- Close the throttle immediately.
- Look for an open area where the aircraft can come to a halt.
- If a collision cannot be avoided, shut down fuel, engine, and electrical systems. Steer to lessen impact force — avoid a head-on collision with a solid obstruction.
Emergency Stop
Close the throttle and apply brakes evenly — hard enough to stop without locking the main wheels. Factors that increase braking distance:
- High taxi speed
- Strong tailwind
- Slippery surfaces (wet grass, slush, ice)
- Downhill slope
- Standing water
Purpose
Learn to maneuver the aircraft safely on the ground.
Airmanship
Lookout
Before moving off, always check that the aircraft can maneuver safely. Maintain a good lookout while taxiing — especially near runways, active or not. Always visually check before crossing or entering a runway, even after receiving ATC clearance. Always look before changing direction.
ATC Liaison
At an airport with an Air Traffic Service Unit (ATSU), obtain taxi instructions before beginning to taxi. Have an airport diagram available for reference and do not hesitate to ask for help if you are unsure of an instruction or clearance.
Brake Check
Check the brakes within the first few feet of taxiing. The brakes should also be checked before entering a parking area or confined space.
Moving Off
- Lookout — scan the area before moving.
- Close the throttle and release the parking brake.
- Increase power gradually until the aircraft moves forward.
- Close the throttle and test the brakes within 5–10 meters of moving off.
- Use power to regulate taxi speed — much less power is needed once rolling.
Control of Direction on the Ground
- Lookout before every turn.
- Apply left rudder — the aircraft turns to the left.
- Apply right rudder — the aircraft turns to the right.
- Centralize the rudder pedals — the aircraft straightens out and stops turning.
Remember
The aircraft responds to how far and how fast you move the controls. On aircraft with a free-castering nosewheel, opposite rudder and opposite differential braking may be needed to straighten the nosewheel and stop the turn.
Use of Differential Braking
- Lookout before turning.
- Begin a turn using rudder (e.g., left rudder for a left turn).
- Apply the inside brake (e.g., left brake) to tighten the turn and reduce the turning circle.
- Centralize the rudder pedals and release the brake to stop the turn.
- Use opposite rudder and brake if needed to return to the original heading.
Stopping
- Maintain a good lookout and anticipate the braking distance required.
- Close the throttle first.
- Then apply the brakes evenly.
- Always stop with the nosewheel straight.
- Once at rest, set the parking brake and adjust throttle to the recommended RPM.
Simulator Practice
The Aviator.NYC AATD simulator lets you develop nosewheel steering coordination and brake feel in a controlled environment. Practice taxi patterns to build confidence before your first time on the ramp.
Learning Objectives
By the end of this exercise — which will take several flights to complete — you should:
- Be able to maneuver the aircraft safely on a variety of surfaces and in a variety of wind conditions.
- Appreciate the essential precautions and checks required when taxiing.
- Understand basic signals and right-of-way rules.
Key Points to Remember
| Topic | Key Rule |
|---|---|
| Speed control | Throttle first, brakes second — never power against brakes |
| Steering | Rudder pedals for direction; differential braking for tight turns |
| Wind | Position controls correctly relative to wind; reduce speed in strong winds |
| Surface changes | Cross at 45 degrees, slowly, minimum power |
| Right of way | Landing/takeoff traffic first; "on the right, in the right" |
| Lookout | Always look before moving, turning, or crossing a runway |
Emergency Preparedness
You will practice emergencies throughout your flight training. Always remain alert to the possibility of a problem while taxiing — whether it's steering failure, brake issues, or the need for an emergency stop.
What's Next
In the next lesson — Climbing — you will learn the techniques for climbing the aircraft safely and efficiently, including the different types of climbs and the power/attitude settings required.
Simulator Tip
Book a dedicated taxi practice session at Aviator.NYC to build proficiency with nosewheel steering and brake management before your next lesson.
Coming Up Next: Lesson 3 — Climbing
Learn to establish and maintain a climb at a specified airspeed, in various configurations, and to level off at a specified altitude. Understand the factors that determine climb performance and when...
Skills You'll Work On
These are the maneuvers and procedures covered in this lesson. Your instructor tracks each one as you progress.
- Preflight Inspection
- Certificates And Documents
- Airworthiness Requirements
- Taxiing Crosswind & Taxi Checks
- Radio Communications
- Before Takeoff Check
- Takeoff, Departure, and Climb
- Revise Effects of Primary Controls
- Revise Attitude Selection & Maintenance
- Level Flight
- Straight Flight
- Use of trim
- Use & Effect of Throttle on Airspeed
- Use & Effect of Flaps, Mixture, Carb Heat
- Effect of Propeller Slipstream
- Normal Landing
- After Landing Parking and Securing
Grades reflect what was covered in this lesson, not a certification of pilot competency.
Lesson Plan
Where this fits: Lesson 2 of the Private Pilot syllabus, Stage 1 — Basics (Exercise 5, Taxiing). Coming after Lesson 1's introduction to the effects of the controls, this session is the student's first time maneuvering the aircraft on the ground. It precedes Lesson 3, Climbing, and the takeoff work that depends on confident taxiing.
- Prerequisite
- Lesson 1 — Effects of Controls (can locate the primary controls and use the positive exchange of control routine).
- Materials
- Cessna 172 with G1000 simulator; airport taxi diagram; student checklist card; headset. The simulator is set running on the ramp with a clear taxi route loaded.
- Objectives for this session
- Move off safely — lookout, release brake, gradual power — and complete a brake check within the first few feet.
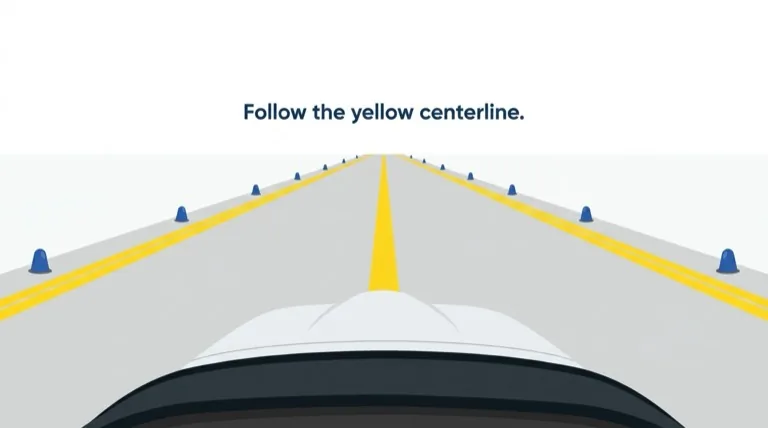
- Steer along the taxiway centerline with the rudder pedals and control speed with throttle and brakes at a walking pace.
- Position the controls correctly for the wind while taxiing (turn into the wind for a crosswind, yoke forward for a tailwind) and complete the taxi and before-takeoff checks.
- Practice radio communications for taxi instructions and stop correctly at the hold short line.
Looking Ahead
Lesson 3, Climbing, introduces the takeoff, establishing and maintaining a climb at a specified airspeed, and leveling off accurately. If holding the centerline or the wind correction was inconsistent today, taxi a straight line and re-check the wind at the start of Lesson 3 before lining up.
These lesson plans are provided as supplementary training guidance only. They do not supersede FAA publications, aircraft manufacturer documentation, or your instructor's direction. Always refer to the FAA Instrument Flying Handbook, Airplane Flying Handbook, AIM, and applicable POH/AFM as the official sources.