Pattern and Landing Emergencies
Learn to recognize and respond to engine failures and other emergencies during the most critical phases of flight — takeoff, pattern, and landing. Pre-planned decision-making is the key to surviving these situations.
Lesson Objectives
- Execute immediate actions for engine failure on takeoff (below and above 500 ft AGL)
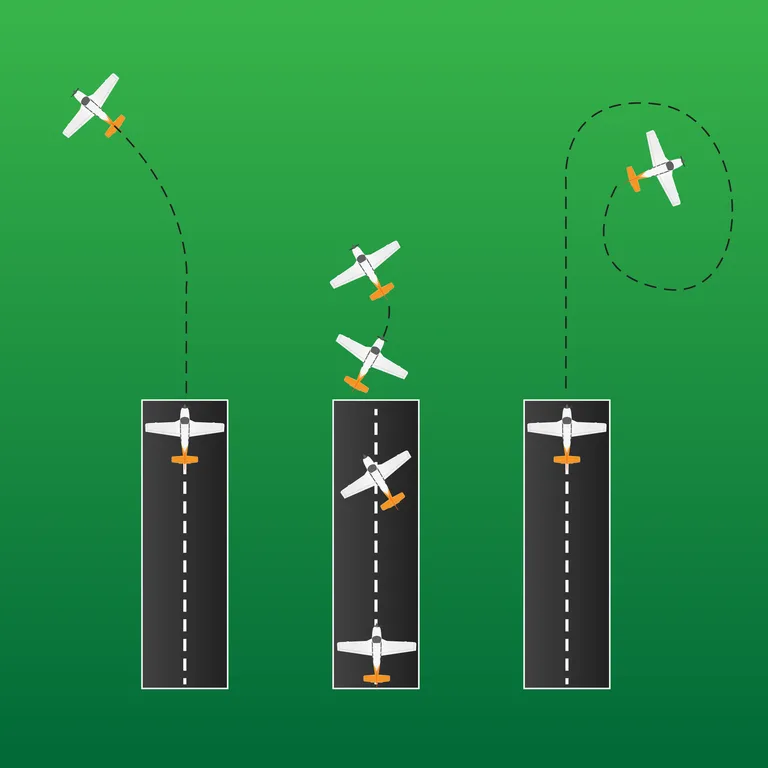
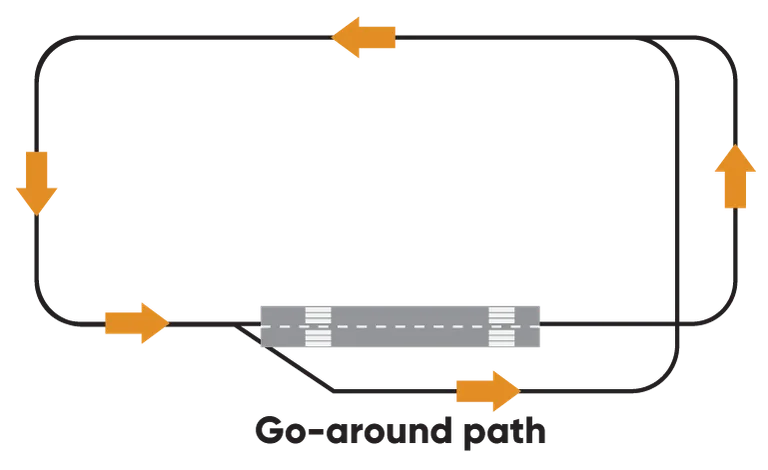
- Perform a go-around from any point in the traffic pattern
- Respond to engine failure on downwind, base, and final
- Apply pre-planned decision-making for emergencies in the pattern
Engine failure during the takeoff and pattern phases is the most critical emergency a pilot can face. At low altitude, there is very little time to react and very few options available. The key to surviving these emergencies is pre-planning — knowing what you will do before it happens.
This lesson covers the full range of emergencies that can occur from the start of the takeoff roll through to landing: abandoned takeoffs, engine failures at various points in the traffic pattern, and radio failure procedures.
Critical Safety Message
The decision to NOT turn back after an engine failure on takeoff is one of the most important decisions a pilot can make. Pre-brief your plan before every takeoff.
Background Briefing Topics
- Avoiding Engine Problems
- Abandoned Takeoff
- Engine Failure After Takeoff
- Why Not Turn Back? (The Impossible Turn)
- Engine Failure in the Pattern
- Radio Failure in the Pattern
Read the full Background Briefing →
Flight Exercise Topics
- Abandoned Takeoff Practice
- Engine Failure After Takeoff
- Engine Failure in Various Pattern Positions
Avoiding Engine Problems
Prevention is always better than cure. Many engine failures are the result of poor engine management by the pilot. Follow these practices to minimize the risk of engine problems:
- Proper warm-up: Allow the engine to reach normal operating temperatures before applying high power. Follow the POH recommended warm-up procedure.
- Carburetor heat: Apply carburetor heat regularly during flight and always before reducing power. Carburetor ice is one of the most common causes of partial or full power loss in training aircraft.
- Fuel management: Verify fuel quantity before flight. Select the correct fuel tank. Monitor fuel consumption against planned values. Switch tanks at regular intervals if applicable.
- Mixture: Set mixture appropriately for altitude. Over-leaning can cause engine damage or failure. Enrichen the mixture before applying full power.
Prevention First
Most engine "failures" in training aircraft are actually preventable engine stoppages caused by fuel starvation, carburetor ice, or incorrect mixture settings. Good operating practices dramatically reduce the risk.
Abandoned Takeoff
The decision to abort a takeoff must be made before the takeoff begins. During your pre-takeoff briefing, identify a go/no-go point on the runway — if the aircraft has not achieved the expected performance by that point, you will abort.
Reasons to Abort
- Engine not developing full power (RPM or manifold pressure below normal)
- Airspeed not alive or not increasing as expected
- Engine roughness or abnormal indications
- Directional control problems
- Door or window opening
- Obstruction on the runway (aircraft, vehicle, wildlife)
- Any situation that makes you uncomfortable with continuing
Abandoned Takeoff Procedure
- Throttle — idle. Reduce power immediately.
- Brakes — apply. Use maximum braking as required to stop on the remaining runway.
- Maintain directional control. Keep the aircraft on the centerline with rudder and differential braking.
- Flaps — retract (if extended) to place more weight on the wheels for better braking.
- Once stopped, clear the runway and assess the situation.
Commit to the Decision
Once you decide to abort, commit fully. Do not hesitate or change your mind partway through. An aborted takeoff with runway remaining is always survivable. A continued takeoff with an engine problem may not be.
Engine Failure After Takeoff
Engine failure immediately after takeoff is the most critical emergency a pilot can face. You are at low altitude, low airspeed, and in a nose-high attitude. The immediate priority is to prevent a stall.
Immediate Actions
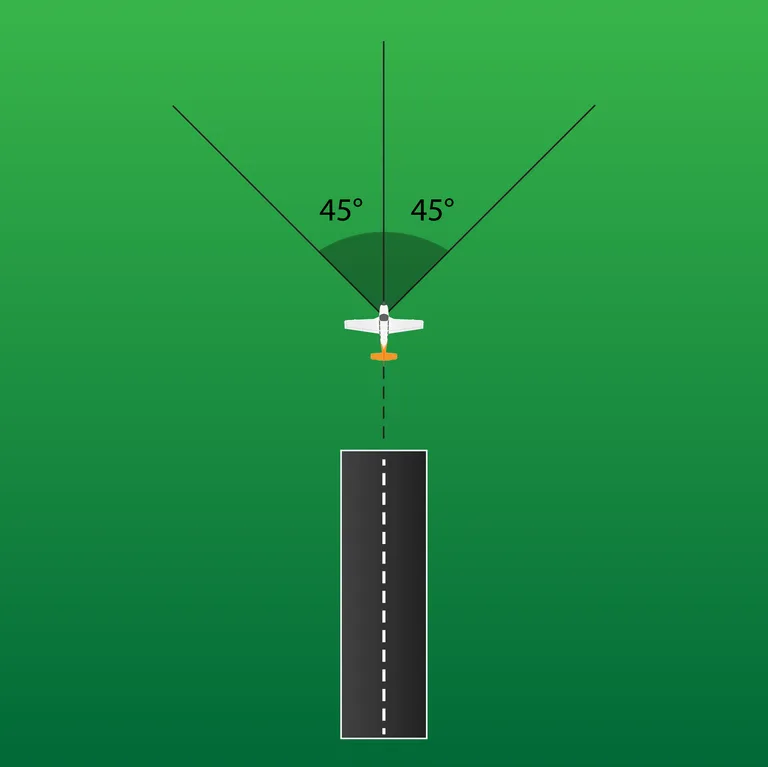
- Lower the nose immediately — pitch to the best glide attitude. This is the single most important action. Without airspeed, you have no options.
- Land straight ahead — or with only minor turns (up to 30 degrees) to avoid obstacles.
- Do NOT attempt to return to the runway.
The instinct to turn back to the runway is strong — behind you is a long, clear, paved surface. But attempting to return is almost always fatal at low altitude. This is known as the "impossible turn".
The Golden Rule
Engine failure after takeoff: LOWER THE NOSE, LAND AHEAD. A controlled landing in a field ahead of you is survivable. A stall/spin from a turn-back attempt is not.
Why Not Turn Back? (The Impossible Turn)
The mathematics and physics of the turn-back maneuver demonstrate why it fails at low altitude:
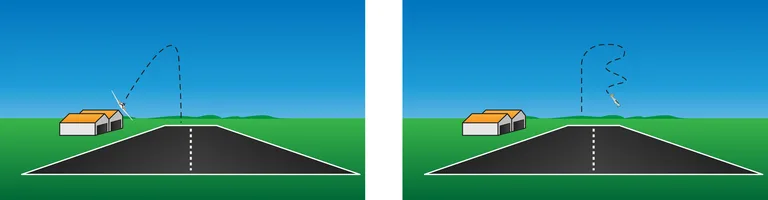
- To return to the runway, you must complete approximately a 180-degree turn (actually more, accounting for wind and alignment).
- In the turn, the aircraft loses altitude due to the increased load factor and reduced lift component.
- The turn must be made at a relatively steep bank angle to minimize altitude loss — but steep bank at low speed is dangerously close to the accelerated stall speed.
- Wind pushes you further from the runway during the turn (you took off into wind, so turning back puts the wind behind you).
- The total altitude required to complete the turn-back safely is typically 800-1,000 feet AGL minimum — and most engine failures after takeoff occur well below this altitude.
Accident statistics consistently show that pilots who attempt the turn-back at low altitude have a very high fatality rate. Pilots who land straight ahead — even in unsuitable terrain — have a much higher survival rate.
The Numbers Do Not Lie
At 300-500 feet AGL — a typical altitude when engine failure occurs after takeoff — there is simply not enough height to complete a 180-degree turn and land on the runway. The turn-back requires losing 300-500 feet just in the turn itself, and you still need to align with and descend to the runway. The math does not work.
Engine Failure in the Pattern
If the engine fails at pattern altitude (typically 1,000 feet AGL), you have more options than immediately after takeoff — but time is still very limited.
On Downwind
- You are at pattern altitude with the runway alongside you.
- Immediately turn toward the runway — you may be able to glide to a modified base and final.
- Pitch for best glide speed. Do not waste altitude trying to reach a distant point on the runway.
- Accept a landing on any available portion of the runway, or a suitable area short of the runway if you cannot reach it.
On Base Leg
- You are already turning toward the runway and relatively close.
- Pitch for best glide speed and continue the turn to final.
- Adjust your aim point — you may need to land on the first third of the runway rather than your normal touchdown point.
On Final
- You are already aligned with the runway.
- Pitch for best glide speed.
- If you are too high, use flaps or a forward slip to increase the descent rate.
- If you cannot reach the runway, select the best available landing area ahead of you.
Radio Failure in the Pattern
If your radio fails while in the traffic pattern at a controlled airport:
- Squawk 7600 on the transponder (the radio failure code).
- Continue flying the standard traffic pattern. Maintain normal pattern procedures — the tower will be expecting you to do this.
- Watch for light signals from the control tower:
| Light Signal | Meaning (In Flight) |
|---|---|
| Steady green | Cleared to land |
| Flashing green | Return for landing (cleared to approach) |
| Steady red | Give way to other aircraft and continue circling |
| Flashing red | Airport unsafe — do not land |
| Flashing white | Not applicable in flight (ground signal only) |
| Alternating red and green | Exercise extreme caution |
- Acknowledge that you have seen the light signal by rocking your wings (in flight) or by moving your ailerons or rudder (on the ground).
At Uncontrolled Airports
Radio failure at an uncontrolled airport is less critical — there is no ATC clearance required. Continue the standard pattern, maintain vigilant lookout for other traffic, and land normally.
Purpose
To practice the correct responses to engine failures and other emergencies during the takeoff roll, immediately after takeoff, and at various positions in the traffic pattern. The emphasis is on pre-planned decision-making and immediate, correct responses.
Abandoned Takeoff Practice
Your instructor will simulate situations requiring an aborted takeoff during the takeoff roll. Practice the following sequence until it becomes automatic:
- Recognition: Identify the abnormality (engine roughness, abnormal indications, obstruction).
- Decision: "Aborting takeoff."
- Throttle — idle. Close the throttle completely and immediately.
- Brakes — maximum. Apply firm, progressive braking.
- Directional control. Maintain centerline with rudder and differential braking.
- Flaps — retract (if extended).
- Clear the runway when safe to do so.
Simulator Practice
The Aviator.NYC AATD simulator is ideal for practicing abandoned takeoffs. Your instructor can introduce failures at different points during the takeoff roll, allowing you to build recognition and response times without the risk of an actual aborted takeoff on a real runway.
Engine Failure After Takeoff
Your instructor will simulate an engine failure at various altitudes after takeoff (by reducing power to idle). Your response must be immediate and correct:
Immediate Actions
- Pitch for best glide speed. Lower the nose immediately to maintain VG (best glide speed — typically 65 knots in a Cessna 172). This is the single most critical action.
- Select a landing area. Look straight ahead or with only minor deviations (30 degrees maximum). Choose the best available option — a field, road, or open area.
- Wings level. Do not turn. Minor heading changes only if required to avoid an obstacle directly ahead.
- If time permits: Attempt an engine restart (fuel selector, mixture, magnetos, carburetor heat). But do NOT sacrifice airspeed or altitude to troubleshoot.
- Prepare for landing: Flaps as appropriate for the landing area. Secure the aircraft (mixture idle cutoff, fuel off, master off) if time permits.
Never Attempt the Impossible Turn
Below 800-1,000 feet AGL, DO NOT attempt to turn back to the runway. The aircraft does not have enough altitude to complete the turn without stalling. Land straight ahead. A controlled landing in a field is survivable — a stall/spin is not.
Engine Failure in Various Pattern Positions
Your instructor will simulate engine failures at different points in the traffic pattern. For each scenario, practice the following:
On Crosswind Leg
- Pitch for best glide speed immediately.
- Assess whether you can reach the runway with a turn back. At low altitude on crosswind, this is unlikely — treat it as an engine failure after takeoff and land ahead.
- At higher altitudes on crosswind, a modified return to the runway may be possible.
On Downwind Leg
- Pitch for best glide speed immediately.
- Turn toward the runway — you are at pattern altitude and the runway is beside you.
- Plan a shortened approach — base and final may be compressed.
- Accept any available portion of the runway. Do not try to reach your normal touchdown point if it means stretching the glide.
On Base Leg
- Pitch for best glide speed.
- Continue the turn to final — you are already close to the runway.
- Adjust aim point as needed. Use flaps judiciously (they increase descent rate but also reduce glide range).
On Final Approach
- Pitch for best glide speed.
- You are already aligned with the runway — continue the approach.
- If too high: add flaps or slip to increase descent rate.
- If too low or cannot reach the runway: select the best available landing area ahead and below you.
Glide Range Awareness
At all times in the traffic pattern, maintain awareness of where you could land if the engine failed right now. This situational awareness is what allows you to make immediate, correct decisions when the real emergency occurs.
Key Takeaways
Engine Failure After Takeoff Is the Most Dangerous Emergency
At low altitude, with low airspeed and a nose-high attitude, there is almost no margin for error. The correct response must be pre-planned and executed immediately without hesitation. There is no time to think — only to act on a decision already made.
Decision-Making Must Be Pre-Planned
Before every takeoff, brief your emergency plan:
- On the ground: If anything is abnormal during the takeoff roll, I will abort (throttle idle, brakes, maintain directional control).
- Below 500 feet AGL: If the engine fails, I will lower the nose and land straight ahead.
- Above 500 feet AGL: I will consider a modified pattern, but only if I have sufficient altitude and a clear area to land.
- At pattern altitude: I will turn toward the runway and plan a glide approach.
The Impossible Turn
| Altitude (AGL) | Recommended Action |
|---|---|
| 0-500 ft | Land straight ahead. No turns except minor deviations to avoid obstacles. |
| 500-800 ft | Land ahead with minor turns (up to 30 degrees). Turning back is extremely high risk. |
| 800-1,000+ ft | Turn-back may be possible IF practiced and pre-briefed. Still high risk. Landing ahead remains the safest option in most cases. |
Critical Points to Remember
- Lower the nose first — airspeed is life. Without airspeed, you have zero options.
- Never attempt the impossible turn at low altitude — the physics do not allow it below 800-1,000 feet AGL.
- A controlled off-airport landing is survivable — a stall/spin from a turn-back attempt is almost always fatal.
- Brief your plan before every takeoff — the decision must be made on the ground, not in the emergency.
- Prevention is key — proper warm-up, carburetor heat, fuel management, and mixture settings prevent most engine failures.
- Know the light signals — in case of radio failure at a controlled airport.
The Most Important Decision
The decision to NOT turn back after an engine failure on takeoff is one of the most important decisions a pilot can make. Pre-brief your plan before every takeoff.
What's Next
In the next lesson, you will continue building your pattern skills with additional pattern work and procedures. The emergency awareness developed in this lesson should become part of your standard thinking on every pattern flight — always know where you would go if the engine stopped.
Simulator Tip
The Aviator.NYC AATD simulator is the perfect environment to practice engine failure scenarios repeatedly. Your instructor can introduce failures at any point in the traffic pattern, building your recognition and response skills in a completely safe environment. Request a dedicated "emergency procedures" session to maximize your practice.
Coming Up Next: Lesson 13 — Glide Approach and Landing
Practice the glide (power-off) approach and landing — essential for engine failure scenarios and precision flying.
Skill Items
| Skill | D P 1 2 3 4 5 6 |
|---|---|
| Preflight Inspection | |
| Engine Starting | |
| Taxi & Before Takeoff Check | |
| Radio Communications | |
| Normal Takeoff & Departure | |
| General Handling | |
| Traffic Pattern Entry | |
| Altitude Speed Config & Trim | |
| Approach Planning & Altimeter Setting | |
| Normal/ Crosswind Landing | |
| Simulated Engine Failure After Takeoff | |
| Side Slip Technique | |
| After Landing Parking and Securing |
Radio Communication Scenarios
Practice VFR radio calls for this lesson. Listen to the scenario, then formulate your response before revealing the full exchange.
You are in N106ST, preparing to depart Daytona Beach International (Class C). You've listened to ATIS (information Juliet) and plan to fly west to Cross City Airport at 4,500 feet. Contact Clearance Delivery for your VFR departure clearance, then be ready to copy heading, altitude, departure frequency, and squawk code.
Check Transcript
Daytona Beach International Airport information Juliet. 1600 Zulu weather. Wind 250 at 15. Visibility 10. Few clouds at 4,500. Temperature 28, dewpoint 20. Altimeter 3005. Visual approaches in use. ILS runway 7 Left approach in use. Landing runway 7 Left. Departing runway 7 Right. All VFR aircraft contact clearance delivery on 121.3 prior to taxi. Readback all runway assignments and altitude restrictions. Advise on initial contact you have information Juliet.
After receiving your clearance (heading, altitude, departure freq, squawk), read back the ENTIRE clearance. No abbreviations.
- You (Pilot)"Daytona Clearance, november-one-zero-six-sierra-tango, PA-28, information Juliet, VFR to Cross City, requesting four thousand five hundred."
- Daytona Clearance"november-one-zero-six-sierra-tango, Daytona Clearance. VFR to Cross City. On departure fly heading two-eight-zero, climb and maintain two thousand five hundred, expect four thousand five hundred within one-zero minutes. Departure frequency one-two-five point eight. Squawk five-one-one-two."
- You (Pilot)"Fly heading two-eight-zero, climb and maintain two thousand five hundred, expect four thousand five hundred in one-zero minutes, departure one-two-five point eight, squawk five-one-one-two, six-sierra-tango."
- Daytona Clearance"november-one-zero-six-sierra-tango, readback correct. Contact Ground one-two-one point niner when ready to taxi."
- You (Pilot)"Ground on one-two-one point niner, six-sierra-tango."
You are in N106ST at 5,500 feet over the Marvel VOR, en route to Covington Municipal in Tennessee. Your most direct route goes through the Memphis Class B airspace. You may NOT enter without an explicit "cleared into the Class Bravo" from ATC. Call Memphis Approach.
Request Class B clearance. Include position, altitude, destination, and explicitly request "clearance through the Class Bravo." If the controller says "remain clear of Class Bravo" — you must comply and cannot enter.
- You (Pilot)"Memphis Approach, november-one-zero-six-sierra-tango, over Marvel VOR, five thousand five hundred, en route Covington Municipal, request clearance through the Class Bravo."
- Memphis Approach"november-one-zero-six-sierra-tango, Memphis Approach, squawk four-four-two-three and ident."
- You (Pilot)"Squawk four-four-two-three, six-sierra-tango."
- Memphis Approach"november-one-zero-six-sierra-tango, radar contact one-five miles southwest of Memphis, five thousand five hundred. Cleared into the Class Bravo. Maintain five thousand five hundred. Fly heading zero-four-zero."
- You (Pilot)"Cleared into the Class Bravo, maintain five thousand five hundred, heading zero-four-zero, six-sierra-tango."
These lesson plans are provided as supplementary training guidance only. They do not supersede FAA publications, aircraft manufacturer documentation, or your instructor's direction. Always refer to the FAA Instrument Flying Handbook, Airplane Flying Handbook, AIM, and applicable POH/AFM as the official sources.