Glide Approach and Landing
Practice the glide (power-off) approach and landing — essential for engine failure scenarios and precision flying.
Lesson Objectives
- Perform a stabilized power-off (glide) approach from pattern altitude to touchdown
- Judge the glide angle and make corrections using flaps and slipping
- Execute a proper flare and touchdown on the centerline
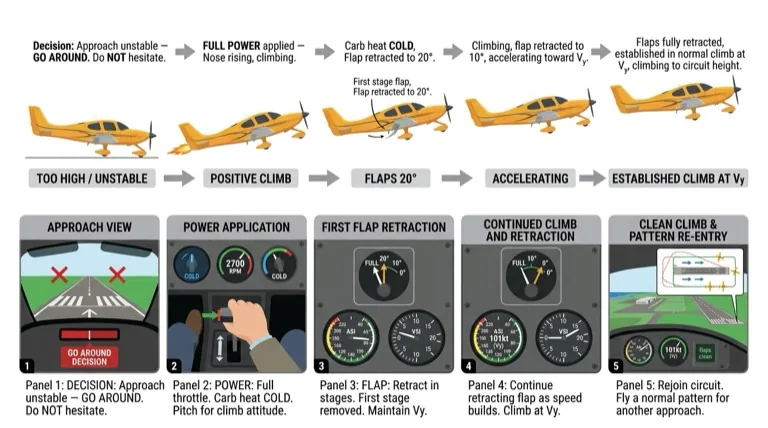
- Go around decisively when the approach is not stabilized
The purpose of this exercise is to practice the glide (power-off) approach and landing. This is a precision exercise that builds judgment and has direct application to engine-out landing scenarios. Mastering the glide approach gives you confidence that you can land the aircraft safely without engine power.
The key skill is judging the power-off point and managing the glide to arrive at the correct position for the flare. Flaps are your primary tool for adjusting the approach angle once the throttle is closed.
Simulator Practice
At Aviator.NYC, you'll practice glide approaches on our FAA-approved AATD simulator. The simulator allows you to repeat the judgment exercise many times — closing the throttle at different points and learning to recognize the correct descent profile without the pressure of a real engine-out scenario.
Background Briefing Topics
- Adjustment of the Pattern
- Judging the Power-Off Point
- Maintaining the Glide — Use of Flap
- The Glide Landing
Read the full Background Briefing →
Flight Exercise Topics
- HASELL-type awareness check
- Glide approach from the pattern
- Use of flap to adjust descent angle
- Flare and touchdown
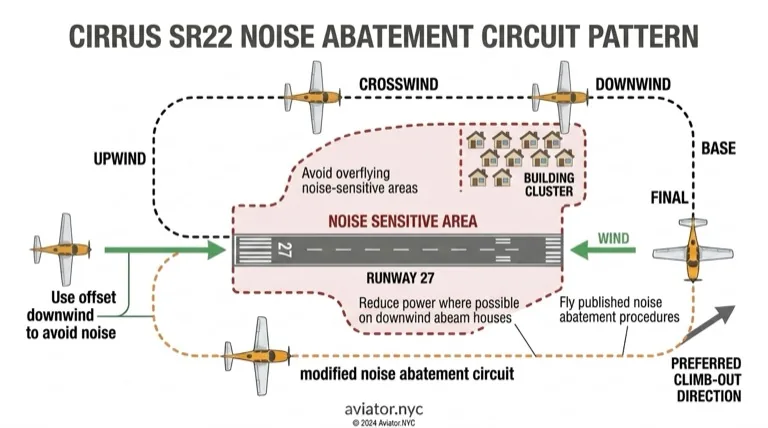
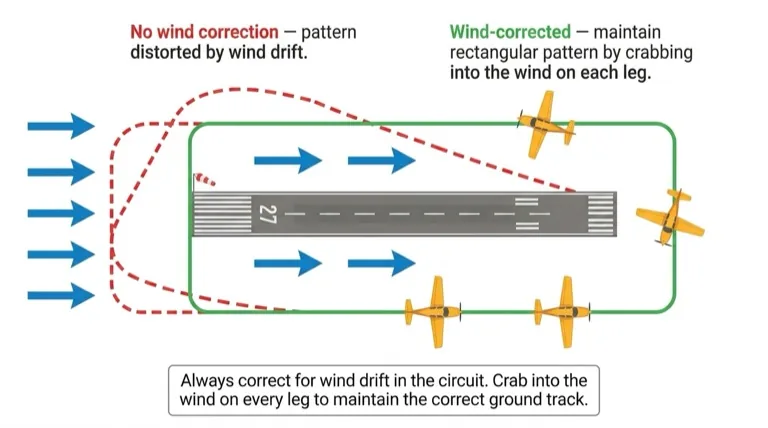
Adjustment of the Pattern
A glide approach requires a modified traffic pattern. Because you will have no engine power available after the power-off point, you must position the aircraft so that it can glide to the runway without any power assistance.
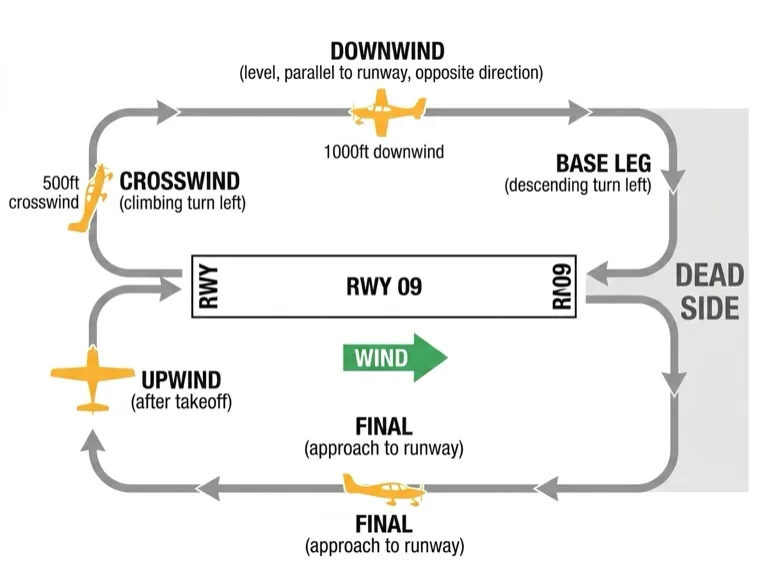
The key modification is in the base-to-final turn. In a normal powered approach, you have the luxury of adjusting power to correct for errors in positioning. In a glide approach, once the throttle is closed, your only tools are:
- Adjusting the pattern (flying closer to or farther from the runway)
- Using flaps to steepen or shallow the glide
- Adjusting airspeed (within the safe range)
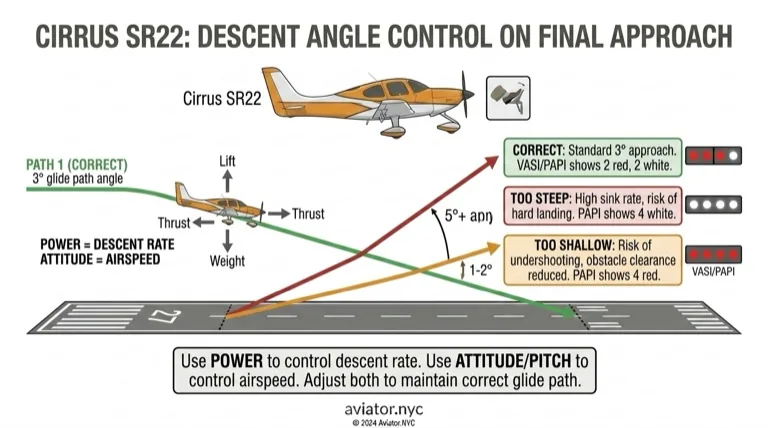
The base-to-final turn is critical because it is the last major opportunity to adjust your flight path. If you turn final too high, you can use flaps to steepen the descent. If you turn final too low, your options are limited — you may need to add power (converting it back to a powered approach) or accept a landing short of your target.
Key Concept
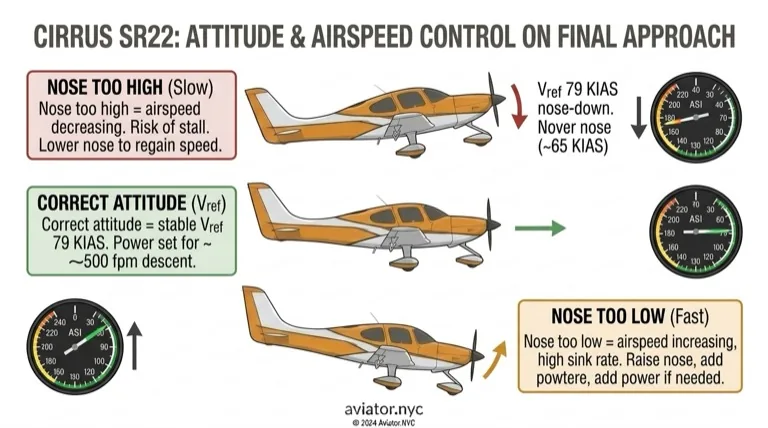
In a glide approach, you cannot make the aircraft go farther by pulling the nose up. This only decreases airspeed and increases the rate of descent. Always maintain best glide speed.
Judging the Power-Off Point
The standard power-off point is abeam the intended touchdown point on the downwind leg. At this position:

- Apply carburetor heat HOT (always before closing the throttle)
- Close the throttle smoothly to idle
- Establish the best glide speed attitude
- Trim for the glide
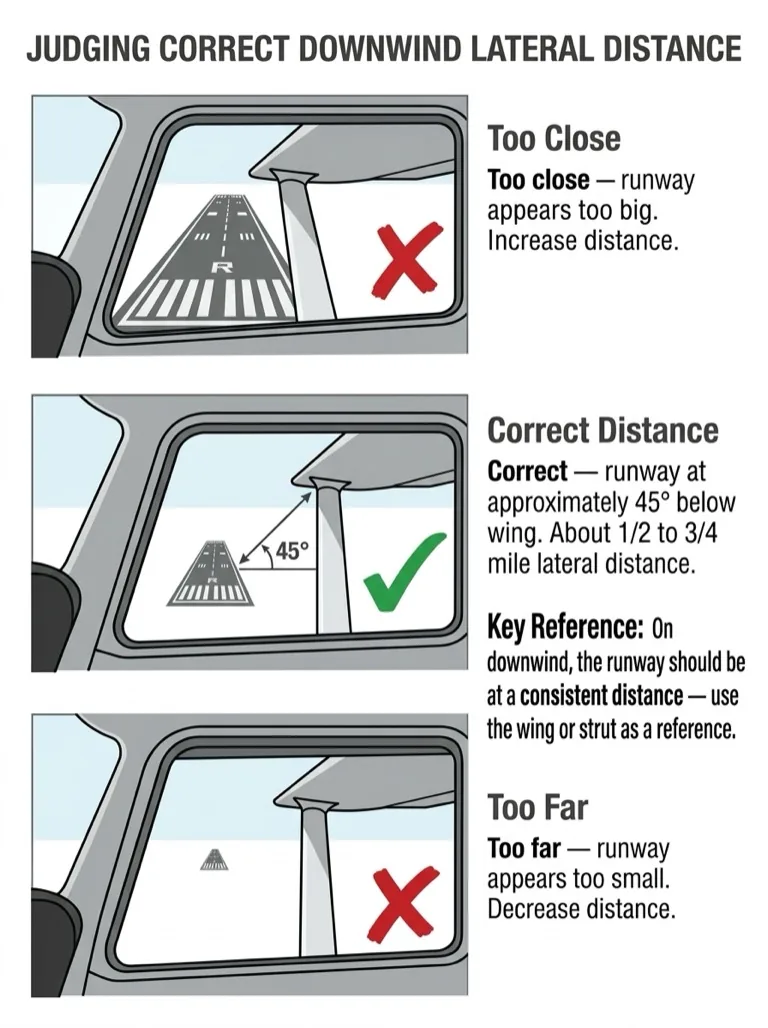
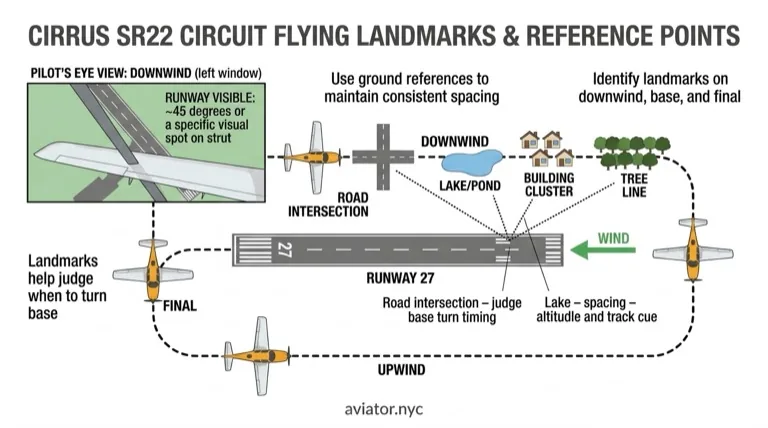
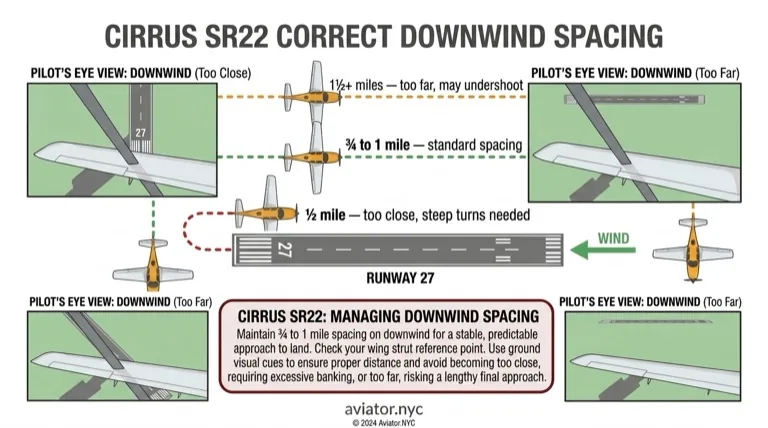
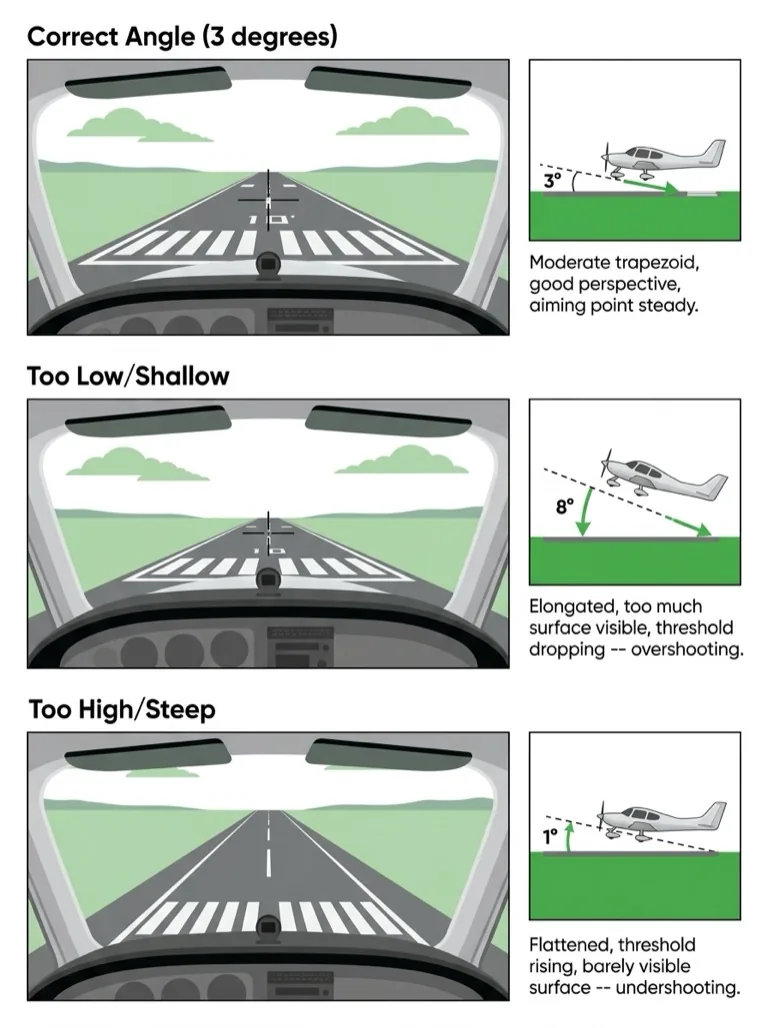
Judge the distance to the runway by the apparent position of the runway relative to the wing. With practice, you will learn to recognize whether the runway appears in the correct position — approximately 30 to 45 degrees below the horizon when abeam on downwind.
Factors that affect where you should close the throttle include:
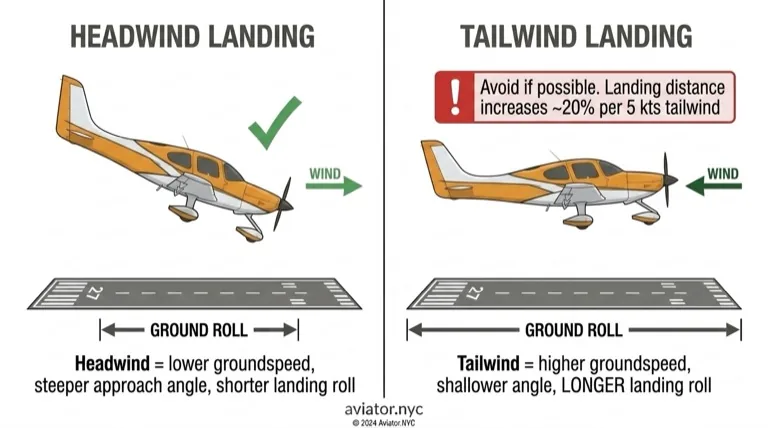
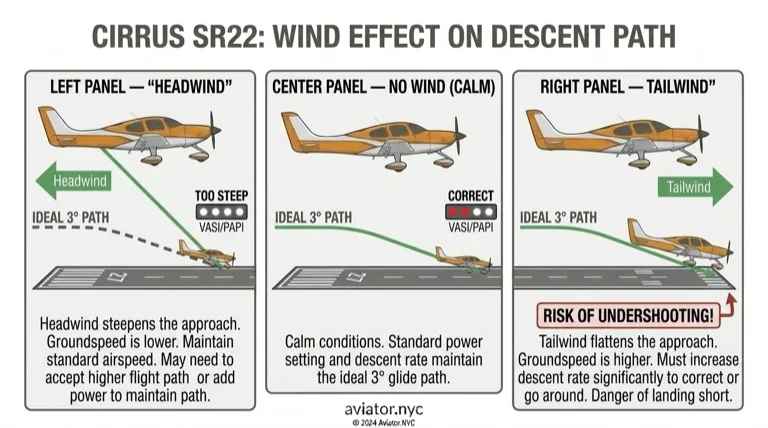
- Wind: A stronger headwind on final means you need to be closer to the runway or higher
- Aircraft weight: A lighter aircraft glides farther at the same speed
- Altitude: If higher than normal pattern altitude, you may need to delay the power-off point or widen the pattern
Note
Carburetor heat must always be applied before closing the throttle. A closed throttle at idle creates the ideal conditions for carburetor ice to form rapidly.
Maintaining the Glide — Use of Flap
Once established in the glide, your primary tool for adjusting the approach angle is flap. Flaps steepen the approach without increasing speed — they increase both lift and drag, but at the settings used in approach, the drag increase dominates.
Decision Rules
| Situation | Action |
|---|---|
| Too high — will go-around the target | Add more flap to steepen the descent |
| Too low — will undershoot the target | Use less flap (or adjust the pattern to fly closer to the runway) |
| On profile — correct angle | Maintain current configuration |
Apply flaps incrementally. Each notch of flap steepens the descent. Once flaps are extended, they should not normally be retracted during the approach — retracting flaps causes a sudden loss of lift and a sink that may be dangerous at low altitude.
Safety
Never retract flaps at low altitude unless you have adequate airspeed and altitude to manage the resulting sink. If you are too low on a glide approach, the safest option is to add power and convert to a powered approach or go around.
Airspeed Management
Throughout the glide, maintain the best glide speed (or the recommended approach speed for the flap setting in use). This speed provides the flattest glide angle and maximum distance per altitude lost. Deviations from this speed — either faster or slower — will steepen the descent.
The Glide Landing
The glide landing follows the same technique as a normal landing, with the difference that you arrive at the flare point from a steeper approach angle and without power:
- Maintain best glide speed to the flare point — do not allow the speed to decay prematurely
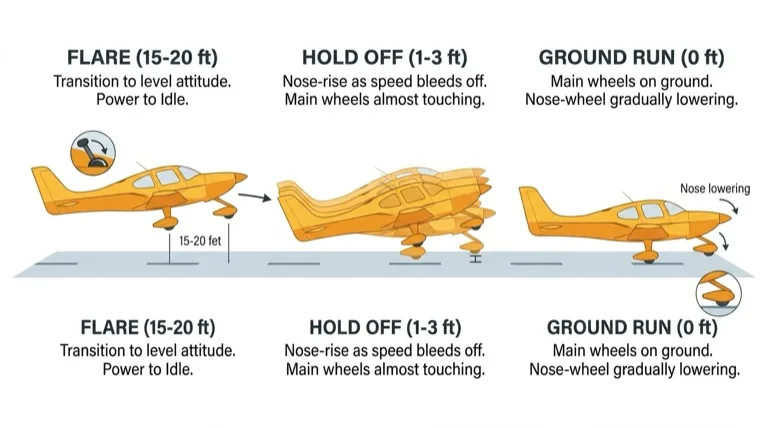
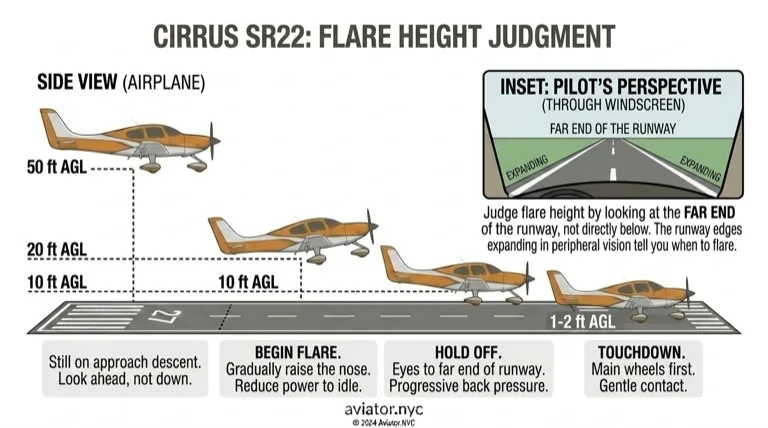
- Round out (flare) at the correct height — gently raise the nose to arrest the descent rate
- Hold off as speed decreases — keep the aircraft flying just above the runway while speed bleeds away
- Touch down on the main wheels — the aircraft settles onto the runway in a slightly nose-up attitude
The flare height may be slightly different from a powered approach because the steeper descent requires a slightly earlier and more progressive round-out. With practice, you will learn to judge the correct height and rate of pitch change.
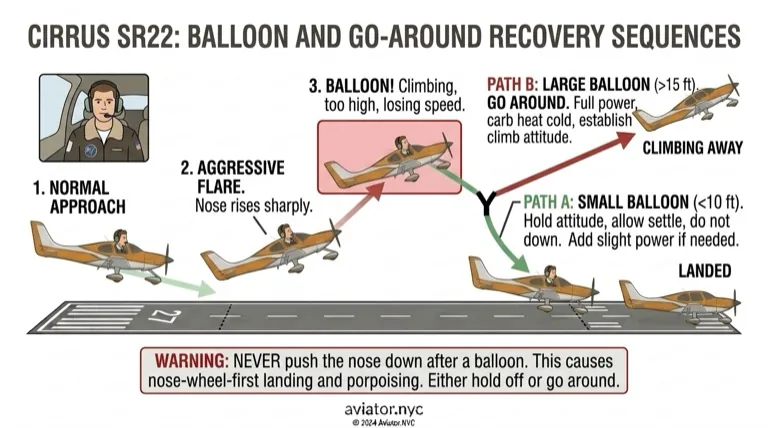
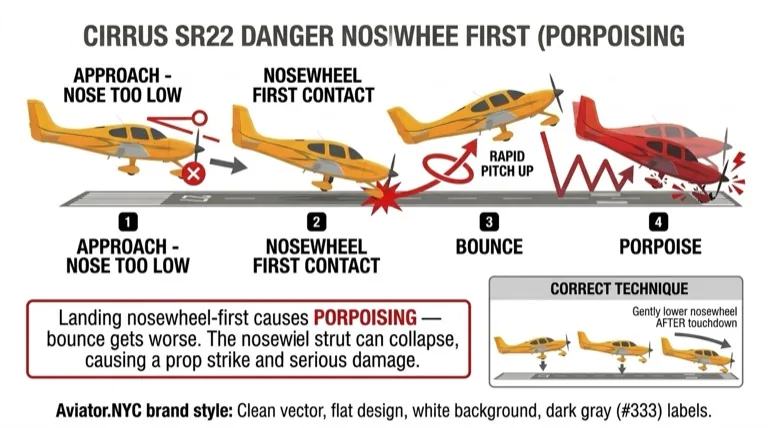
Key Concept
The round-out must be progressive — not abrupt. An abrupt flare will cause the aircraft to balloon (climb back up), wasting energy and potentially resulting in a hard landing as it stalls back onto the runway.


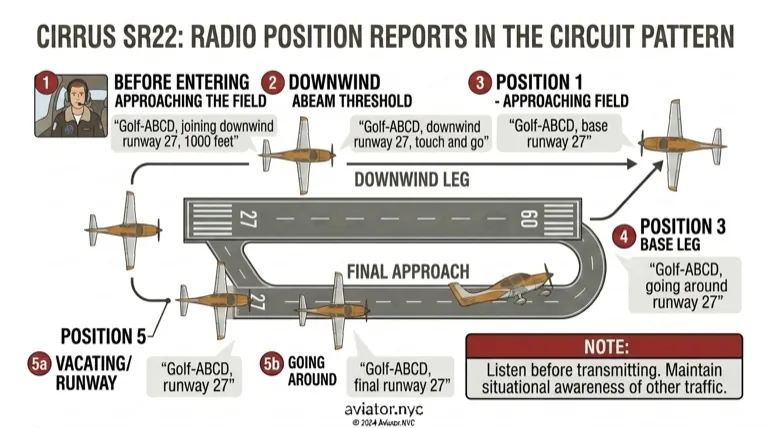
HASELL-Type Awareness Check
Before commencing the glide approach exercise, complete an awareness check appropriate to the situation. In the traffic pattern, this takes the form of verifying:
- Height — at normal pattern altitude
- Airframe — configured for the downwind leg (clean or as appropriate)
- Security — harnesses secure, loose items stowed
- Engine — temperatures and pressures in the green, fuel on correct tank
- Location — confirm the runway environment and traffic
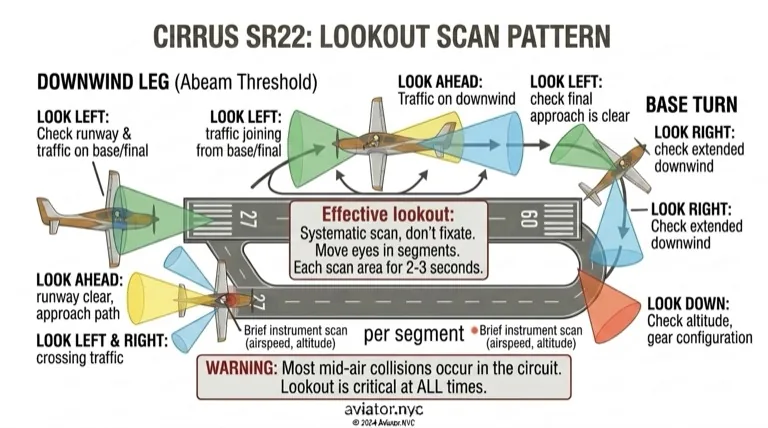
- Lookout — scan for other traffic, particularly on base and final
Glide Approach from the Pattern
The glide approach is initiated from the downwind leg, abeam the intended touchdown point (the numbers or a selected aiming point):
- Abeam the numbers: Apply carburetor heat HOT
- Close the throttle smoothly to idle
- Establish best glide speed — pitch for the correct attitude and trim
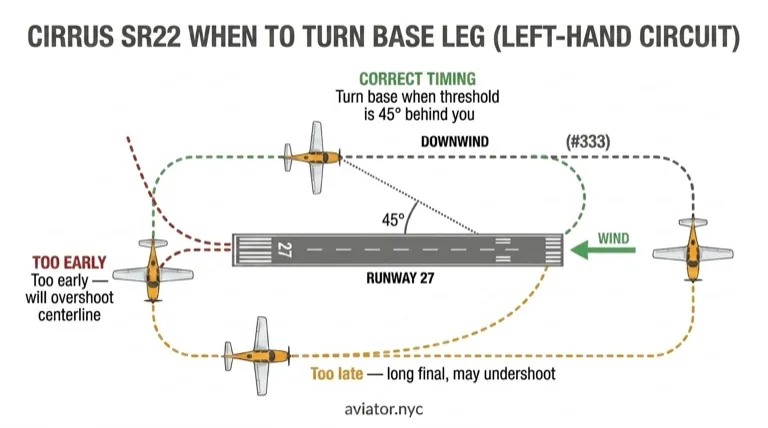
- Turn base when the runway is approximately 45 degrees behind the wing (judge by angle)
- On base: Assess your height relative to the runway — decide whether flap is needed
- Turn final: Align with the runway centerline and assess the approach angle
Key Concept
The base-to-final turn is your last major opportunity to adjust the flight path. If you are too high turning final, you have room to add flap. If you are too low, consider adding power and converting to a go-around.
Use of Flap to Adjust Descent Angle
On base and final, use flap incrementally to manage the descent profile:
| Assessment | Flap Action | Effect |
|---|---|---|
| Too high | Add one notch of flap | Steeper descent, slower approach |
| Slightly high | Hold current flap, reassess | Monitor the approach angle |
| On profile | Maintain configuration | Continue to the flare |
| Too low | Do not add flap — consider go-around | Preserve what glide distance remains |
After each flap change, re-trim for the new approach speed and allow the aircraft to stabilize before making further adjustments.
Note
Each aircraft type has a recommended approach speed for each flap setting. Refer to the POH for your aircraft. As a general rule, the approach speed decreases slightly with each increment of flap.
Flare and Touchdown
The flare technique for a glide approach is essentially the same as for a powered approach:
- Approaching the threshold: Confirm you are on speed and on profile
- At approximately 15-20 feet: Begin the round-out — smoothly raise the nose to reduce the descent rate
- Hold off: Continue to ease back on the control column as speed decreases — keep the aircraft flying just above the runway
- Touchdown: Main wheels contact the runway first in a slightly nose-up attitude
- After touchdown: Lower the nosewheel gently, apply braking as needed
Simulator Practice
Practice the glide approach repeatedly on the Aviator.NYC AATD. Vary the conditions — different wind strengths, different power-off points, and different flap configurations. The goal is to develop consistent judgment of the correct approach profile.
Key Takeaways
Glide Approach Sequence
| Phase | Action | Key Point |
|---|---|---|
| Abeam numbers | Carb heat HOT, close throttle | Always carb heat before closing throttle |
| Downwind glide | Establish best glide speed, trim | Do not raise the nose to stretch the glide |
| Base turn | Assess height, consider flap | Too high = add flap; too low = go around |
| Final | Fine-tune with flap, maintain speed | Incremental flap changes only |
| Flare | Round out, hold off, touch down | Progressive round-out — not abrupt |
Critical Points to Remember
- Best glide speed is non-negotiable — flying faster or slower reduces your glide distance.
- Flaps steepen the approach — use them when high, withhold them when low.
- Never retract flaps at low altitude — the resulting sink can be unrecoverable close to the ground.
- Carburetor heat before throttle closure — idle power creates peak icing conditions.
- The base-to-final turn is your key judgment point — assess height and make your flap decision here.
- Go around if too low — there is no shame in adding power and going around.
Application to Engine Failure
The glide approach is not merely an exercise — it is the exact technique you would use in an engine failure scenario. Every glide approach you practice builds the judgment and muscle memory that could save your life in a real emergency.
Key Concept
In a real engine failure, you will not have the luxury of a perfectly positioned pattern. But the skills you build here — judging the glide, managing flaps, maintaining speed — transfer directly to emergency situations.
What's Next
In the next lesson — Short-Field & Soft-Field Operations — you will learn maximum-performance takeoff and landing techniques for use on runways near the aircraft's minimum required distance, and on unpaved or soft surfaces.
Simulator Tip
Schedule an AATD session at Aviator.NYC to practice glide approaches with varying wind conditions. Try closing the throttle at different points on the downwind leg to develop your judgment of what works and what does not.
Coming Up Next: Lesson 14 — Short-Field and Soft-Field Operations
Operate from runways near the aircraft's minimum required distance and from unpaved/soft surfaces.
Continue to Lesson 14: Short-Field and Soft-Field Operations →
Skills You'll Work On
These are the maneuvers and procedures covered in this lesson. Your instructor tracks each one as you progress.
- Preflight Inspection
- Engine Starting
- Taxi & Before Takeoff Check
- Radio Communications
- Normal Takeoff & Departure
- General Handling
- Traffic Pattern Entry
- Altitude Speed Config & Trim
- Approach Planning & Altimeter Setting
- Normal/ Crosswind Landing
- No-Flap Landing
- Side Slip Technique
- After Landing Parking and Securing
Grades reflect what was covered in this lesson, not a certification of pilot competency.
Lesson Plan
Where this fits: Exercise 12b in Stage 3 (Traffic Pattern), the third of the four lessons that close the PPL simulator track. It builds directly on the engine-failure work from Lesson 12, refining the glide into a precise power-off approach and landing the student can fly on demand.
- Prerequisite
- Lesson 12 — Pattern and Landing Emergencies (can pitch for best glide and respond to a failure from any pattern position).
- Materials
- C172 G1000 simulator, approach and landing checklists, airport diagram, and the POH approach-speed/flap reference.
- Objectives for this session
- Complete a HASELL-type awareness check, then start the glide approach abeam the numbers with carburetor heat hot and throttle closed to idle.
- Judge the base and base-to-final turns by angle, using flap incrementally to control the descent angle and re-trimming after each change.
- Fly the round-out, hold-off, and main-wheel touchdown of a stabilized power-off (and no-flap) approach.
Looking Ahead
Next session is Lesson 14 — Short-Field and Soft-Field Operations, the final PPL lesson, where the precise approach control practiced here is applied to demanding short and soft runways.
These lesson plans are provided as supplementary training guidance only. They do not supersede FAA publications, aircraft manufacturer documentation, or your instructor's direction. Always refer to the FAA Instrument Flying Handbook, Airplane Flying Handbook, AIM, and applicable POH/AFM as the official sources.