Short-Field and Soft-Field Operations
Operate from runways near the aircraft's minimum required distance and from unpaved/soft surfaces.
Lesson Objectives
- Perform a short-field takeoff and landing within required distances
- Perform a soft-field takeoff and landing with proper technique
- Calculate takeoff and landing distances using the POH performance charts
- Adjust technique for runway surface, gradient, and obstacle clearance
This exercise teaches maximum-performance takeoff and landing techniques for use on short runways, as well as modified techniques for soft or unpaved surfaces. These skills expand where you can safely operate and are tested on the FAA Private Pilot practical exam.
Performance calculations are central to this lesson. Before using any short runway, you must verify mathematically that the aircraft can safely take off and land within the available distance — with appropriate margins.
Safety
If your calculations show the runway is too short, there is no point proceeding to prove the calculation was correct.
Simulator Practice
At Aviator.NYC, you'll practice short-field and soft-field techniques on our FAA-approved AATD simulator. The simulator allows you to attempt operations at runways of various lengths and surfaces without risk, building the precise speed and attitude control these operations demand.
Background Briefing Topics
- Calculation of Takeoff Distance
- Use of Flaps for Short-Field Takeoff
- Short-Field Takeoff Technique
- Short-Field Approach & Landing
- Soft-Field Definition
- Soft-Field Takeoff
- Soft-Field Landing
- Operation from a Soft-Field Runway
- Performance Factors Supplement
Read the full Background Briefing →
Flight Exercise Topics
- Short-field takeoff: brakes held, full power, Vx climb
- Short-field approach: precision speed control, target touchdown
- Soft-field takeoff: back pressure, ground effect, accelerate then climb
- Soft-field landing: minimum speed touchdown, nosewheel protection
Calculation of Takeoff Distance
Before using any short runway, you must calculate the required takeoff distance using the POH performance charts. The published figures assume specific conditions — you must correct for actual conditions on the day.
Factors Affecting Takeoff Distance
| Factor | Effect on Takeoff Distance |
|---|---|
| Higher temperature | Increases distance (reduced air density) |
| Higher altitude (density altitude) | Increases distance (reduced air density) |
| Heavier weight | Increases distance (more inertia, higher rotation speed) |
| Tailwind | Increases distance (higher ground speed at liftoff) |
| Headwind | Decreases distance (lower ground speed at liftoff) |
| Soft/wet surface | Increases distance (rolling resistance) |
| Uphill slope | Increases distance (gravity component opposes acceleration) |
Safety
ALWAYS check performance calculations before using a short runway. If your calculations show the runway is too short, there is no point proceeding to prove the calculation was correct.
Use of Flaps
For short-field takeoff, the POH typically recommends an initial flap setting (often 10 degrees). This setting:
- Reduces the ground roll by allowing liftoff at a lower speed
- May improve the initial climb gradient over an obstacle
- Creates more drag than a clean configuration once airborne
Always follow the POH recommendation for your specific aircraft. Some aircraft perform better with zero flaps for the short-field takeoff — the POH is the authority.
Short-Field Takeoff
The short-field takeoff is a maximum-performance technique designed to minimize ground roll and clear an obstacle at the departure end of the runway:
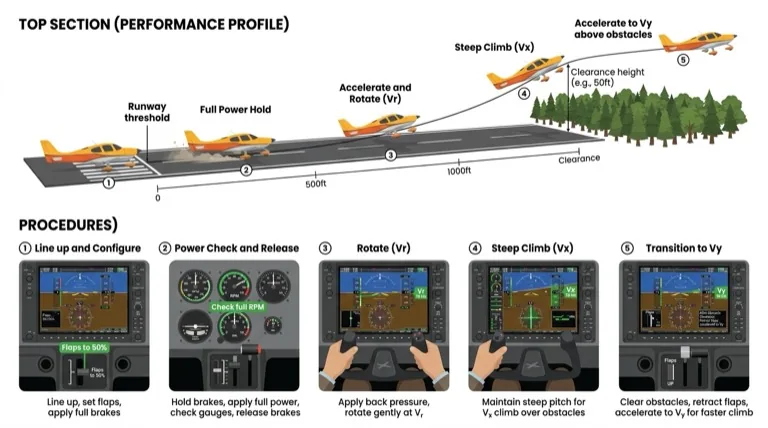
- Line up using the full length of the runway — taxi to the very end
- Hold brakes firmly
- Apply full power — verify engine instruments are normal
- Release brakes when full power is confirmed
- Rotate at the minimum safe speed specified in the POH
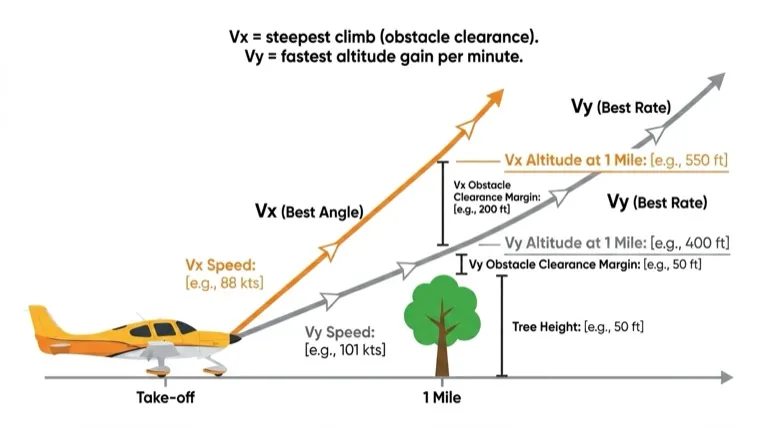
- Climb at VX (best angle of climb speed) until the obstacle is cleared
- Accelerate to VY (best rate of climb speed) for the continued climb
- Retract flaps once at a safe altitude and accelerating
Key Concept
VX gives the steepest climb angle (most altitude gained per distance over the ground). VY gives the fastest climb rate (most altitude gained per unit of time). Use VX to clear obstacles, then transition to VY.
Short-Field Approach & Landing
The short-field approach requires precision airspeed control and a specific aim point. The goal is to touch down on target with minimum float and then stop in the shortest possible distance.
- Fly a stabilized approach at the correct speed (typically Vref or 1.3 VS0)
- Use full flaps as recommended by the POH
- Aim for a specific touchdown point — typically the first available landing area
- Touch down at minimum speed — do not float past the target
- Apply maximum braking immediately after touchdown (retract flaps to put weight on wheels)
Note
On the FAA practical exam, short-field landing accuracy is typically judged as touching down within 200 feet of a designated point. Practice consistently hitting your mark.
Soft-Field Definition
A soft field is any surface that creates increased rolling resistance compared to a hard, paved runway. Examples include:
- Grass (short or long)
- Dirt or mud
- Gravel
- Snow or slush
- Wet pavement with standing water
The primary challenge of a soft surface is that the wheels tend to sink in, creating high rolling resistance that can slow the aircraft dramatically during the takeoff roll or cause the nose to pitch forward during landing.
Soft-Field Takeoff
The soft-field takeoff technique minimizes the time the wheels are in contact with the soft surface:
- Maintain back pressure throughout — keep weight off the nosewheel from the start of the roll
- Apply full power smoothly — do not stop on the runway (keep rolling from the taxiway)
- Get airborne as soon as possible — the aircraft will lift off at a speed below normal climb speed
- Accelerate in ground effect — remain within one wingspan of the surface, allowing speed to build
- Climb away once VX or VY is reached
Key Concept
Ground effect reduces induced drag when the aircraft is within approximately one wingspan of the surface. This allows the aircraft to accelerate to a safe climb speed even though it lifted off below that speed. Do not attempt to climb out of ground effect until you have sufficient airspeed.
Soft-Field Landing
The soft-field landing technique minimizes the impact on soft surfaces and protects the nosewheel:
- Fly a normal approach at the correct speed
- Touch down at the minimum possible speed — use a smooth, full flare to dissipate energy
- Keep full back pressure after touchdown — hold the nosewheel off the surface as long as possible
- Do not brake hard — on a soft surface, hard braking can dig the wheels in and flip the aircraft
- Allow the aircraft to decelerate naturally — the soft surface provides plenty of rolling resistance
Safety
On very soft surfaces, the nosewheel digging in can cause the aircraft to nose over. Keep back pressure to protect the nosewheel and reduce the risk of a prop strike or worse.
Operation from a Soft-Field Runway
Operating on soft surfaces presents challenges beyond just takeoff and landing:
- Taxi challenges: Keep the aircraft moving — if you stop, the wheels may sink and you may not be able to get rolling again
- No sharp turns: Sharp turns at low speed on a soft surface put high side loads on the landing gear and increase the risk of getting stuck
- Keep momentum: When taxiing onto the runway for takeoff, do not stop — roll continuously from the taxiway into the takeoff roll
- Surface inspection: If possible, inspect the runway surface on foot before attempting to use it. Look for ruts, soft spots, standing water, and obstructions
Performance Factors Supplement
When POH data does not directly account for certain conditions, apply the following approximate corrections to the calculated takeoff and landing distances:
| Condition | Distance Correction |
|---|---|
| Dry grass (short, firm) | +15% to ground roll |
| Wet grass or long grass | +20% or more to ground roll |
| Soft ground or mud | +25% or more (may be prohibitive) |
| 2% uphill slope | +10% to takeoff distance |
| 2% downhill slope | -10% from takeoff distance (but +10% to landing distance) |
| Tailwind (10% of liftoff speed) | +20% to takeoff distance |
Note
These corrections are approximate and cumulative. If you have a grass strip at altitude on a hot day with a tailwind, the corrections multiply — always add a safety margin beyond what the numbers show. A common rule of thumb is to require at least 50% more runway than the calculated distance.
Short-Field Takeoff
The short-field takeoff maximizes use of available runway and provides the steepest initial climb to clear obstacles:
- Pre-takeoff: Complete all checks. Set flaps as recommended by POH (typically 10 degrees). Trim for takeoff.
- Position: Taxi to the very beginning of the runway. Use every foot available.
- Hold brakes: Apply and hold toe brakes firmly.
- Full power: Advance throttle to full power. Verify engine instruments — RPM, oil pressure, oil temperature all normal.
- Release brakes: Once full power is confirmed and stable, release brakes simultaneously.
- Accelerate: Keep the aircraft tracking straight with rudder. Slight back pressure to reduce nosewheel drag.
- Rotate: At the POH-specified rotation speed, smoothly rotate to the climb attitude.
- Climb at VX: Maintain best angle of climb speed until any obstacle is cleared (or to at least 50 feet AGL).
- Transition to VY: Lower the nose slightly to accelerate to best rate of climb speed.
- Retract flaps: Once established in the climb at VY with adequate altitude.
Simulator Practice
On the Aviator.NYC AATD, practice short-field takeoffs with a simulated 50-foot obstacle at various distances from the runway end. This builds the discipline of VX climb and the awareness of obstacle clearance margins.
Short-Field Approach & Landing
Precision speed control and a specific aim point are essential. The goal is zero float and touchdown on your mark:
- Configure early: Full flaps (as POH recommends) established on final approach.
- Speed control: Maintain the POH approach speed precisely — typically Vref or 1.3 VS0. Do not add excessive speed.
- Aim point: Select a specific touchdown point and fly toward it. The aim point should remain stationary in the windscreen if you are on the correct glide path.
- Power management: Use power to control the descent rate. Reduce to idle just before the flare.
- Flare: Round out at the normal height — touch down firmly but not hard.
- After touchdown: Retract flaps immediately (dumps lift, puts weight on wheels). Apply maximum braking. Use aerodynamic braking (hold the nose up) as speed permits.
Key Concept
Excess speed is the enemy of a short-field landing. Every extra knot above the correct approach speed adds float distance. On a genuinely short runway, that extra float can mean running off the end.
Soft-Field Takeoff
The soft-field takeoff minimizes time on the soft surface and uses ground effect to accelerate to a safe climb speed:
- Taxi without stopping: Roll continuously from the taxiway onto the runway and into the takeoff roll. Do not stop on the soft surface.
- Full back pressure: As you align with the runway, hold full back pressure to keep the nosewheel light (or off the surface entirely).
- Full power: Apply full power smoothly as you roll.
- Lift off early: The aircraft will become airborne at a speed below normal climb speed. Allow this — do not force it back onto the ground.
- Accelerate in ground effect: Immediately after liftoff, lower the nose slightly to remain within one wingspan of the surface. Allow the airspeed to build.
- Climb: Once VX or VY is reached, establish a normal climb.
Note
The aircraft will be flying in a high angle of attack, low speed configuration immediately after liftoff. Do not pull back further or attempt to climb — you will stall. Let the aircraft accelerate in ground effect first.
Soft-Field Landing
The soft-field landing aims to touch down at the lowest possible speed with a nose-high attitude to protect the nosewheel:
- Normal approach: Fly a stabilized approach at the correct speed with appropriate flaps.
- Full flare: Use a complete flare to dissipate as much energy as possible before touchdown.
- Minimum speed touchdown: Allow the aircraft to settle onto the main wheels at the slowest possible speed.
- Hold back pressure: After touchdown, maintain full back pressure to keep the nosewheel off the surface for as long as possible.
- Do not brake hard: Allow the soft surface to decelerate the aircraft. Hard braking on a soft surface risks digging the wheels in.
- Keep rolling: If possible, keep the aircraft moving until you reach a hard surface or parking area. Stopping on a soft surface may make it difficult to start again.
Safety
On extremely soft surfaces, the nosewheel contacting the ground can cause the aircraft to nose over. Protecting the nosewheel is not merely about comfort — it is about preventing a potentially catastrophic pitch-over.
Key Takeaways
Short-Field Operations
| Operation | Key Technique | Critical Speed |
|---|---|---|
| Short-field takeoff | Brakes held, full power, rotate at minimum speed | VX until obstacle cleared, then VY |
| Short-field landing | Precision approach, touch on target, max braking | Vref (1.3 VS0) — no excess speed |
Soft-Field Operations
| Operation | Key Technique | Critical Point |
|---|---|---|
| Soft-field takeoff | Back pressure, lift off early, ground effect | Do not climb until VX/VY reached |
| Soft-field landing | Minimum speed, full flare, nosewheel protection | No hard braking — surface provides deceleration |
Critical Points to Remember
- Performance calculations are mandatory — never guess whether a runway is long enough.
- Corrections are cumulative — grass + heat + altitude + weight can easily double the required distance.
- VX for obstacles, VY for climb rate — know both speeds for your aircraft.
- Excess speed kills short-field landings — every extra knot adds float and uses runway.
- Protect the nosewheel on soft fields — back pressure throughout takeoff and after landing.
- Ground effect is your friend on soft-field takeoff — accelerate in it, do not try to climb through it prematurely.
- Keep moving on soft surfaces — stopping risks getting stuck.
Safety
If your calculations show the runway is too short, there is no point proceeding to prove the calculation was correct. Choose an alternate airport or reduce weight. Never attempt to "make it work" when the numbers say otherwise.
Completing the Pattern Training Sequence
This lesson completes the traffic pattern (pattern) training sequence in Stage 3. You have now covered:
- Normal takeoff and landing
- Crosswind operations
- Glide (power-off) approach and landing
- Short-field takeoff, approach, and landing
- Soft-field takeoff and landing
These skills, combined, give you the ability to operate safely from virtually any runway you are likely to encounter as a private pilot. Continue to practice all variations to maintain proficiency.
What's Next
You have completed Stage 3. Review all pattern operations and continue to refine your precision. The skills developed in this stage form the foundation for solo flight and cross-country operations.
Simulator Tip
Schedule an AATD session at Aviator.NYC to practice short-field operations at various simulated airports. Try airports with different runway lengths, elevations, and surrounding terrain to build real-world judgment.
Skills You'll Work On
These are the maneuvers and procedures covered in this lesson. Your instructor tracks each one as you progress.
- Preflight Inspection
- Engine Starting
- Taxi & Before Takeoff Check
- Radio Communications
- Short-Field Takeoff and Maximum Performance Climb
- Short-Field Approach and Landing
- Soft-Field Takeoff and Climb
- Soft-Field Approach and Landing
- Approach Planning & Altimeter Setting
- Go-Around / Rejected Landing
- After Landing Parking and Securing
Grades reflect what was covered in this lesson, not a certification of pilot competency.
Lesson Plan
Where this fits: Exercise 12c in Stage 3 (Traffic Pattern) and the final lesson of the PPL simulator syllabus. It draws together the precise speed control, power management, and pattern discipline from the earlier Stage 3 lessons and applies them to operations at the edge of the aircraft's runway capability.
- Prerequisite
- Lesson 13 — Glide Approach and Landing (can fly a stabilized approach to a chosen aim point with precise speed control).
- Materials
- C172 G1000 simulator, short-field and soft-field checklists, airport diagram, and the POH VX/VY/approach-speed reference.
- Objectives for this session
- Fly a short-field takeoff with brakes held to full power, rotation at the POH speed, and a VX climb to clear a simulated 50-foot obstacle before transitioning to VY.
- Land short-field on a specific aim point with precise approach speed, zero float, and immediate flap retraction and maximum braking after touchdown.
- Perform a soft-field takeoff using back pressure and ground effect, and a soft-field landing with a full flare, minimum-speed touchdown, and the nosewheel held off; fly a go-around when the approach is unstable.
Looking Ahead
This completes the PPL simulator syllabus. From here the focus shifts to checkride preparation — consolidating the full traffic pattern, emergency responses, and short- and soft-field operations into the polished, repeatable performance expected on the practical test.
These lesson plans are provided as supplementary training guidance only. They do not supersede FAA publications, aircraft manufacturer documentation, or your instructor's direction. Always refer to the FAA Instrument Flying Handbook, Airplane Flying Handbook, AIM, and applicable POH/AFM as the official sources.