Slow Flight
Learn to recognize the symptoms of critically slow airspeed and control the aircraft safely at minimum controllable airspeed. This exercise builds the foundation for stall recognition and pattern flying.
Lesson Objectives
- Recognize the symptoms of critically slow airspeed (buffet, mushy controls, high pitch attitude)
- Maintain controlled flight at minimum controllable airspeed (MCA) in various configurations
- Recover from slow flight to normal cruise with minimal altitude loss
- Understand why slow flight proficiency matters for pattern and landing phases
Slow flight is one of the most important exercises in your training. Every takeoff and every landing happens at slow speed — yet the airplane handles very differently near the stall than it does in cruise. Understanding how the aircraft behaves in this regime gives you the awareness and skill to stay safe when it matters most.
Why This Matters
Most loss-of-control accidents occur at low speed and low altitude — typically in the traffic pattern or during go-arounds. Mastering slow flight means you will recognize the warning signs early and react correctly, instinctively.
Distractions and Priority
Flying too slowly often happens when a pilot is distracted by radio calls, passengers, or map reading. Flying the aircraft is always priority number one. This lesson will help you build awareness of airspeed without constant instrument scanning.
Simulator Practice
At Aviator.NYC, our FAA-approved AATD simulator is ideal for practicing slow flight. You can safely explore the boundaries of the flight envelope and build confidence before taking it to the aircraft.
Background Briefing Topics
- Definition of Slow Flight
- Forces in Slow Flight
- Effect of Controls
- Maneuvering at Slow Speed
- Distractions
- Principles of Flight Supplement
Read the full Background Briefing →
Flight Exercise Topics
Definition of Slow Flight
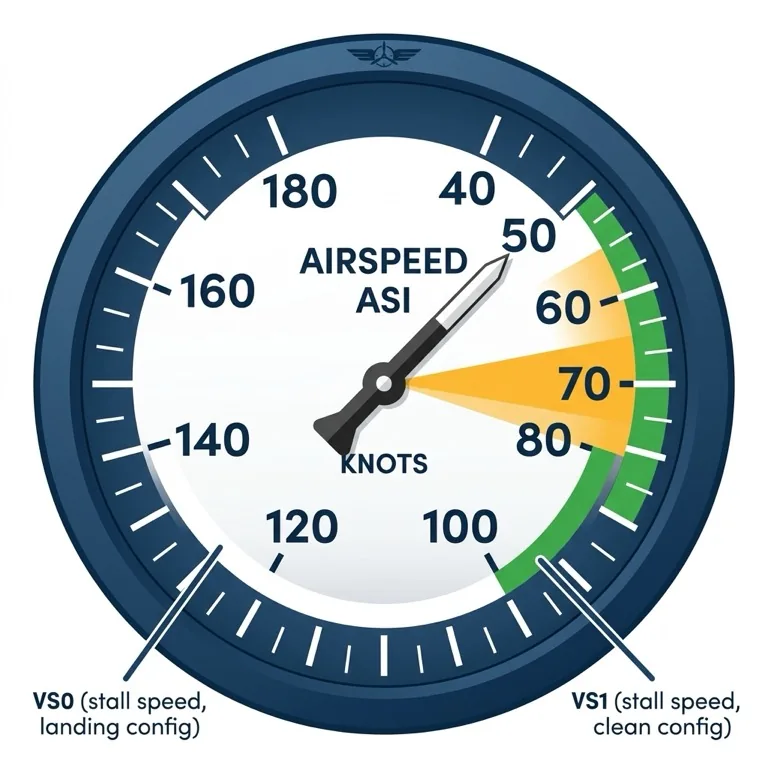
Slow flight is defined as flight at an airspeed approximately 5 knots above the stalling speed. At this speed, the airplane is fully controllable but operating near the lower boundary of its performance envelope.

To understand slow flight, you need to know two key stalling speeds:
- VS0 — Stall Speed (Landing Configuration)
- The bottom of the white arc on the airspeed indicator. This is the stalling speed at maximum weight, full flap, power off. It represents the slowest speed at which the airplane can maintain controlled flight in landing configuration.
- VS1 — Stall Speed (Clean Configuration)
- The bottom of the green arc on the airspeed indicator. This is the stalling speed at maximum weight, no flap, power off. It represents the slowest speed in clean (cruise) configuration.
Reading the Airspeed Indicator
The colored arcs on the ASI are your reference for slow flight limits. The white arc covers the flap operating range (VS0 to VFE), and the green arc covers the normal operating range (VS1 to VNO). In slow flight, you are operating just above the bottom of these arcs.
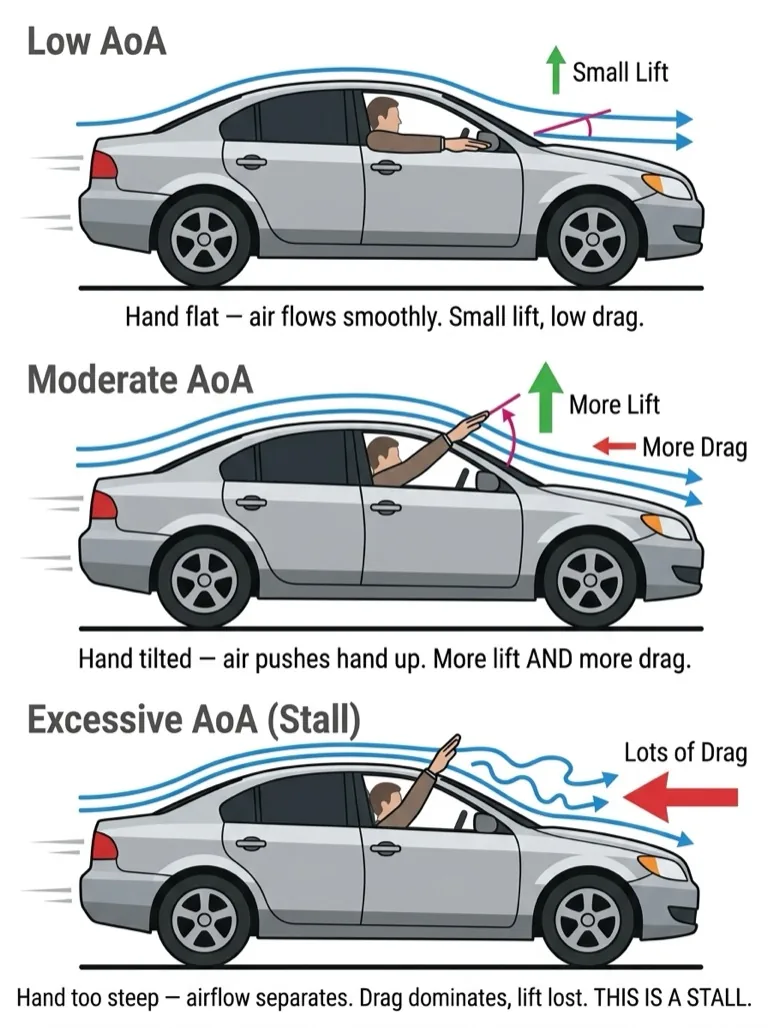
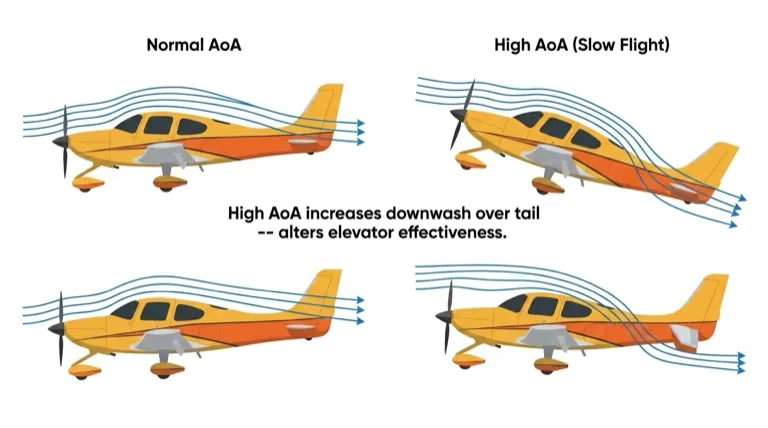
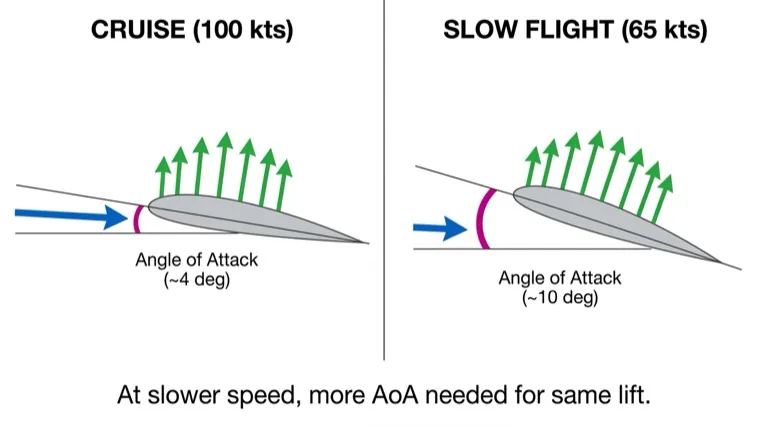
Forces in Slow Flight
At slow speed, the airplane must fly at a significantly higher angle of attack to generate sufficient lift. In cruise, the angle of attack is approximately 4 degrees. In slow flight, it increases to approximately 10 degrees or more.

This high angle of attack has several consequences:
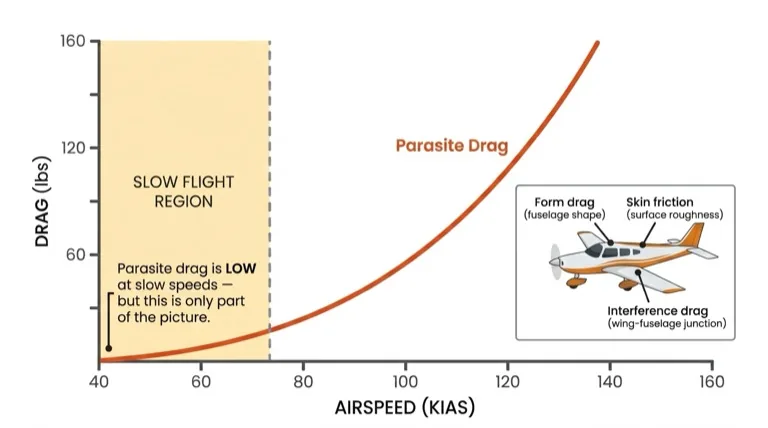
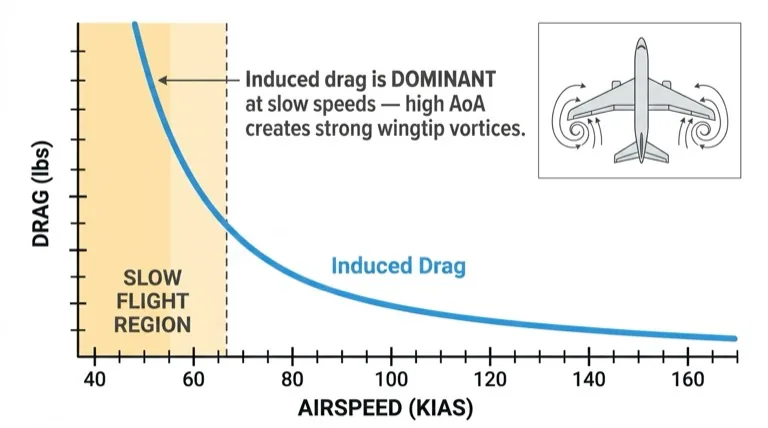
- Increased induced drag: Induced drag is inversely proportional to speed squared — at half the cruise speed, induced drag is four times greater
- More power required: The airplane needs significantly more power to maintain altitude at slow speed than at cruise
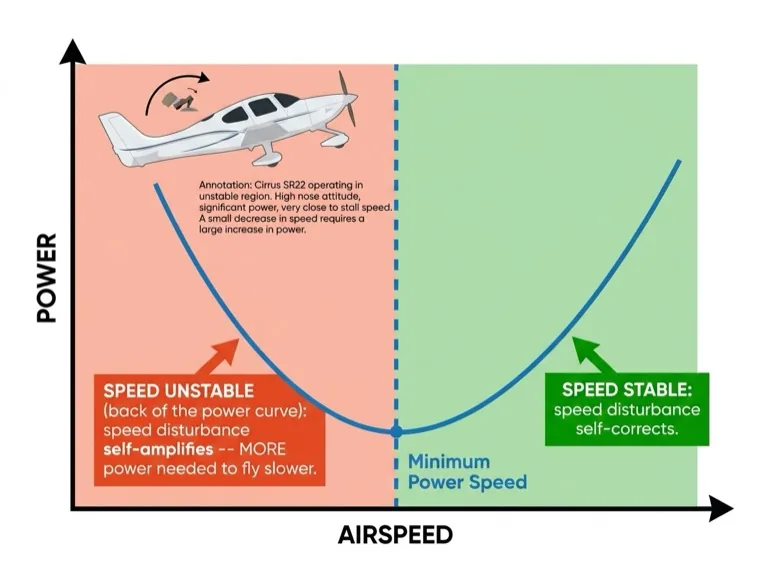
- Speed-unstable region: Below the minimum power required speed, the airplane enters a region where slowing down requires MORE power, not less
The Speed-Unstable Region
In normal flight, if you reduce power the airplane slows down and eventually reaches a new equilibrium. In the speed-unstable region (also called the "back side of the power curve"), any speed decrease causes drag to increase faster than the speed decrease reduces it. The airplane will continue to decelerate toward the stall unless you add power. This is why slow flight requires MORE power to fly SLOWER.
| Flight Condition | Approximate AoA | Relative Drag |
|---|---|---|
| High-speed cruise | 2° | Low |
| Normal cruise | 4° | Moderate |
| Slow flight | 10° | High |
| Approaching stall | 12–15° | Very high |
Effect of Controls
At slow speed, the reduced airflow over the control surfaces makes all controls less effective. You will notice:

- Sloppy feel: The controls feel mushy and unresponsive compared to cruise. Larger control movements are needed to achieve the same result.
- Adverse yaw more pronounced: Because the ailerons are less effective but still creating differential drag, adverse yaw becomes much more noticeable. Coordinated rudder use is essential.
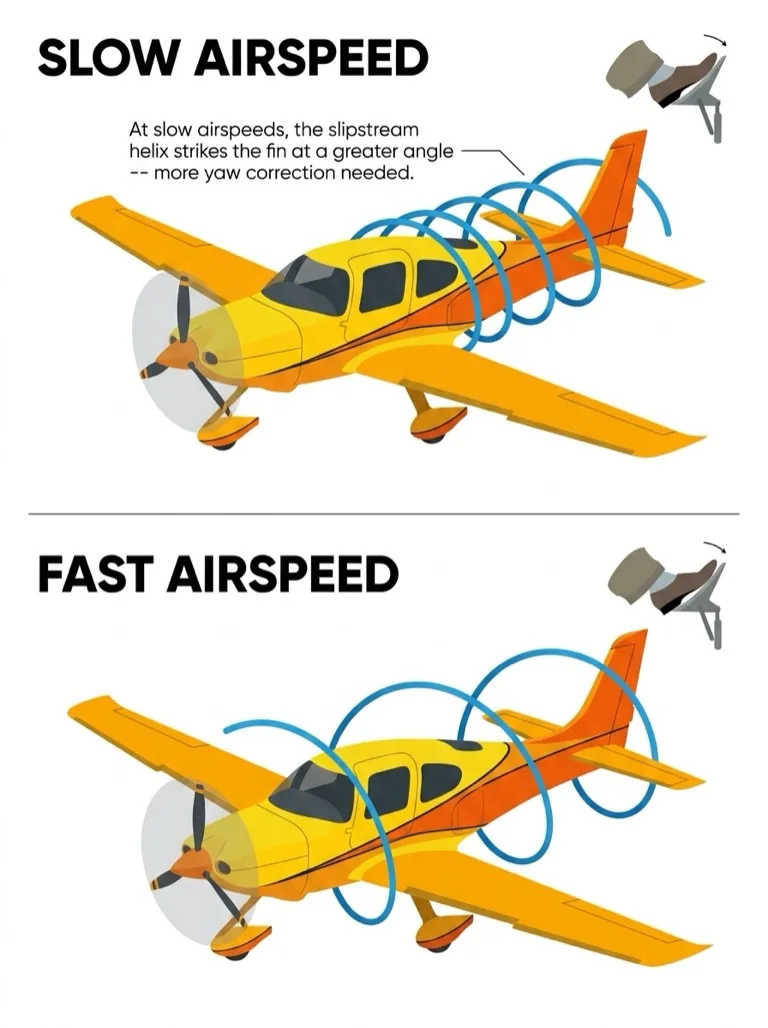
- Slipstream effect more noticeable: With high power settings needed for slow flight, the propeller slipstream creates a stronger asymmetric effect, requiring more right rudder to maintain coordinated flight.
Flap Caution
Never raise flaps when below VS1. Retracting flaps reduces the wing's maximum coefficient of lift, effectively increasing the stalling speed. If you are already below the clean stalling speed when you raise flaps, the airplane will stall immediately.
Maneuvering at Slow Speed
The fundamental relationship Power + Attitude = Performance still applies in slow flight, but the roles are reversed from normal cruise:
- Attitude controls airspeed: Lowering the nose increases speed; raising it decreases speed
- Power controls altitude: Adding power arrests descent; reducing power causes descent
When turning in slow flight:
- Limit bank angle to 15 degrees maximum — steeper banks increase load factor, which increases stalling speed
- Keep the airplane in balance — use the ball indicator and stay coordinated
- Add a small amount of power in the turn to compensate for the increased load factor and maintain altitude
Why 15 Degrees?
At 15 degrees of bank, the load factor is approximately 1.04G — a minimal increase in stall speed. At 30 degrees the load factor rises to 1.15G, and at 45 degrees to 1.41G. When you are already only 5 knots above the stall, even a small increase in stalling speed could push you into a stall.
Distractions
Inadvertent slow flight is one of the most dangerous situations in general aviation. It typically occurs when the pilot becomes distracted and allows airspeed to decay without noticing. Common distractions include:
- Radio calls: Listening for or making transmissions while in the traffic pattern
- Passengers: Conversation or passenger emergencies diverting attention
- Map reading / GPS programming: Looking inside the cockpit for extended periods
- Looking for traffic: Head-down time searching for reported traffic
Priority One
Flying the aircraft is ALWAYS the number one priority. Aviate, Navigate, Communicate — in that order. No radio call, no checklist item, no passenger request is worth losing control of the airplane. If you get task-saturated, let everything else go and fly the airplane first.
Principles of Flight Supplement
To fully understand slow flight, you need to understand the aerodynamic concepts behind it.
Angle of Attack
The angle of attack (AoA) is the angle between the chord line of the wing and the relative airflow. The chord line is an imaginary straight line drawn from the leading edge to the trailing edge of the wing.

Increasing the angle of attack increases the coefficient of lift — up to a point. The airplane does not know its pitch attitude relative to the horizon; it only responds to the angle of attack relative to the air flowing over the wing.
Critical Angle of Attack
The critical angle of attack is approximately 12 to 15 degrees for most light aircraft wings. Beyond this angle, the smooth airflow over the upper surface of the wing can no longer follow the surface contour. It separates from the wing, destroying lift and causing the stall.
Coefficient of Lift (CL) Curve
The relationship between angle of attack and lift coefficient is shown on the CL curve:
- From 0° to approximately 12–15°, CL increases roughly linearly with AoA
- At the critical angle, CL reaches its maximum value (CL max)
- Beyond the critical angle, CL drops sharply — the wing is stalled
Airflow Separation
As the angle of attack increases toward the critical angle, the airflow begins separating from the upper surface of the wing starting at the trailing edge. This separation point moves progressively forward as AoA increases. When separation reaches approximately the quarter-chord point, the wing stalls.
Center of Pressure Movement
The center of pressure is the point on the wing where the total aerodynamic force effectively acts. As the angle of attack increases, the center of pressure moves forward along the chord. At the stall, it moves rapidly rearward, causing a nose-down pitching moment — this is actually a built-in safety feature that helps the airplane recover from the stall naturally.
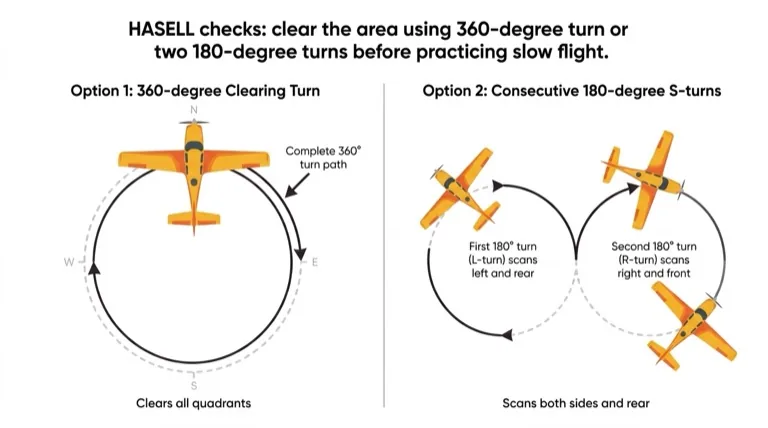
HASELL Checks
Before practicing any slow flight or stalling exercise, you must complete the HASELL check. This ensures you are in a safe environment to explore the edges of the flight envelope.
- H — Height
- Sufficient altitude to recover safely. Minimum 3,000 feet AGL for training exercises.
- A — Airframe
- Configuration appropriate for the exercise: flaps as required, landing gear (if retractable), brakes off, trim set.
- S — Security
- Harnesses tight, loose articles stowed, hatches and doors secure.
- E — Engine
- Temperatures and pressures in the green, fuel on fullest tank, mixture set, carburetor heat as required.
- L — Location (ABCC)
- Away from controlled airspace, Built-up areas, Clouds, and Congested traffic areas. Choose a practice area with clear terrain below.
- L — Lookout
- Complete a clearing turn (180° or two 90° turns) to ensure the area is free of other traffic above, below, and all around.
Abbreviated HELL Check
Between maneuvers within the same practice session, use the abbreviated HELL check: Height, Engine, Location, Lookout. This saves time while ensuring you remain in a safe configuration for the next maneuver.
Entering Slow Flight
The procedure for controlled deceleration to critically slow airspeed follows the Power-Attitude-Trim sequence:
Step 1 — POWER: Reduce
- Smoothly reduce power toward idle (or a low power setting as briefed)
- The airplane will begin to decelerate
Step 2 — ATTITUDE: Pitch Up to Maintain Level Flight
- As the airspeed decreases, progressively raise the nose to maintain altitude
- The pitch attitude will be noticeably higher than cruise — this is normal
- As speed continues to decrease, you will need to add power to maintain altitude (speed-unstable region)
Step 3 — TRIM
- Trim to relieve control pressure as you stabilize at the target speed
- Target: approximately 5 knots above VS1 (or VS0 if flaps are extended)
What You Will Notice
As you slow down, observe: the controls becoming sloppy, the nose-high attitude, the stall warning horn activating intermittently, a general sense of the airplane "hanging" on the propeller. These are the symptoms of critically slow airspeed that you must learn to recognize instantly.
Maneuvering in Slow Flight
Once stabilized in slow flight, practice:
- Maintaining altitude and heading — notice how much attention it requires
- Gentle turns (15 degrees bank maximum) — add a touch of power to compensate for the increased load factor
- Climbing and descending using power changes while maintaining slow airspeed
Recovery to Normal Flight
Recovery from slow flight to normal cruise uses a positive, sequential procedure:
Step 1 — POWER: Steadily Increase to Full
- Apply power smoothly and progressively — avoid slamming the throttle open, which can cause a yaw to the left
- Maintain balanced flight with right rudder as power increases
Step 2 — ATTITUDE: Maintain Altitude Until Airspeed Increases
- Hold altitude — the nose will need to come down slightly as speed builds
- Once airspeed reaches normal climb speed (VY), pitch to the climb attitude if a climb is desired
- Or maintain level flight as speed increases toward cruise
Step 3 — TRIM
- Re-trim for the new flight condition (climb or cruise)
- Retract flaps in stages once safely above VS1
Power Application
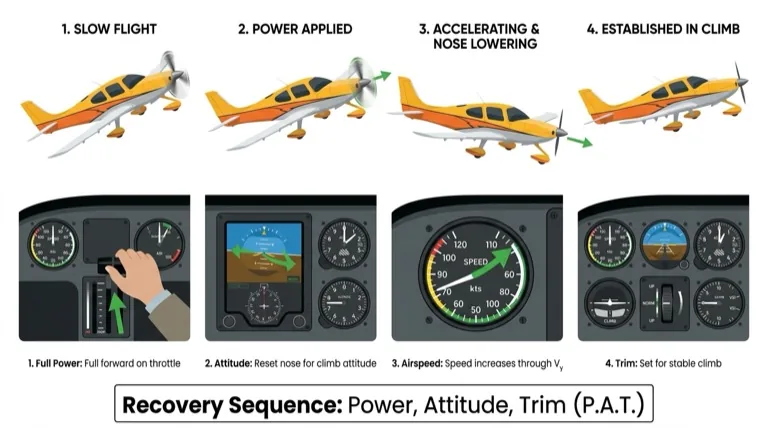
When applying full power from slow flight, be prepared for a significant left-turning tendency due to propeller effects (torque, P-factor, slipstream, gyroscopic precession). Use right rudder to maintain coordinated flight throughout the recovery.
What You Have Learned
You can now recognize the symptoms of critically slow airspeed and control the aircraft safely at minimum controllable airspeed. You understand how the airplane behaves differently near the stall and can maneuver confidently in this regime.
Key takeaways from this lesson:
- Slow flight is speed-unstable: Below minimum power required speed, you need MORE power to fly SLOWER — the back side of the power curve
- Controls are less effective: Larger inputs needed, adverse yaw more pronounced, coordination is critical
- Attitude controls airspeed, power controls altitude — the reversed relationship at slow speed
- Turns limited to 15 degrees bank — load factor increases stalling speed, and you have very little margin
- Never raise flaps below VS1 — doing so will cause an immediate stall
- Fly the airplane first — no distraction is worth losing airspeed awareness
Skills for What Comes Next
The awareness you have built in this lesson is directly applicable to two critical areas of your training:
Next: Stalling (Lesson 8)
Slow flight brings you to the edge of the stall. In the next lesson, you will cross that boundary — intentionally entering and recovering from full stalls. The symptoms you learned to recognize here are the same warning signs that precede every stall.
Pattern flying: Every approach and landing happens in the slow flight regime. The airplane is configured with flap, flying at relatively low speed, close to the ground. Your ability to maintain precise airspeed control at slow speed — while managing radio calls, checklists, and traffic — is exactly what pattern flying demands.
The foundation is solid. You know what the airplane feels and sounds like when it is running out of airspeed. That awareness will protect you throughout your entire flying career.
Coming Up Next: Lesson 8 — Stalling
Learn to recognize, enter, and recover from stalls in various configurations. Understand the aerodynamics of the stall, correct wing-drop technique, and master the incipient stall recovery that will...
Aviator.NYC Lesson Plan
Briefing Topics
- Aviation weather tools
- NYC-area training airports overview
- Decision-making strategies
Simulator Session
- Pre-Flight Weather Briefing — TAF and METAR
- Depart KFRG or KCDW into deteriorating weather
- Diversion to alternate airport (KMMU or KHPN)
- Simulated Radio Failure — NORDO landing procedure
- Go-Around from 200 ft AGL
Debrief
Review decision-making under pressure and airport familiarity.
Pilot Preparation
- Practice weather briefing on aviationweather.gov
- Review NORDO (no radio) procedures
Skill Items
| Skill | D P 1 2 3 4 5 6 |
|---|---|
| Preflight Inspection | |
| Engine Starting | |
| Taxi & Before Takeoff Check | |
| Radio Communications | |
| Normal Takeoff and Climbs | |
| Climbing & Leveling Off With Turns | |
| Straight & Level Flight/Various Airspeeds | |
| Steep Turns | |
| Slow Flight (With & Without Flaps) | |
| Use of Trim Flaps Mixture Carb Heat | |
| Clean Stall Entry & Symptoms | |
| Recovery With & Without Power | |
| Incipient Recovery of Clean Stall | |
| Go Around Procedure (At Altitude) | |
| Descent & Leveling Off | |
| Ground Ref Maneuvers | |
| Approach Planning & Altimeter Setting | |
| Normal Landing | |
| After Landing Parking and Securing |
Radio Communication Scenarios
Practice VFR radio calls for this lesson. Listen to the scenario, formulate your response, then reveal the full exchange.
You are in N106ST and have just taken off from Kirksville Regional in Missouri. After a few minutes, you see that you are experiencing unforecast light icing. You decide to go back to Kirksville, but want to give a PIREP to Flight Watch. Tune 122.0 and make the report.
Contact Flight Watch on 122.0 and give a PIREP. Include: callsign, location, altitude, aircraft type, and the icing conditions you're experiencing. State your intentions.
- You (Pilot) "Flight Watch, november-one-zero-six-sierra-tango, PIREP."
- Flight Watch "november-one-zero-six-sierra-tango, Flight Watch, go ahead with your PIREP."
- You (Pilot) "november-one-zero-six-sierra-tango, PA-28, one-zero miles northeast of Kirksville, four thousand five hundred. Light rime icing, unforecast. Returning to Kirksville."
- Flight Watch "november-one-zero-six-sierra-tango, roger, PIREP received. Kirksville altimeter two-niner-niner-two. Weather, ceiling three thousand broken, visibility five."
- You (Pilot) "Two-niner-niner-two, six-sierra-tango. Thank you."
You are in N106ST on a long cross-country to Central Nebraska Regional Airport. You've filed an open VFR flight plan. You pass the Ponca City VOR at 1830 Zulu and decide to update Flight Service with your current position.
Contact Flight Service to update your VFR flight plan with a position report. Include: callsign, that you have an open VFR flight plan, your current position, altitude, and time over the fix.
- You (Pilot) "Radio, november-one-zero-six-sierra-tango, position report on open VFR flight plan."
- FSS (Radio) "november-one-zero-six-sierra-tango, Radio, go ahead."
- You (Pilot) "november-one-zero-six-sierra-tango, over Ponca City VOR at one-eight-three-zero Zulu, five thousand five hundred, en route Central Nebraska Regional."
- FSS (Radio) "november-one-zero-six-sierra-tango, roger, position report received. Ponca City altimeter three-zero-zero-five."
- You (Pilot) "Three-zero-zero-five, six-sierra-tango."
These lesson plans are provided as supplementary training guidance only. They do not supersede FAA publications, aircraft manufacturer documentation, or your instructor's direction. Always refer to the FAA Instrument Flying Handbook, Airplane Flying Handbook, AIM, and applicable POH/AFM as the official sources.