Stalling
Learn to recognize, enter, and recover from stalls in various configurations. Understand the aerodynamics of the stall, correct wing-drop technique, and master the incipient stall recovery that will protect you throughout your flying career.
Lesson Objectives
- Recognize the aerodynamic indications of an approaching stall
- Perform stall entries and recoveries in clean and landing configurations
- Recover from stalls with minimal altitude loss using proper technique
- Demonstrate correct wing-drop recovery (lower the nose, not opposite aileron)
The stall is one of the most misunderstood topics in aviation. Many students fear it — but once you understand the aerodynamics and practice the recovery, you will find that stalls are predictable, manageable, and fully recoverable when handled correctly. This lesson takes you beyond the edge you explored in slow flight and teaches you what happens when the wing exceeds its critical angle of attack.
A Stall Is an Angle, Not a Speed
The wing stalls when it exceeds the critical angle of attack — regardless of airspeed, attitude, or power setting. You can stall at any speed and in any attitude. However, since light aircraft lack angle-of-attack indicators, airspeed remains your primary reference for stall proximity.
Safety First
All stall practice is conducted at safe altitude (minimum 3,000 feet AGL) after completing full HASELL checks. The goal is never to surprise yourself — it is to build recognition and correct response into muscle memory.
Simulator Practice
At Aviator.NYC, our FAA-approved AATD simulator accurately models stall behavior, including buffet and wing drop. Practicing stalls in the sim first builds confidence and correct technique before you experience them in the aircraft.
Background Briefing Topics
- Forces in a Stall
- Control Effectiveness
- Factors Affecting Stalling Speed
- Wing Drop at the Stall
- Symptoms of Approaching Stall
- Standard Stall Recovery
- Secondary Stall
- Departure Stall
- Incipient Stall Recovery
Read the full Background Briefing →
Flight Exercise Topics
Forces in a Stall
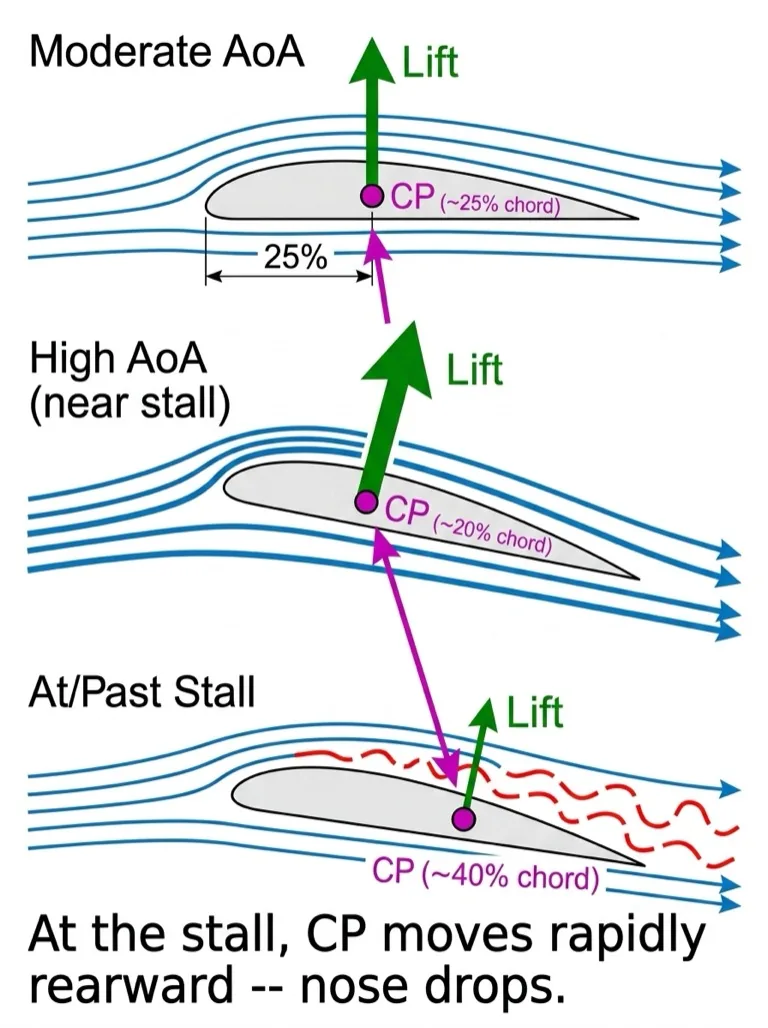
A stall occurs when the wing exceeds its critical angle of attack (approximately 12 to 15 degrees for most light aircraft). At this point, the smooth airflow over the upper surface of the wing separates catastrophically, causing a marked loss of lift.
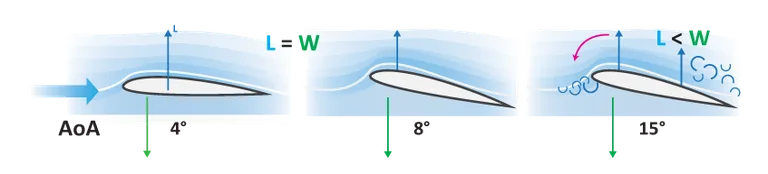
The key principle: a stall occurs at an angle, not a speed. The wing does not know how fast it is going — it only responds to the angle at which air meets its surface. However, since most light training aircraft lack angle-of-attack indicators, airspeed is your primary practical reference for stall proximity.
When the wing stalls:
- Lift decreases dramatically (by 30-50% in an instant)
- Drag increases sharply
- The nose pitches down (due to the rearward shift in center of pressure)
- The airplane may roll to one side if the stall is asymmetric
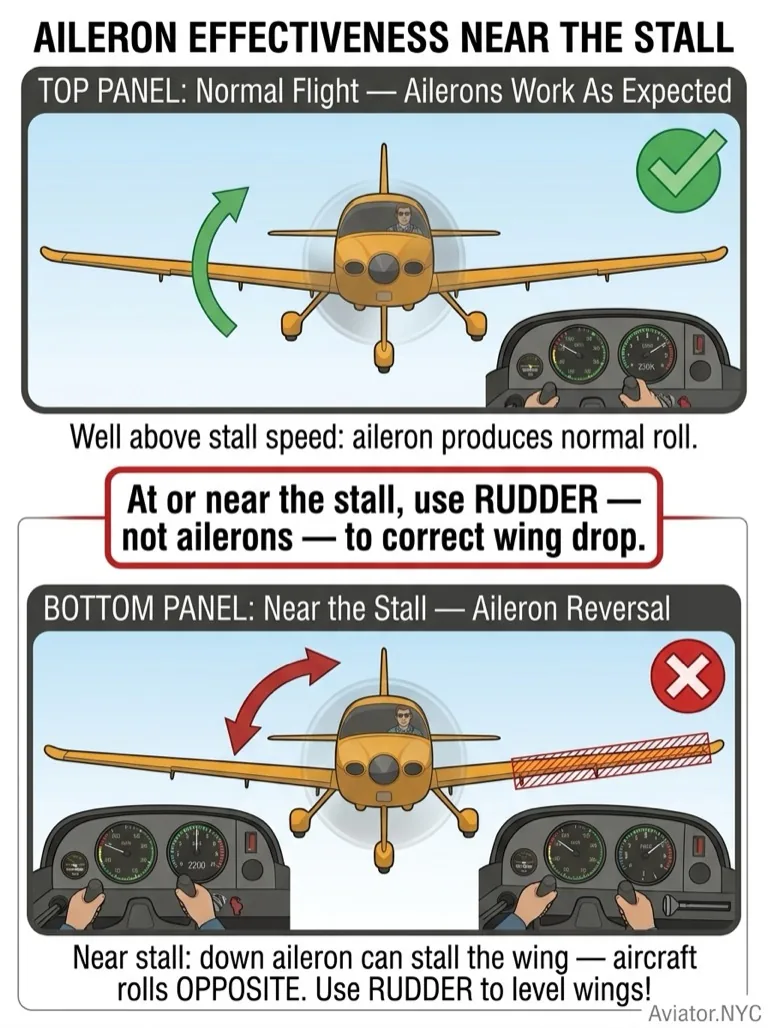
Control Effectiveness
At and near the stall, the flight controls behave very differently from normal flight:
- Ailerons: Very ineffective and potentially dangerous. Because the wing is at or beyond the critical angle of attack, deflecting an aileron DOWN (to raise a dropped wing) increases the local angle of attack on that wing further, potentially deepening the stall on that wing and making the roll worse.
- Rudder: Still effective because it operates in the propeller slipstream and in undisturbed airflow. This is why rudder is used to correct wing drop at the stall — NOT aileron.
- Elevator: Still effective enough for recovery. Pushing forward reduces the angle of attack across the entire wing, which is the fundamental recovery action.
Critical Rule
DO NOT use aileron to correct a wing drop at the stall. Use RUDDER. Aileron will make the situation worse and can lead to a spin entry. This is one of the most important rules in all of flight training.
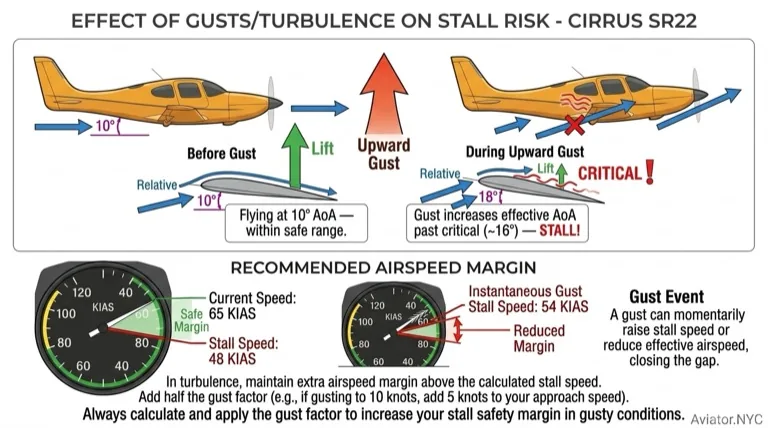
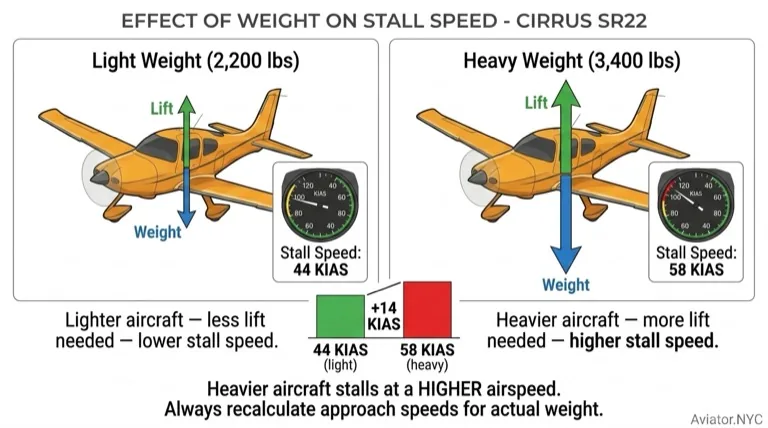
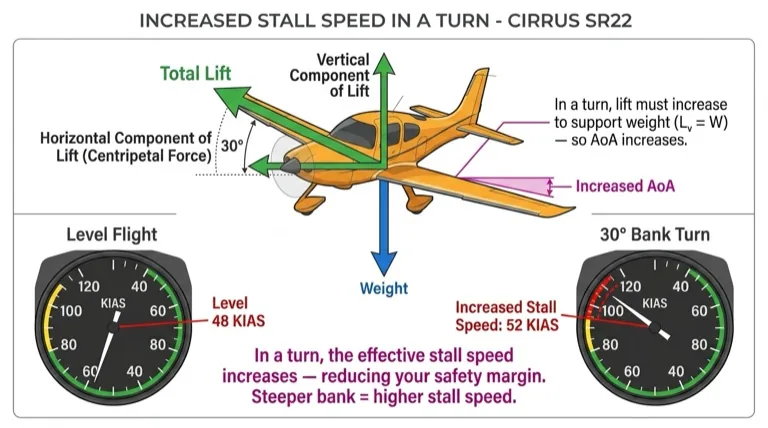
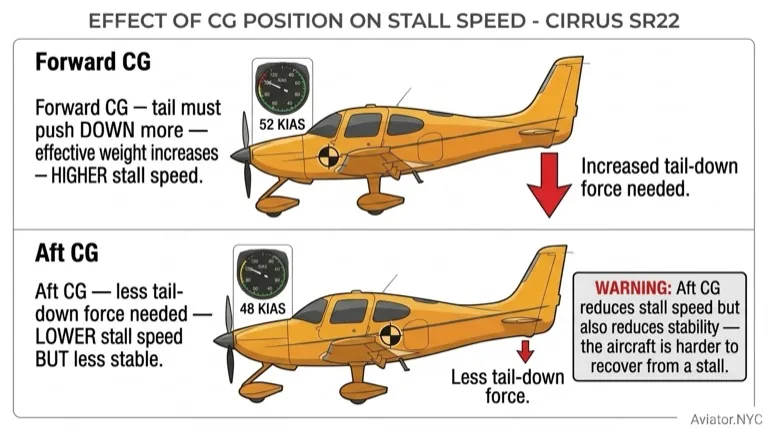
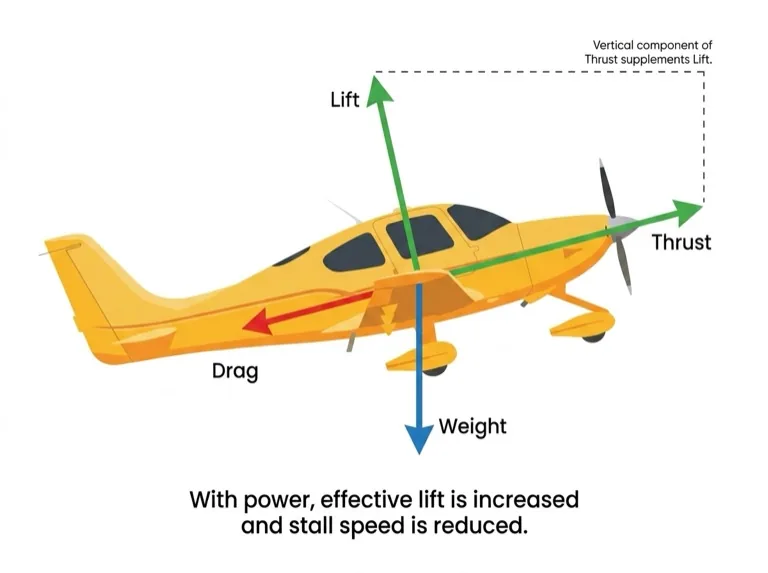
Factors Affecting Stalling Speed
While the stall always occurs at the same critical angle of attack, the airspeed at which this angle is reached varies significantly depending on several factors:

| Factor | Effect on Stall Speed | Explanation |
|---|---|---|
| Weight (heavier) | Increases | More lift required; higher AoA needed at any given speed |
| Bank angle (steeper) | Increases | Load factor increases; wing must produce more lift |
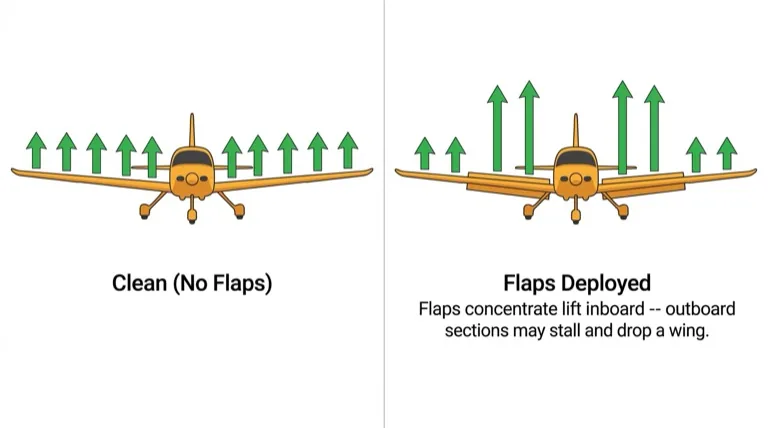
| Flap (extended) | Decreases | Higher CL max; wing produces more lift at lower speed |
| Power (applied) | Decreases slightly | Vertical component of thrust partially supports weight |
| Ice / contamination | Increases | Disrupts airflow; reduces CL max |
| CG position (forward) | Increases | Tail must produce more downforce; wing carries more load |
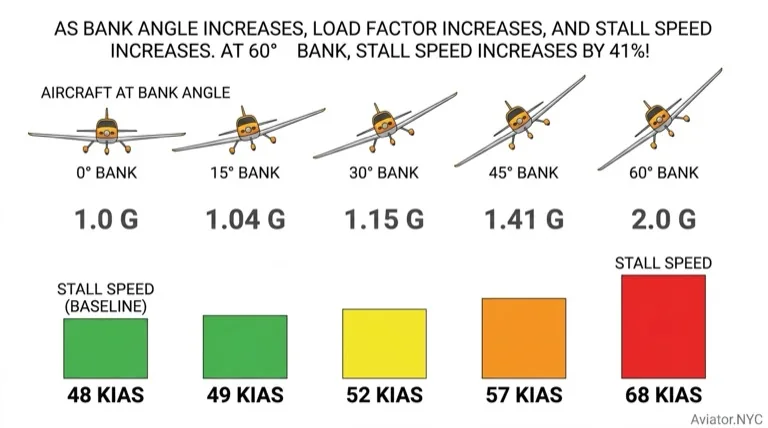
Bank Angle and Load Factor
In a 60-degree bank, the load factor is 2G — meaning the stalling speed increases by approximately 41% (multiply by the square root of the load factor). A typical trainer with a VS1 of 48 knots would stall at approximately 68 knots in a 60-degree bank. This is why steep turns at low speed are so dangerous.
Wing Drop at the Stall
A wing drop occurs when one wing stalls before the other, causing an asymmetric loss of lift and a rapid roll toward the stalled wing. This is caused by:
- Uneven airflow separation across the wing span
- Slight rigging asymmetries in the airframe
- Yaw at the point of stall (uncoordinated flight)
- Turbulence or gusts affecting one wing differently
The correct response to a wing drop at the stall:
- Apply opposite rudder to prevent further yaw and roll
- Simultaneously lower the nose (reduce angle of attack) to unstall both wings
- Do NOT use aileron — it will deepen the stall on the dropping wing
Wing Drop to Spin
An uncorrected wing drop at the stall — especially if aggravated by aileron input — can develop into a spin. The spin is an autorotating stalled condition that requires a specific recovery technique and significant altitude to resolve. Correct wing-drop response prevents spin entry.
Symptoms of Approaching Stall
Learning to recognize the approach of a stall is more important than learning to recover from one. If you can identify these symptoms early, you can prevent the stall entirely:
- Decreasing airspeed: The airspeed indicator shows a declining trend toward the stall speed range
- Less effective controls: The yoke/stick feels mushy; larger inputs are needed for less response
- High nose attitude: The pitch attitude is noticeably higher than normal for the flight phase
- Buffet / vibration: Turbulent airflow from the separated boundary layer strikes the tail, causing airframe vibration you can feel through the controls and seat
- Stall warning horn: The aural warning activates 5-10 knots above the stall (activated by a vane or pressure sensor on the wing leading edge)
The Buffet Is Your Friend
Aerodynamic buffet is a natural, built-in stall warning that works regardless of electrical systems. Learn to feel it through the airframe. Many experienced pilots use buffet onset as their primary indicator of stall proximity — more reliable than any gauge.
Standard Stall Recovery
The standard stall recovery is performed simultaneously — all actions happen together, not sequentially:
- Lower the nose — reduce the angle of attack below the critical angle. This is the PRIMARY recovery action. The stall is caused by excessive angle of attack; reducing it is the cure.
- Apply full power — to minimize altitude loss and accelerate the airplane back to a safe flying speed
- Level the wings with rudder — if a wing has dropped, use rudder to bring wings level (not aileron)
Once the wings are unstalled and flying speed is regained, smoothly return to the desired flight attitude. The goal is to minimize altitude loss while recovering positively.
The Priority
Reducing angle of attack (lowering the nose) is ALWAYS the first priority. Power helps minimize altitude loss, but the airplane will not fly again until the angle of attack is reduced below the critical angle. Even with full power, if the angle of attack remains too high, the wing stays stalled.
Secondary Stall
A secondary stall occurs when the pilot pulls back too aggressively during the recovery from a primary stall. By pulling the nose up too quickly or too far, the angle of attack exceeds the critical angle again before the airplane has regained sufficient speed.
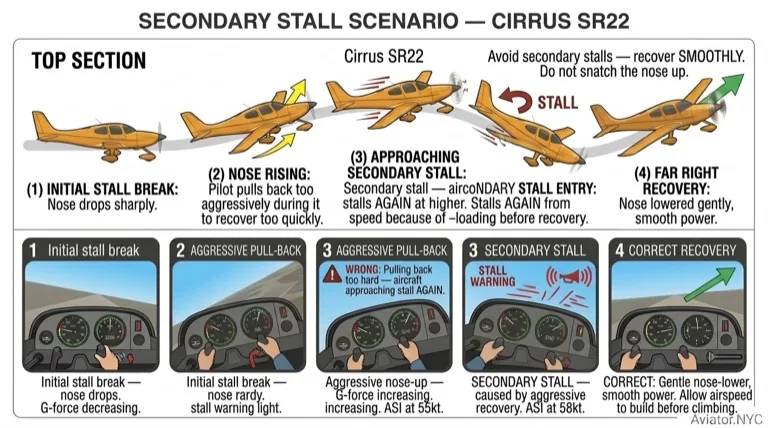
To avoid a secondary stall:
- Recover smoothly — do not snatch the nose up after the initial pitch down
- Allow airspeed to build before raising the nose to climb
- Accept some altitude loss — it is far better to lose 100 feet recovering properly than to stall again closer to the ground
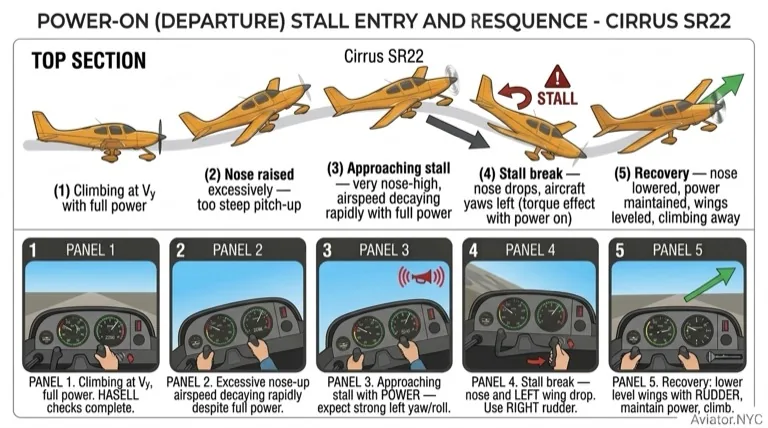
Departure Stall
A departure stall (also called a power-on stall or takeoff/climb stall) simulates a stall during the takeoff or climb phase. It occurs with power applied and in a nose-high attitude — exactly the configuration after takeoff.
Departure stalls are particularly dangerous because:
- They occur at low altitude — very little room for recovery
- The high power and nose-high attitude can mask the approaching stall
- Propeller effects (torque, P-factor) can cause a rapid wing drop or yaw at the stall
- The pilot may be distracted by after-takeoff tasks
Incipient Stall Recovery
The incipient stall is the developing stall — the phase between recognizing the first symptoms and the full stall break. Recovering at this point is the key practical skill because:
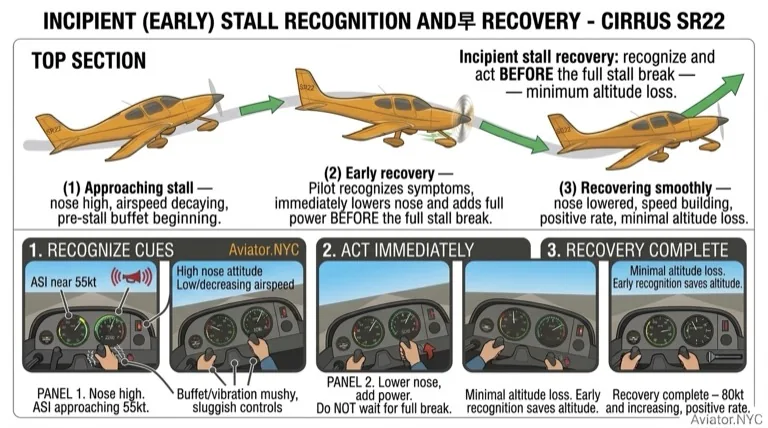
- It requires less altitude loss than recovering from a full stall
- There is no wing drop or loss of control to manage
- It represents how you will actually use stall awareness in real flying — recognizing and correcting BEFORE the stall occurs
Incipient stall recovery technique:
- At the first recognition of stall symptoms (buffet, stall warning, sloppy controls) — immediately reduce angle of attack (lower the nose slightly)
- Apply power as needed to arrest any altitude loss
- The stall is prevented; the airplane continues flying
This Is the Real Skill
Full stall practice teaches you what happens if you miss the signs. Incipient recovery practice teaches you what to do when you catch them. In real-world flying, incipient recovery is the skill that saves lives — you will rarely (if ever) intentionally stall an airplane outside of training.
HASELL Checks
Before any stall exercise, complete the full HASELL check as described in Lesson 7. Ensure you have a minimum of 3,000 feet AGL, clear airspace, and have performed a thorough clearing turn.
Between Stalls
Use the abbreviated HELL check (Height, Engine, Location, Lookout) between each stall exercise. Confirm you still have adequate altitude and are clear of traffic before the next maneuver.
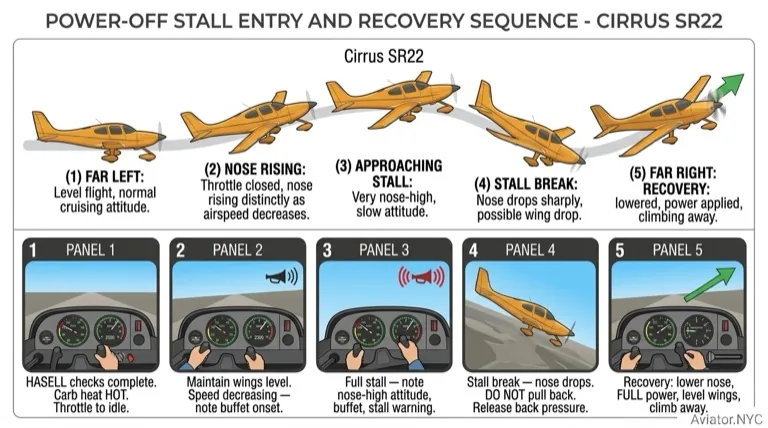
Stall and Recovery Without Power
This is the basic stall — clean configuration, power at idle. It demonstrates the fundamental aerodynamics of the stall in its simplest form.
Entry
- Establish straight and level flight at a safe altitude
- Reduce power smoothly to idle
- Maintain altitude by progressively raising the nose
- Continue raising the nose as speed decreases — note the symptoms as they develop
- Hold the back pressure until the stall break occurs (nose drops, possible wing drop)
Recovery (Without Power)
- Lower the nose — relax back pressure to reduce angle of attack
- Level wings with rudder if a wing has dropped
- As speed builds, smoothly raise the nose to level flight
- Add power to regain cruise speed
What to Observe
Note how the airplane gives you clear warning before it stalls: the buffet, the stall warning horn, the mushy controls. The stall break itself should not surprise you — you have been warned by multiple cues.
Stall and Standard Recovery (With Power)
This is the standard stall recovery you will use in practice — applying full power during recovery to minimize altitude loss.
Entry
Same as above — idle power, maintain altitude, let speed decay to the stall.
Standard Recovery
- Simultaneously: Lower the nose (reduce AoA), apply full power, level wings with rudder
- Maintain balanced flight — right rudder as power increases
- As airspeed increases, smoothly transition to climb or level flight
- Retract flaps (if extended) in stages once safely above VS1
Avoid the Secondary Stall
Do not raise the nose too aggressively after recovery. Allow airspeed to build before transitioning to a climb. Pulling up too soon or too hard will simply stall the airplane a second time — now at a lower altitude.
Stall With Power
This exercise simulates a departure stall — stalling with power applied, as might occur during takeoff or climb if the pilot raises the nose too high.
Entry
- Establish cruise flight, then apply climb power (or full power as briefed)
- Progressively raise the nose well above the normal climb attitude
- Maintain wings level and balanced flight as speed decays
- Continue until the stall break
What to Expect
- The stall will occur at a higher pitch attitude than the power-off stall
- The nose drop at the stall may be more pronounced
- Wing drop tendency may be stronger due to propeller effects (P-factor, slipstream)
- More right rudder is needed throughout to stay coordinated
Recovery
Standard recovery: lower the nose, maintain full power, level wings with rudder, transition to climb as speed builds.
Stall With Flap
This demonstrates how flap affects the stall characteristics. Flap lowers the stalling speed (VS0 is lower than VS1) but also changes the stall behavior.
Entry
- Reduce speed below VFE (maximum flap extension speed)
- Extend full flap
- Reduce power to idle
- Maintain altitude as speed decays to the stall
What to Expect
- The stall occurs at a lower airspeed than clean configuration
- The nose-down pitch at the stall may be more abrupt
- Higher drag means the airplane decelerates faster toward the stall
Recovery
- Standard recovery: lower nose, full power, level wings with rudder
- Do NOT raise flaps immediately — first establish positive climb or level flight
- Retract flaps in stages (e.g., full to half, then half to clean) once safely above VS1 and with positive rate
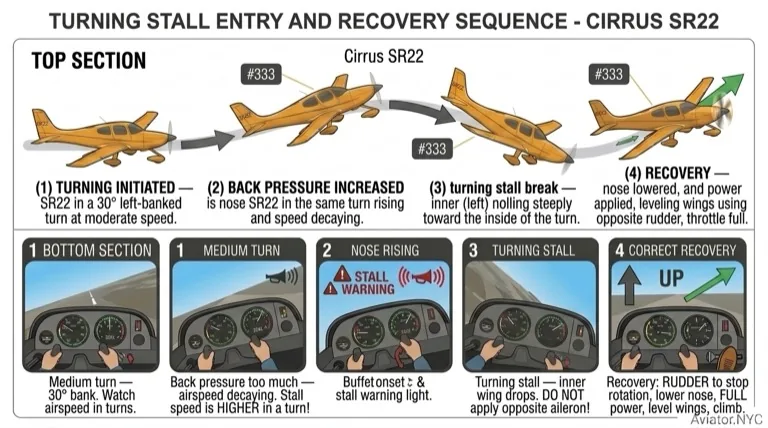
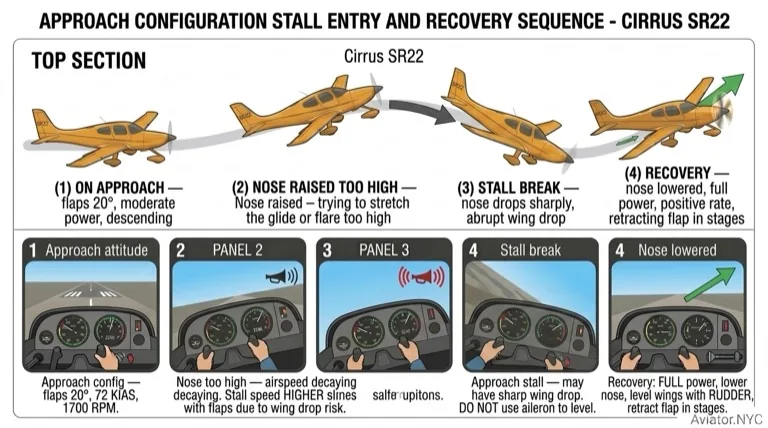
Stall in Approach Configuration (Power and Flap)
This simulates a stall on final approach — the most dangerous real-world scenario because it occurs at low altitude with limited recovery room.
Entry
- Configure as for approach: flap extended, approach power set
- Establish a normal approach attitude and speed
- Gradually raise the nose (simulating the pilot pulling back too much on short final)
- Allow speed to decay to the stall while maintaining power at approach setting
Recovery
- Lower the nose — reduce angle of attack
- Simultaneously apply full power
- Level wings with rudder
- Establish positive rate of climb before raising flaps in stages
Real-World Context
A stall on final approach is one of the most lethal scenarios in general aviation. At 200-500 feet AGL, there is very little room to recover. This is why recognizing the approach of a stall (incipient recovery) is so critical — you must catch it early, long before the full stall develops.
Recovery at Incipient (Developing) Stall
This is the most important practical skill in the stall series. In real flying, you will use incipient recovery — never allowing the stall to fully develop.
Procedure
- Enter as for any stall configuration (clean, with flap, with power)
- At the first symptom of the approaching stall — buffet onset, stall warning horn, or mushy controls — immediately recover
- Recovery: lower the nose slightly (just enough to reduce AoA below critical), apply power as needed
- The stall is prevented; minimal altitude is lost
Practice Variations
- Recover at stall warning horn activation
- Recover at first buffet
- Recover at first sense of mushy controls
- Practice in various configurations: clean, with flap, with power, in turns
Building the Instinct
The goal is to make incipient stall recovery an automatic response. When you feel the buffet or hear the horn, your hands should move to lower the nose and add power without conscious thought. This is the reflex that protects you in the traffic pattern, on go-arounds, and throughout your flying career.
What You Have Learned
You can now recognize, enter, and recover from stalls in various configurations. More importantly, you can identify an approaching stall and recover before it fully develops — the skill that matters most in real-world flying.
Key takeaways from this lesson:
- A stall is an angle, not a speed — the wing stalls when it exceeds the critical angle of attack, regardless of airspeed or attitude
- Use RUDDER for wing drop — never aileron. Aileron deepens the stall and can cause a spin.
- Standard recovery: simultaneously lower the nose (reduce AoA), apply full power, level wings with rudder
- Factors change stalling speed: weight, bank angle, flap, power, ice, and CG position all affect the speed at which the stall occurs
- Avoid the secondary stall: recover smoothly; do not pull up too aggressively
- Incipient recovery is the key skill: recognize the symptoms early and act immediately — this prevents the stall from ever developing
The Skill That Protects You
A Lifelong Skill
Stall awareness and incipient recovery are not just training exercises you practice and forget. These skills form the safety net that protects you on every flight — during every takeoff, every approach, every go-around. The pilot who recognizes the first buffet and instinctively unloads the wing is the pilot who never has a loss-of-control accident.
Throughout your flying career, you will encounter situations where the airplane approaches the stall inadvertently: a gust on short final, an aggressive turn in the pattern, a distraction during climb-out. Your training in this lesson ensures that your response is immediate, correct, and automatic.
The stall is not something to fear. It is something to understand, respect, and know how to handle. You now have that understanding.
Looking Ahead
With slow flight and stalling mastered, you have the awareness and control skills needed for the next phases of training. The lessons ahead will build on this foundation:
- Pattern flying: Operating in the slow flight regime close to the ground, managing configuration changes while maintaining safe airspeed
- Forced landings: Glide approaches where stall awareness during the final turn is critical
- Advanced maneuvers: Steep turns, advanced stalls, and unusual attitude recovery all rely on your understanding of the stall
Coming Up Next: Lesson 9 — Spin Avoidance
Understand how spins develop from stalls and learn to recover at the incipient stage.
Aviator.NYC Lesson Plan
Briefing Topics
- Ground-based and GPS navigation
- Sectional charts
- VOR, GPS, and waypoints
- FAA Knowledge Test structure
Simulator Session
- Departure Briefing — KFRG to JFK VOR
- In-Flight Navigation — GPS and VOR tracking
- Diversion Exercise — weather or NOTAM scenario
- Arrival and Descent to Class D airport
Debrief
Review navigation technique and knowledge test preparation plan.
Pilot Preparation
- Study FAA Knowledge Test subjects
- Register for the written test
- Practice with Sporty's study app
Skill Items
| Skill | D P 1 2 3 4 5 6 |
|---|---|
| Preflight Inspection | |
| Engine Starting | |
| Taxi & Before Takeoff Check | |
| Radio Communications | |
| Normal Takeoff and Climbs | |
| Climbing & Leveling Off With Turns | |
| Straight & Level Flight/Various Airspeeds | |
| Steep Turns | |
| Slow Flight (With & Without Flaps) | |
| Use of Trim Flaps Mixture Carb Heat | |
| Clean Stall Entry & Symptoms | |
| Recovery With & Without Power | |
| Incipient Recovery of Clean Stall | |
| Go Around Procedure (At Altitude) | |
| Descent & Leveling Off | |
| Ground Ref Maneuvers | |
| Approach Planning & Altimeter Setting | |
| Normal Landing | |
| After Landing Parking and Securing |
Radio Communication Scenarios
Practice VFR radio calls for this lesson. Listen to the scenario, formulate your response, then reveal the full exchange.
You are in N106ST, 20 miles out from your destination, Corona Municipal Airport. You're getting close and would like to get Corona's AWOS. You are talking to SoCal Approach on 135.4. Let the controller know your intentions.
Let approach know you'd like to leave the frequency briefly to pick up the AWOS at your destination. A simple: "request frequency change to monitor Corona AWOS."
- You (Pilot) "SoCal Approach, november-one-zero-six-sierra-tango, request frequency change to monitor Corona AWOS."
- SoCal Approach "november-one-zero-six-sierra-tango, frequency change approved. Report back this frequency."
- You (Pilot) "Frequency change approved, will report back, six-sierra-tango."
- You (returning) "SoCal Approach, november-one-zero-six-sierra-tango, back on your frequency."
- SoCal Approach "november-one-zero-six-sierra-tango, roger."
You are in N106ST, 6 miles southeast of Corona Municipal Airport at 4,500 feet. You are talking to SoCal Approach on 121.3. Wait for an instruction from the controller.
When the controller gives you a traffic advisory or instruction (such as "report field in sight"), acknowledge appropriately. If you see the field: "field in sight." If not: "negative contact, looking."
- SoCal Approach "november-one-zero-six-sierra-tango, Corona is twelve o'clock, five miles. Report the field in sight."
- You (Pilot) "Negative contact, looking, six-sierra-tango."
- You (Pilot) "november-one-zero-six-sierra-tango, field in sight."
- SoCal Approach "november-one-zero-six-sierra-tango, radar services terminated. Squawk one-two-zero-zero. Change to advisory frequency approved."
- You (Pilot) "Squawk one-two-zero-zero, six-sierra-tango."
These lesson plans are provided as supplementary training guidance only. They do not supersede FAA publications, aircraft manufacturer documentation, or your instructor's direction. Always refer to the FAA Instrument Flying Handbook, Airplane Flying Handbook, AIM, and applicable POH/AFM as the official sources.