Effects of Controls
Learn the effects of the primary flight controls when operated independently in flight. This exercise is the foundation of learning to control the aircraft — lessons you learn here will prove invaluable at every stage of your training.
Lesson Objectives
- Identify the three axes of movement and their associated flight controls
- Demonstrate the primary and further effects of ailerons, elevator, and rudder
- Perform a preflight inspection using the appropriate checklist
- Understand the effect of airspeed on control authority
The purpose of this exercise is to learn the effects of the controls when operated independently in flight. This exercise is the foundation of learning to control the aircraft. Lessons you learn here will prove invaluable at later stages of your training.
In the background briefing you will find reference to aerodynamic principles such as lift, drag, thrust, etc. These terms and principles are described only in basic detail in this exercise, but are expanded upon in the following exercises as your knowledge develops.
The exercise may be split into more than one flight, and elements of it will recur and may be revised in later flight exercises. As at all other times, tell your instructor right away if you do not understand a certain point, or would like to see another demonstration.
Simulator Practice
At Aviator.NYC, you'll practice these control effects on our FAA-approved AATD simulator with Garmin G1000 NXi avionics. The simulator provides a safe, controlled environment to feel the control responses before flying in an actual aircraft.
Background Briefing Topics
- Flying Lesson Format
- The Planes and Axes of Movement
- The Function and Initial Effect of the Three Primary Flying Controls
- The Further Effects of the Three Primary Flying Controls
- The Effect of Differing Airspeeds
- The Effect of Propeller Slipstream
- The Effect of Differing Power Settings
- The Trimming Controls
- The Flaps
- Carburetor Heat
- Mixture
- Cockpit Heating and Ventilation
- Other Controls
Read the full Background Briefing →
Flight Exercise Topics
- Purpose
- Airmanship
- The initial effect of elevator
- The initial effect of aileron
- The initial effect of rudder
- The further effect of aileron
- The further effect of rudder
- The effect of differing airspeed
- The effect of propeller slipstream
- The effect of differing power settings
- The effect of flaps
- The effect of elevator trim
Flying Lesson Format
Typically a lesson covers one or more flight exercises and follows this format:
- Background Briefing
- Self-study from a textbook or course notes before the flight. Some flight schools may also give group briefings and lectures.
- Pre-Flight Briefing
- At the flight school immediately before the flight, your instructor will brief you on the air exercise and answer any questions.
- In Flight
- Your instructor will fly each maneuver as described in the pre-flight briefing. Then you fly the maneuver under the guidance of your instructor.
- After Flight Debrief
- A short discussion where your instructor reviews the flight, the progress you have made, and any particular points to concentrate on. The instructor will tell you the next exercise to be flown so you can cover the background briefing in advance.
Study Tip
Before moving to the next exercise, re-read the material for the exercise you have just flown. You'll find it much simpler after flying it, and you'll retain the important points if you refresh your memory within 24 hours.
The Planes and Axes of Movement
| Plane of Movement | Control Surface | Control Movement |
|---|---|---|
| Pitch | Elevator / Stabilator | Control column forward and back |
| Roll | Ailerons | Control column left and right |
| Yaw | Rudder | Rudder pedals left and right |
An aircraft operates in three dimensions, and each of the three primary flight controls moves the aircraft in one of these planes. The axes are fixed relative to the aircraft, not the horizon — for example, regardless of the aircraft's attitude, the elevator controls pitch as the pilot perceives it.
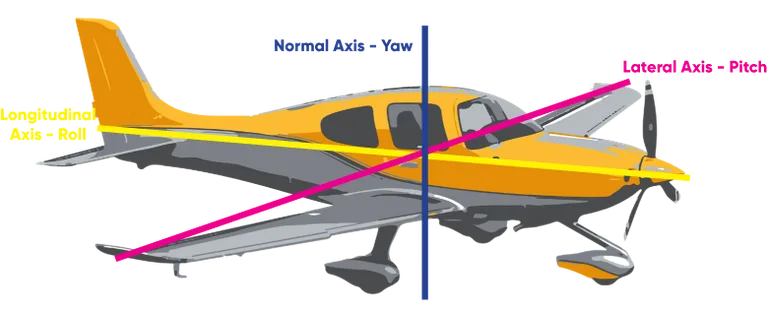

Key Concept
The axes are fixed to the aircraft. Even if the aircraft is in a steep climb, the elevator still controls pitch as the pilot sees it — not relative to the ground.
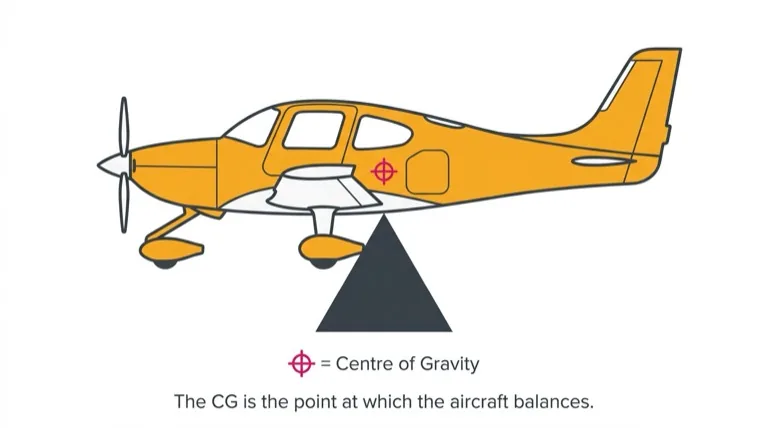
The Function and Initial Effect of the Three Primary Flight Controls
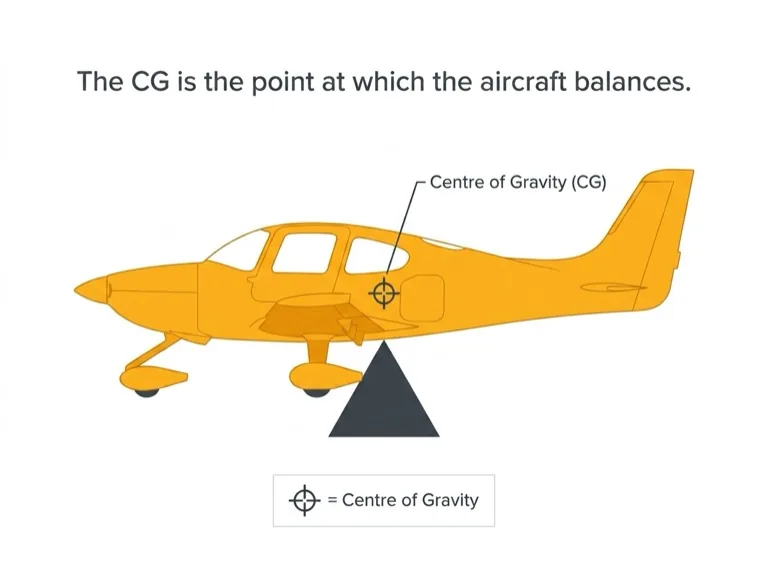
Each control surface works by altering the airflow around it. The movement of the aircraft around an axis is governed by how quickly and how far the control is moved. Each control surface is located some distance from the center of gravity (CG) — for practical purposes, assume the CG is about where the pilot is sitting. The distance between the control surface and the CG provides leverage and enhances its effect.

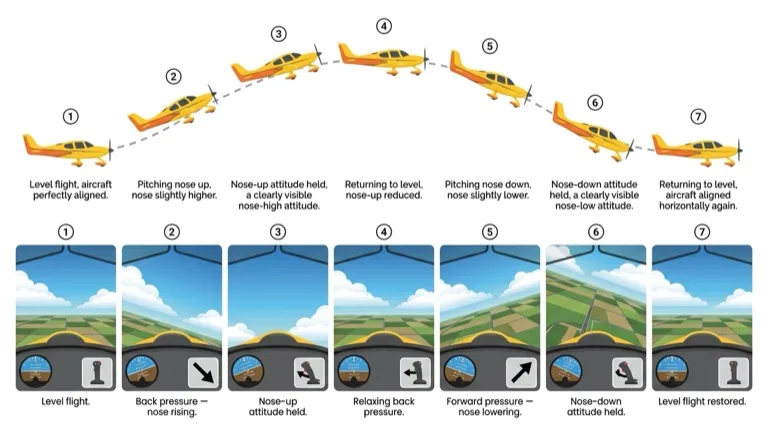


Elevator — Pitch Control
The elevator (or stabilator) controls the aircraft in pitch. When the control column is moved back, the elevator moves up, creating a downward force at the tail. The aircraft pivots around the CG and pitches nose-up. The aircraft continues to pitch nose-up until the control column returns to the neutral position.
When the control column is moved forward, the elevator moves down, creating an upward force at the tail. The aircraft pivots around the CG and pitches nose-down, continuing until the control column is neutralized.
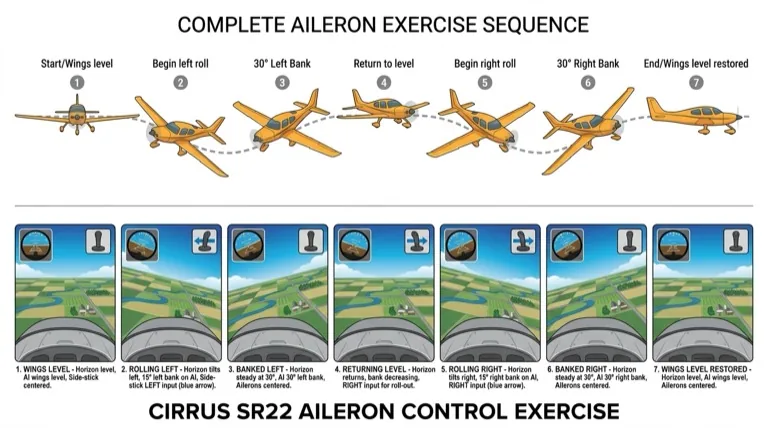
Ailerons — Roll Control
The ailerons control the aircraft in roll. When the control column is moved to the left, the left aileron moves up and the right aileron moves down. These deflections alter the lift produced by each wing — the left wing now produces less lift than the right wing. This imbalance causes the aircraft to roll to the left. The aircraft continues to roll until the control column is centralized.
When the control column is moved to the right, the aileron movements reverse, the lift imbalance reverses, and the aircraft rolls to the right.
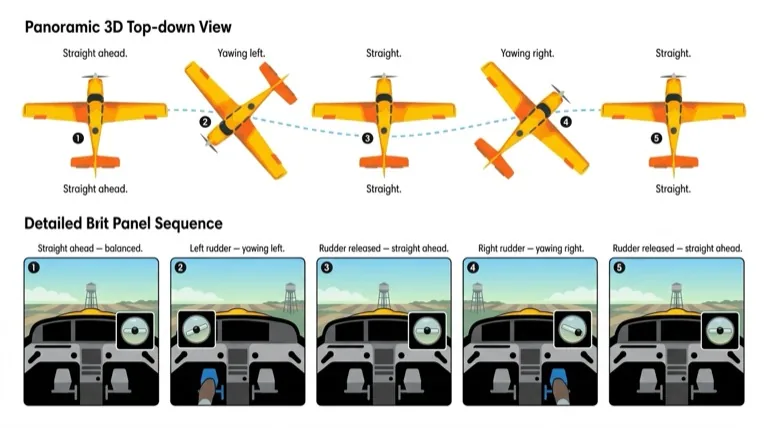
Rudder — Yaw Control
The rudder controls the aircraft in yaw. When the left rudder pedal is pressed, the rudder deflects to the left, creating a lift force at the fin acting to the right. The aircraft pivots around the CG and yaws to the left. When the rudder pedals are centralized, the yaw stops.
When the right rudder pedal is pressed, the rudder moves to the right, creating a lift force acting to the left, and the aircraft yaws to the right as long as the rudder is held.
Even a light aircraft has some inertia, so movement about an axis is not instant when a control is moved. In larger, heavier aircraft, the effect of inertia can be quite pronounced and the pilot must allow time for a control movement to take effect.
The Further Effects of the Three Primary Flight Controls
In the flight exercise, only the further effects of the aileron and rudder are demonstrated. The elevator's further effect — that pitching nose-up decreases airspeed and pitching nose-down increases airspeed — is debatable as a "further effect."
Further Effect of Aileron → Yaw
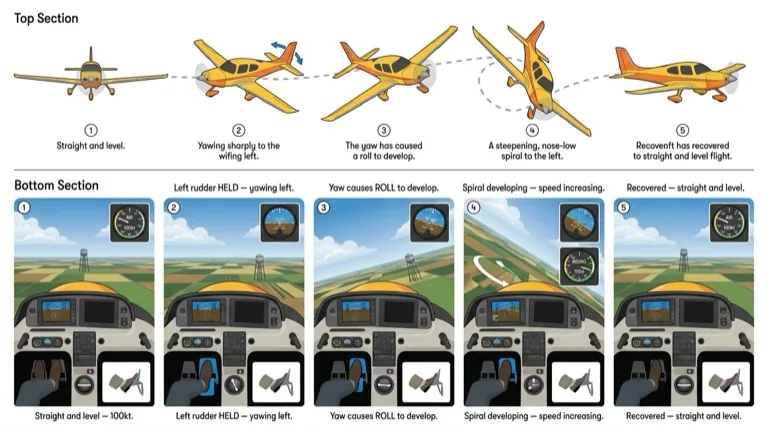
When the aircraft is rolled to a banked attitude using the ailerons and the ailerons are then centralized, the aircraft tends to slip "downhill" toward the lower wing. As the aircraft slips, the airflow strikes the fin from one side, creating a lift force. The aircraft pivots around its CG and yaws toward the lower wing — even though no rudder has been applied.
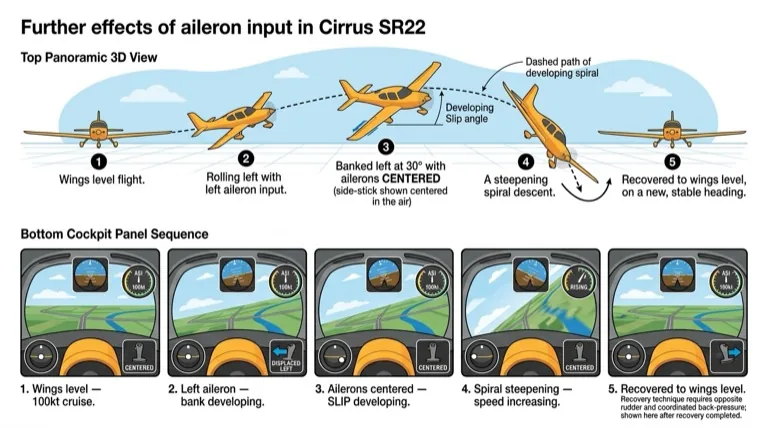
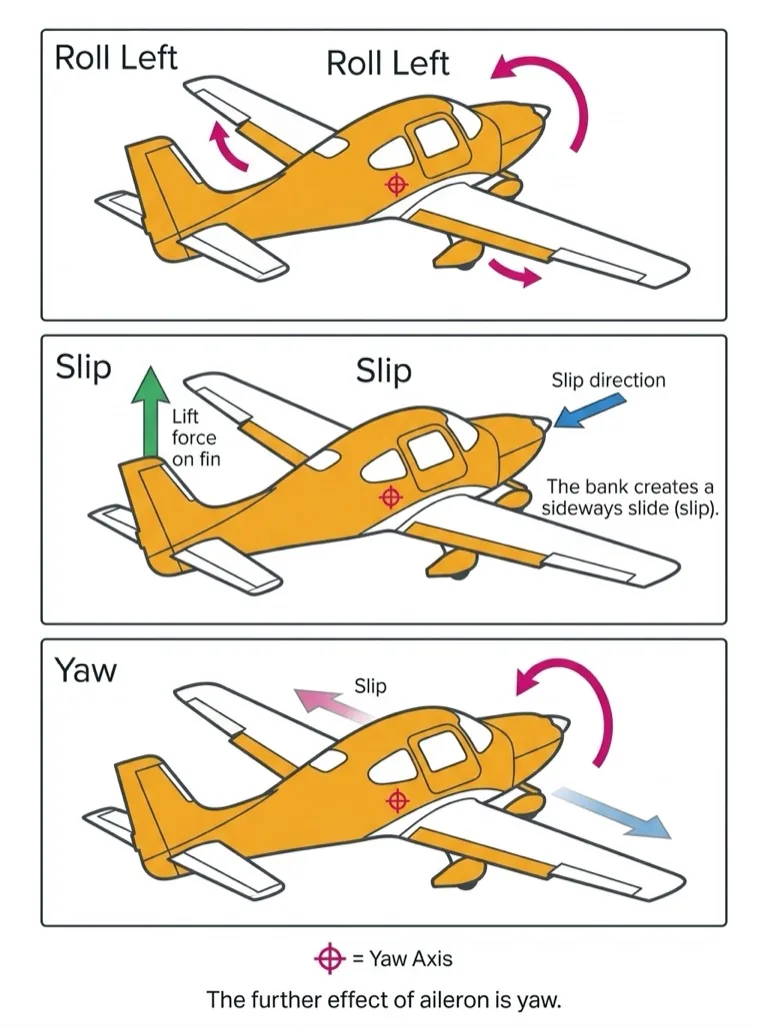
So: the initial effect of aileron is roll; the further effect is yaw.
If the roll and yaw are left unchecked, the aircraft will begin a gradually steepening spiral descent — with increasing roll, increasing airspeed, and loss of altitude. However, this spiral descent is easy to correct, as you will discover during the flight exercise.
Note
There is another yawing effect present while the aircraft is actually rolling, known as adverse yaw. This effect is covered in the turning and slow flight exercises.
Further Effect of Rudder → Roll
While the aircraft yaws, it is effectively skidding through the air. The wing on the outside of the skid has a faster airflow, producing more lift. The inner wing has slower airflow, producing less lift. This lift imbalance causes the aircraft to roll in the same direction as it is yawing — even though no aileron has been applied.
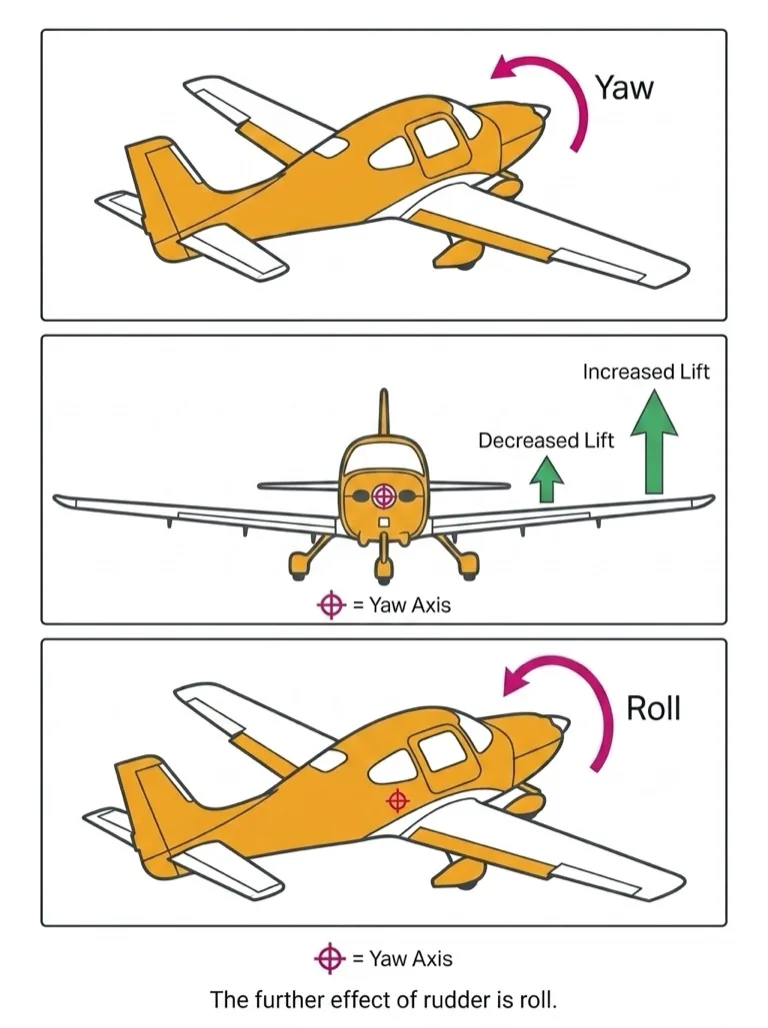
So: the initial effect of rudder is yaw; the further effect is roll.
Key Concept
Stability in yaw and stability in roll are interrelated. A movement in yaw will affect roll, and vice versa. This coupling is fundamental to understanding coordinated flight.
The Effect of Differing Airspeeds
The flying controls function by altering the airflow at their location. At different airflow speeds, the effectiveness and feel of the controls changes:


- Fast airspeed: Controls are very effective — only small movements are needed.
- Slow airspeed: Controls are much less effective — larger movements are needed.
The "feel" of the flying controls becomes an important cue to the pilot. Once familiar with control feel at normal cruising airspeed, you should be able to sense from the controls if the aircraft is flying significantly faster or slower.
The Effect of Propeller Slipstream
The propeller generates a slipstream — a tube of faster-moving air surrounding the fuselage behind the propeller. Most training aircraft have a fixed-pitch propeller rotating at the same speed as the engine:
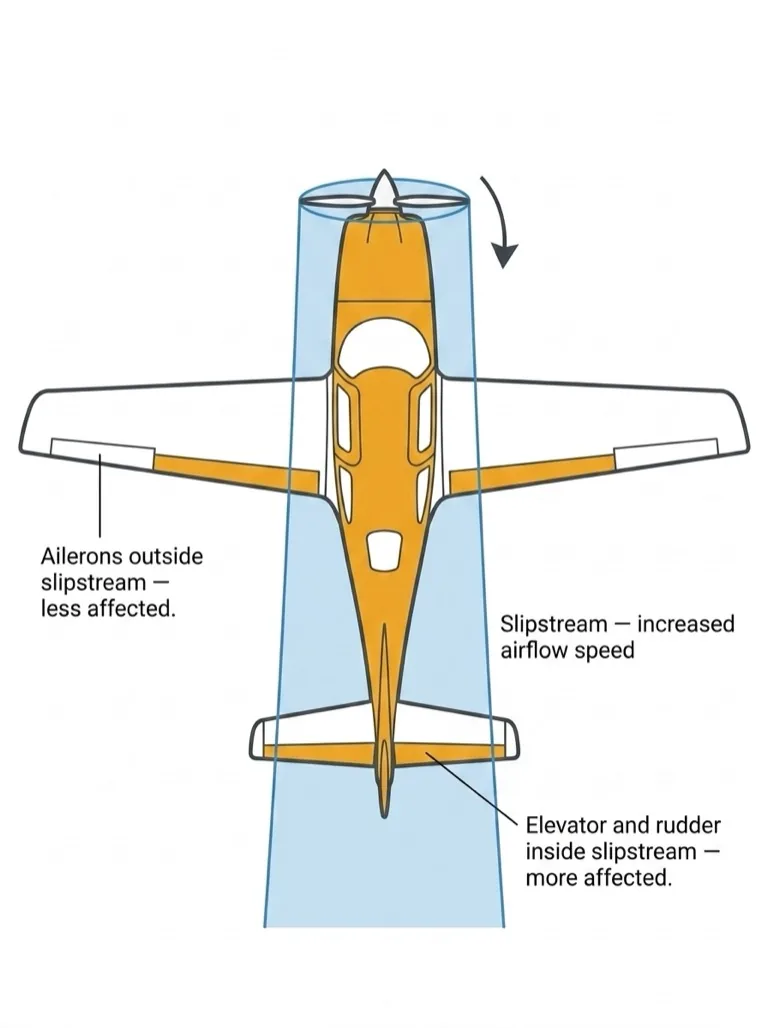
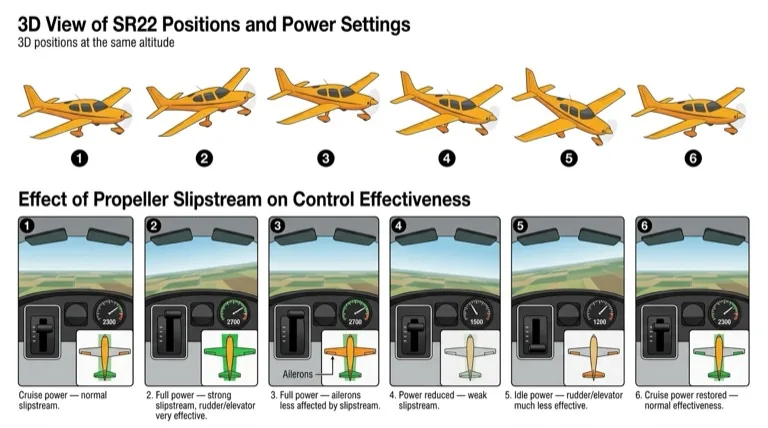
- High power settings: Increased slipstream and airflow speed behind the propeller.
- Low power settings: Decreased slipstream and airflow speed.
Any flight controls inside the slipstream are affected by these varying speeds, just as they are affected by differing airspeeds. Usually the elevator/stabilator and rudder are affected. The ailerons, out at the wingtips, are outside the slipstream.
Important
In a high-power/slow-airspeed situation, the rudder and elevator of a low-tailplane aircraft will still feel effective due to the slipstream effect, despite the slow airspeed. Aircraft with T-tails may have the elevator outside the slipstream.
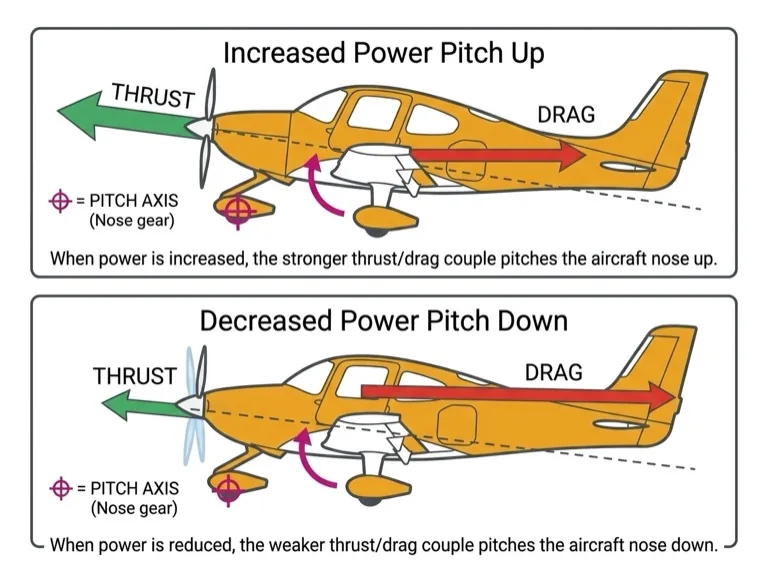
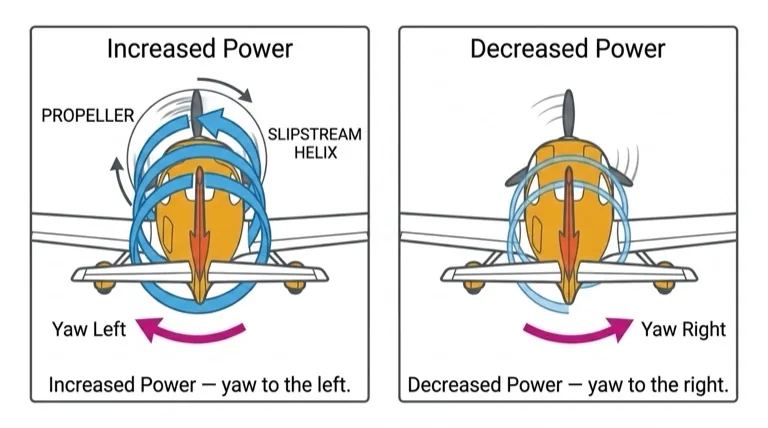
The Effect of Differing Power Settings
The aircraft is designed to be stable at its normal cruise airspeed and power setting. At any other power setting, there are associated pitch and yaw forces.
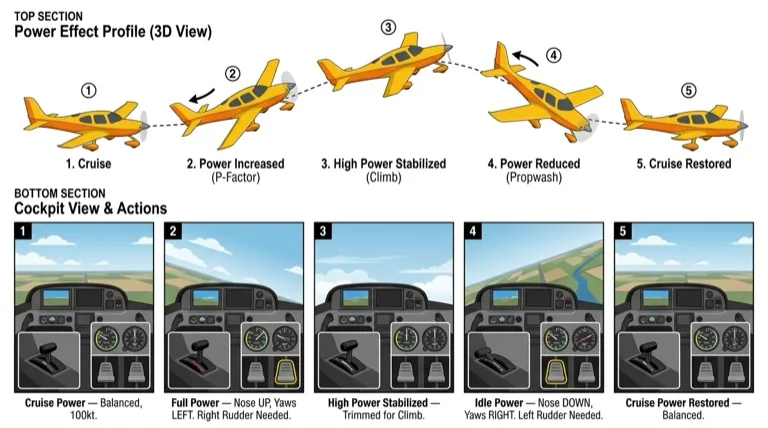
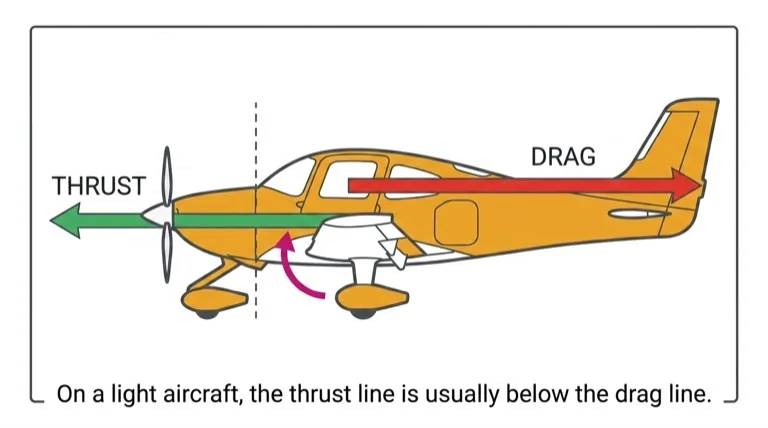
Pitch Effect
On most light aircraft, the thrust line is lower than the drag line. When power is increased, the stronger thrust/drag couple pitches the aircraft nose-up. When power is reduced, the aircraft pitches nose-down. The pitching movement is aided by the change in airflow over the tailplane.
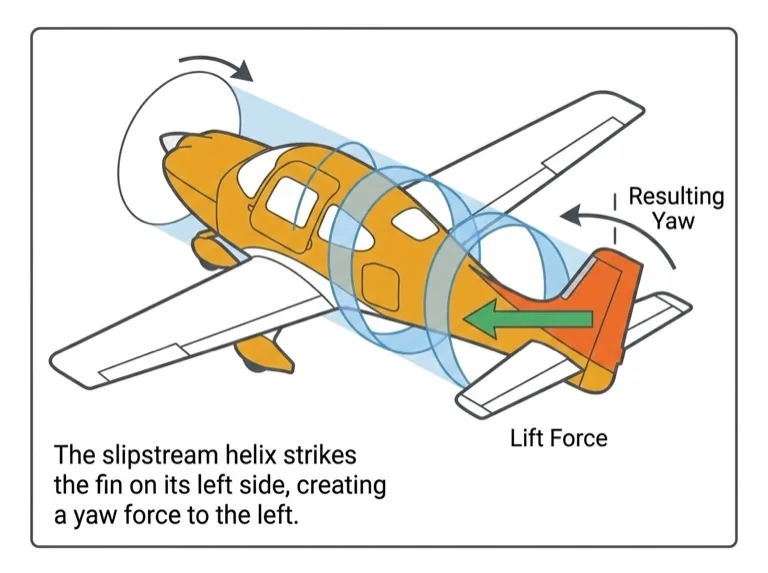
Yaw Effect
On most modern light aircraft, the propeller rotates clockwise as seen from the cockpit. The helix of the propeller slipstream curves around the fuselage and strikes the fin on its left side, creating a yaw tendency to the left.
Some aircraft compensate with an offset fin or engine. This counterforce is calibrated for cruise power:
- Power increased above cruise: The counterforce is overcome → aircraft yaws left.
- Power reduced below cruise: The counterforce overcompensates → aircraft yaws right.
Note
Aircraft with counter-clockwise rotating propellers have reversed yaw tendencies — increased power causes a yaw to the right.
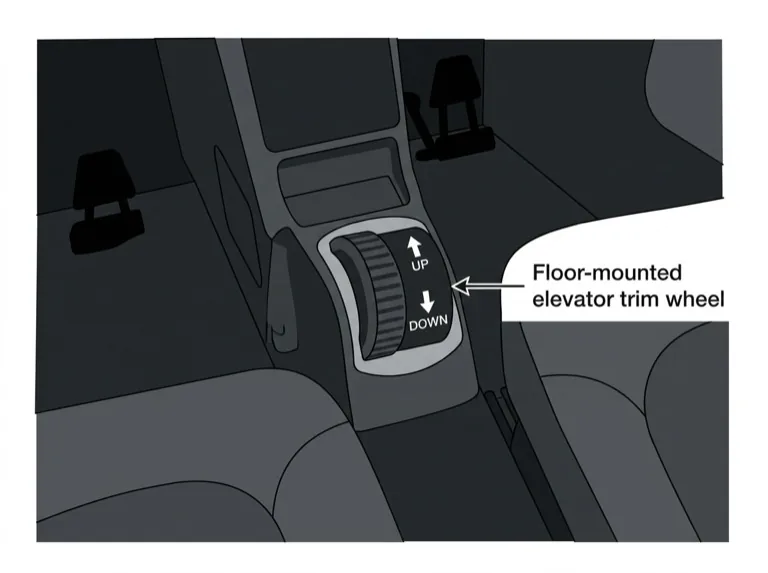
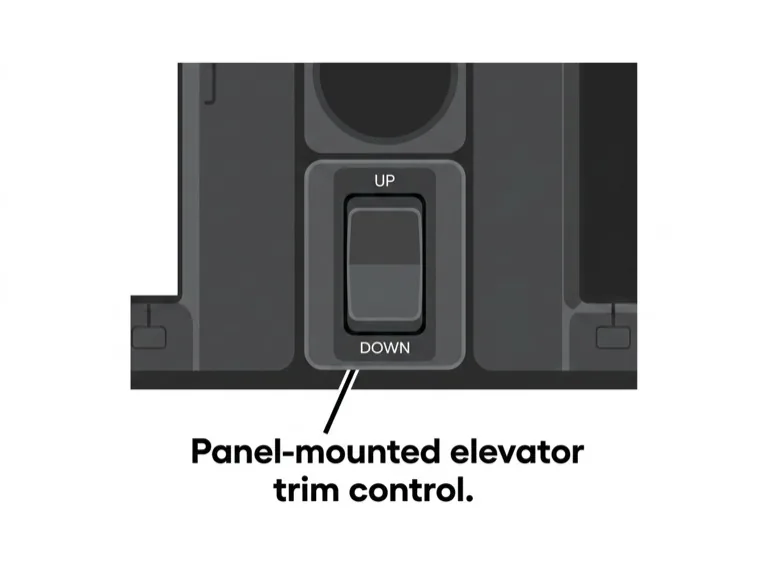
The Trimming Controls
In different flight conditions, there are varying loads on the flight controls, particularly the elevator/stabilator and rudder. To relieve the physical workload, the elevator is fitted with a trimmer. Some aircraft also have a rudder trimmer.
The elevator trimmer usually takes the form of a small trim tab on the trailing edge of the elevator. When a constant pull or push force is needed to hold the elevator in position, the cockpit trim control adjusts the tab to maintain the elevator position aerodynamically — so no pressure is required from the pilot. Some aircraft use a spring in the elevator control cable pattern instead of a trim tab, but the effect is the same.
Remember
The trimmer is used to relieve control loads, not to control the airplane. Always select the desired attitude and performance first, then trim to maintain it.
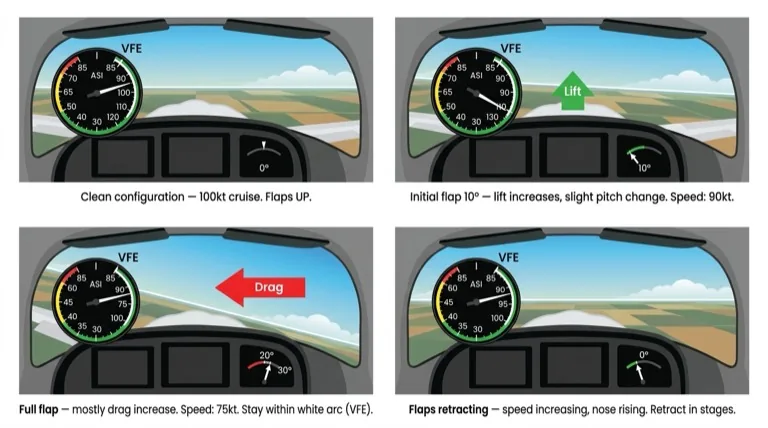
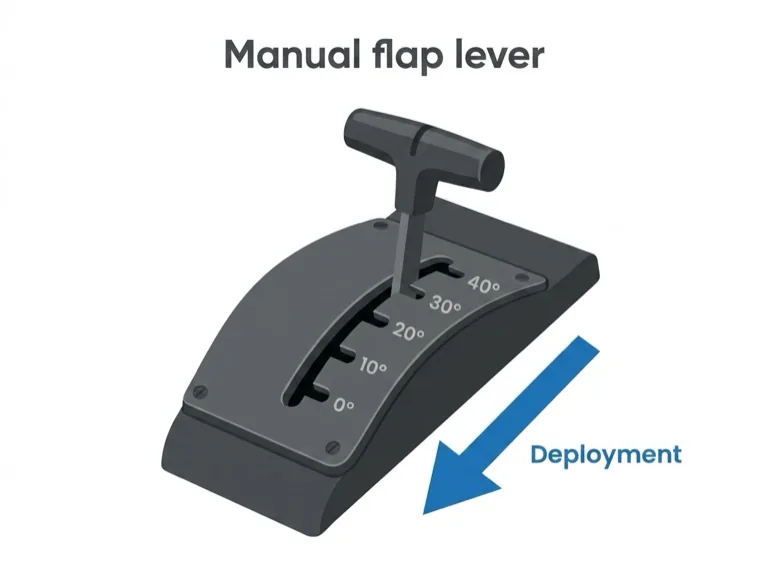
The Flaps
Flaps are fitted to the trailing edge of the wings and operated manually or electrically from a switch or lever in the cockpit. When lowered, they change the wing's shape and the airflow around it:
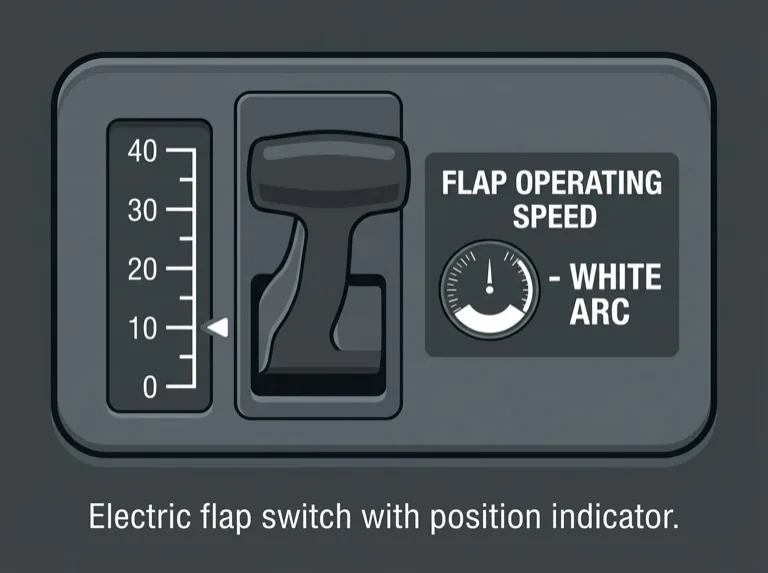
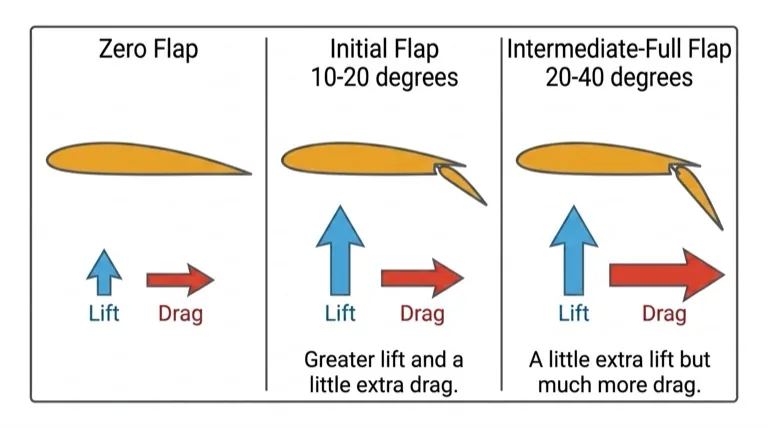
| Flap Setting | Lift Effect | Drag Effect |
|---|---|---|
| Initial flap (10°–20°) | Large increase | Small increase |
| Intermediate to full (20°–40°) | Small further increase | Much larger increase |
When flaps are lowered, the aircraft will pitch nose-up or nose-down depending on the aircraft type. In either case, airspeed reduces due to increased drag.
Speed Limitation
Flaps must only be operated at or below VFE (flap extension speed) — the top of the white arc on the airspeed indicator. Always verify the airspeed is within the white arc before operating flaps, to prevent structural damage.
Carburetor Heat
Most training aircraft engines use a carburetor to supply the fuel/air mixture. If ice forms inside the carburetor — which can happen over a very wide range of temperatures and conditions — engine power will be reduced.
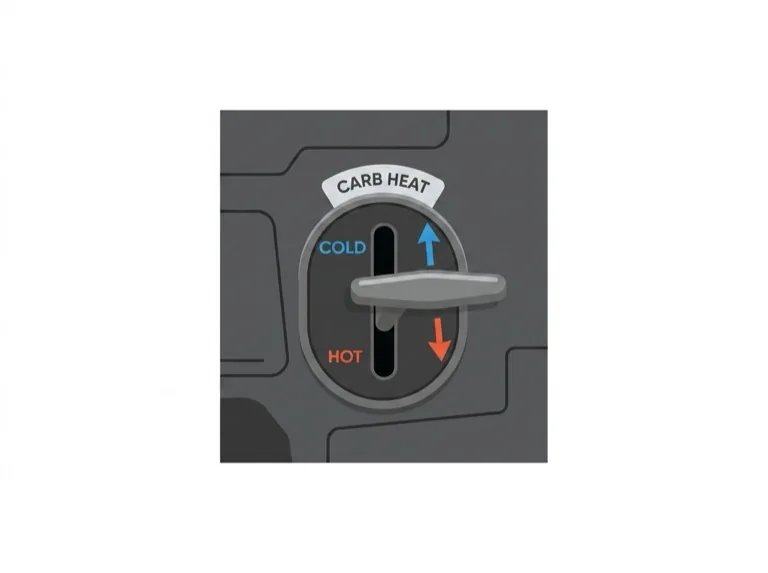
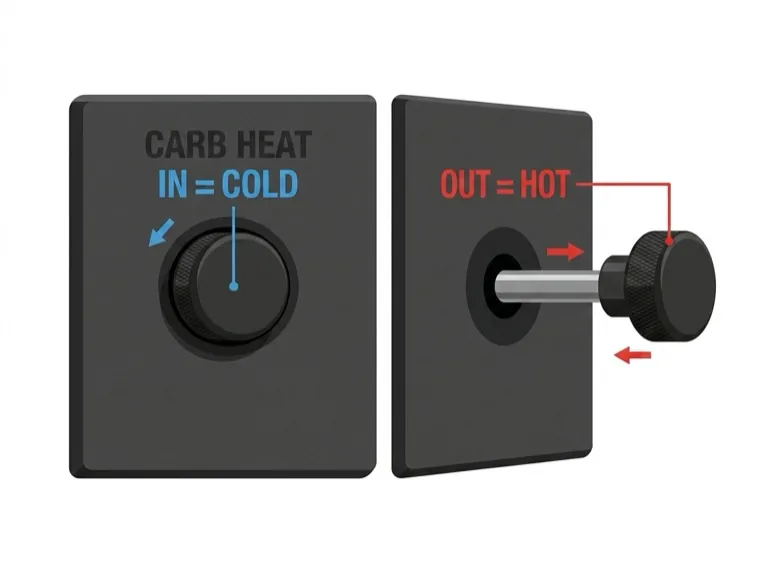
The carburetor heat control routes hot air through the carburetor, melting any ice present. When operated, expect a small reduction in power and possibly slight engine roughness if ice has melted.
Usage Procedure
- The carburetor heat control is normally left in the fully cold position.
- Apply carburetor heat approximately every 10 minutes by moving the control to fully hot.
- Hold for at least 5–10 seconds, then return to cold.
- If RPM returns higher than before, carburetor ice was present — recheck more frequently.
Note
Carburetor icing is covered in much greater detail in later lessons. It is one of the most important topics for pilots to understand thoroughly.
Mixture
In many training aircraft, the fuel-air mixture is controlled by a red lever or knob next to the throttle — the mixture control.
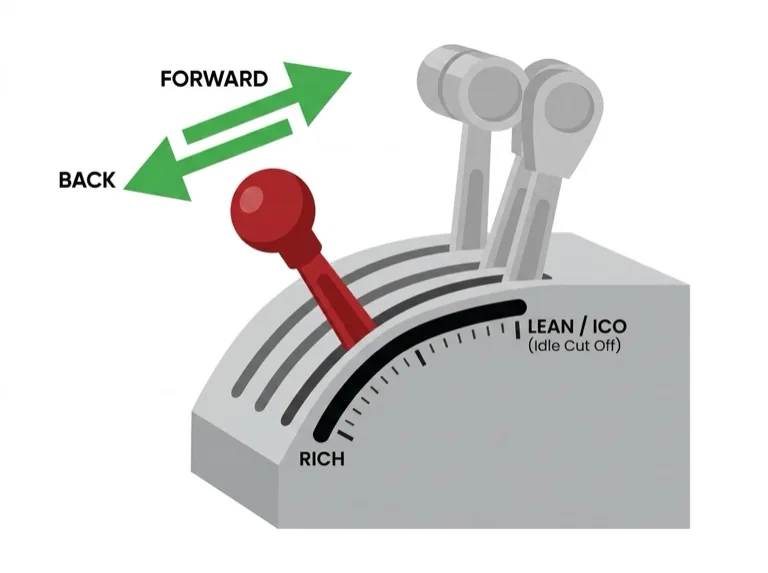
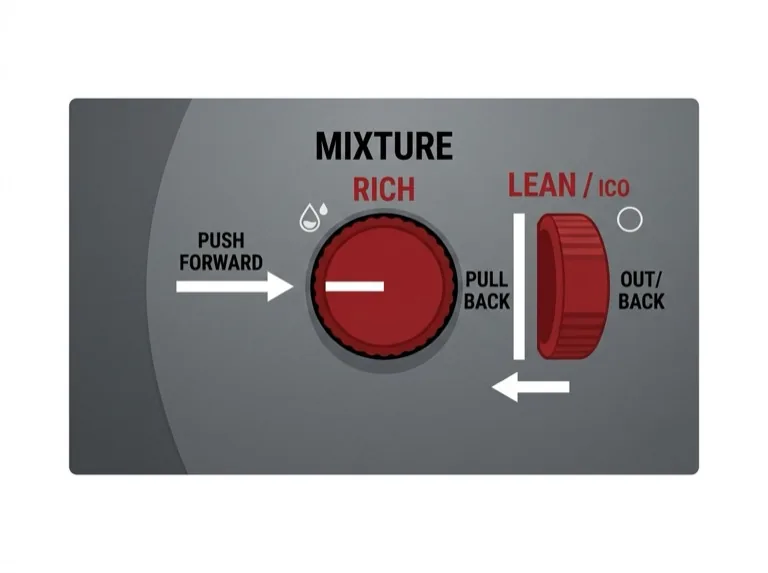
- Low altitudes: Operate with mixture fully rich (control fully forward or fully in).
- High altitudes: Reduced air density means less fuel is needed — the mixture needs to be leaned by moving the control back or out.
Leaning Procedure (Fixed-Pitch Propeller)
- Slowly move the mixture control back (lean).
- Watch for an initial RPM increase.
- RPM will peak, then decrease as you lean further.
- Enrich (move forward) slightly until RPM is on the rich side of peak.
- Reset mixture for any change in power or altitude.
Important
Different engines have different leaning techniques and limitations. Always refer to the aircraft's POH/AFM for specific guidance. The engine is normally stopped by moving the mixture to idle cutoff (ICO), which completely shuts off the fuel supply.
Cockpit Heating and Ventilation
Your instructor will show you the location and use of heating and ventilation controls. Keep the cockpit at a comfortable temperature — if you're not comfortable, your concentration suffers and flying becomes harder than it needs to be.
Carbon Monoxide Warning
The heating system typically draws hot air from a shroud around the engine exhaust. If there is a crack in the exhaust system, carbon monoxide — a colorless, odorless, potentially lethal gas — may enter the cockpit. Always use fresh air ventilation when using cabin heat. If you suspect exhaust fumes, immediately shut off heating and open all ventilation and windows.
Purpose
To learn the effects of the controls when operated independently in flight.
Airmanship
What is airmanship? Airmanship is the common-sense element of flying, but also the quality that differentiates a pilot from an airplane driver. More than anything else, airmanship is about awareness — being aware of what is happening inside and outside the aircraft. Airmanship is best learned by example. Watch your instructor and you will learn more about airmanship than any textbook can teach.
Handing Over / Taking Over Control
During your early flying lessons, control of the aircraft will be transferred between yourself and the instructor many times. It is essential to avoid confusion over who is actually flying the aircraft. Follow this set routine:
Control Transfer Procedure
When the instructor wants you to fly:
- Instructor says: "You have control"
- Student takes the control column in one hand, other hand on the throttle, feet on rudder pedals.
- Student says: "I have control"
When the instructor wants to take control back:
- Instructor says: "I have control"
- Student removes hands and feet from controls.
- Student says: "You have control"
This routine is used at all levels of aviation — from training flights to the cockpit of the largest airliners.
Following Through
When your instructor is demonstrating an exercise, they may ask you to "follow through." This means you should place your hands and feet lightly on the controls so you can feel the control movements your instructor makes — without moving the controls yourself.
Lookout
Develop the habit now of looking outside the aircraft as much as possible at all times. This will help you:
- Look out for other aircraft
- Maintain awareness of your location
- Monitor changing weather
- Make your flying smoother and easier
If you see another aircraft, point it out to your instructor immediately.
Simulator Practice
In the Aviator.NYC AATD simulator, you can safely practice all these control effects with zero risk. The simulator's G1000 NXi display provides the same instrument feedback you'll see in an actual aircraft. Focus on developing the feel for control inputs and their effects before transitioning to an airplane.
Flight Exercise Sequence
During the flight, your instructor will demonstrate each of the following. You will then practice each one yourself:
Initial Effects
- Elevator: Move the control column forward and back. Observe pitch changes.
- Aileron: Move the control column left and right. Observe roll.
- Rudder: Press left and right rudder pedals. Observe yaw.
Further Effects
- Further effect of aileron: Roll to a banked attitude, centralize ailerons, and observe the aircraft yaw toward the lower wing.
- Further effect of rudder: Apply sustained rudder and observe the resulting roll.
Other Effects
- Differing airspeed: Feel control effectiveness at different speeds.
- Propeller slipstream: Observe control feel changes with power changes.
- Differing power settings: Note pitch and yaw changes when power is added or reduced.
- Flaps: Observe pitch and airspeed changes when flaps are extended and retracted.
- Elevator trim: Practice trimming to relieve control pressure.
Key Takeaways
Primary Controls — Initial Effects
| Control | Input | Initial Effect |
|---|---|---|
| Elevator | Control column forward/back | Pitch (nose down/up) |
| Ailerons | Control column left/right | Roll (bank left/right) |
| Rudder | Rudder pedals left/right | Yaw (nose left/right) |
Further Effects
| Control | Initial Effect | Further Effect |
|---|---|---|
| Ailerons | Roll | Yaw (toward lower wing) |
| Rudder | Yaw | Roll (in same direction as yaw) |
Power Effects
| Power Change | Pitch Effect | Yaw Effect (clockwise prop) |
|---|---|---|
| Increase | Nose up | Yaw left |
| Decrease | Nose down | Yaw right |
Critical Points to Remember
- Yaw and roll are interrelated — a change in one will produce a change in the other.
- Control effectiveness varies with airspeed — fast = more effective, slow = less effective.
- Trim relieves control pressure — set the attitude first, then trim. Never use trim to fly the airplane.
- Flaps operate within the white arc only — never exceed VFE with flaps extended.
- Check carburetor heat regularly — approximately every 10 minutes during flight.
- Lookout is continuous — always scan outside the aircraft.
What's Next
In the next lesson — Taxiing — you will learn how to maneuver the aircraft safely on the ground, including pre-taxi checks, control of direction, and ATC ground procedures.
Before that lesson, review this material once more within 24 hours of your flight to reinforce the key concepts.
Simulator Tip
Schedule a follow-up AATD session at Aviator.NYC to reinforce these control effects. Repetition in the simulator builds muscle memory and deepens your understanding of each control input and its effect.
Coming Up Next: Lesson 2 — Taxiing
Learn to maneuver the aircraft safely on the ground — including checks, procedures, rights of way, ATC procedures, signals, and emergency procedures for steering or brake failure.
Skills You'll Work On
These are the maneuvers and procedures covered in this lesson. Your instructor tracks each one as you progress.
- Use of Checklists
- Preflight Inspection
- Certificates and Documents
- Airworthiness Requirements
- Engine Starting
- Radio Communications
- Positive Exchange of Flight Control
- Taxiing & Taxi Checks
- Takeoff, Departure, and Climb
- Level Off
- Effects of Stabilator
- Effects of Aileron
- Effects of Rudder
- Further Effects of Controls
- Effect of Airspeed
- Effect of Propeller Slipstream
- Use of Trim
- Descent & Approach Planning
- Normal Landing
- After Landing, Parking, and Securing
Grades reflect what was covered in this lesson, not a certification of pilot competency.
Lesson Plan
Where this fits: Lesson 1 of the Private Pilot syllabus, Stage 1 — Basics (Exercise 4, Effects of Controls). This is the foundation session: the student meets the cockpit and learns what each control does in isolation before any combined maneuvers. It precedes Lesson 2, Taxiing, and everything that follows builds on the control vocabulary established here.
- Prerequisite
- None — this is the student's first lesson. No prior knowledge assumed beyond a willingness to keep hands and feet light and ask before moving anything.
- Materials
- Cessna 172 with G1000 simulator; student checklist card; sized headset. The simulator is set straight, level, and trimmed in calm air over the practice area for the in-flight portion.
- Objectives for this session
- Establish the positive exchange of flight control routine — "You have control / I have control / You have control" — and use it on every handoff.
- Demonstrate and let the student feel the primary effect of each control independently: elevator (pitch), aileron (roll), and rudder (yaw).
- Introduce the further effects of aileron and rudder and the effect of power and slipstream on pitch and yaw.
- Practice using trim to relieve control pressure, and walk the use of checklists during the power-up.
Looking Ahead
Lesson 2, Taxiing, moves to safe ground operations — nosewheel steering, brake checks, taxi checks, and control positioning for wind. If the positive exchange of control or the further effects of the controls felt unclear today, revisit them briefly at the start of Lesson 2 before moving the aircraft.
These lesson plans are provided as supplementary training guidance only. They do not supersede FAA publications, aircraft manufacturer documentation, or your instructor's direction. Always refer to the FAA Instrument Flying Handbook, Airplane Flying Handbook, AIM, and applicable POH/AFM as the official sources.